Rear seats: Difference between revisions
Ricebubbles (talk | contribs) (Started detail for WIS 91.12 Rear Seats.) |
(→Remove/install rear-seat backrest (CODE 223b): photos added) |
||
| (25 intermediate revisions by the same user not shown) | |||
| Line 1: | Line 1: | ||
== Rear seat adjustment == | |||
[[File:W220_rear_power_seat_bench_feature.png]] | |||
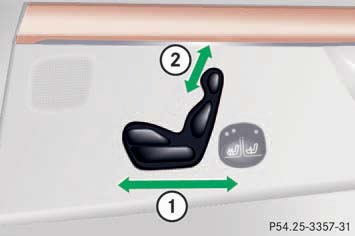
In vehicles equipped with option code [[Option_codes#223_-_REAR_BACK_REST_ADJUSTMENT_AND_HEAD_RESTRAINTS.2C_ELE|223 - REAR BACK REST ADJUSTMENT AND HEAD RESTRAINTS, ELE]] the switches can be used to adjust rear: | |||
* (1) Seat bench fore and aft adjustment | |||
* (2) Head restraint fold/place upright | |||
[[File:W220_individual_rear_power_seats.png]] | |||
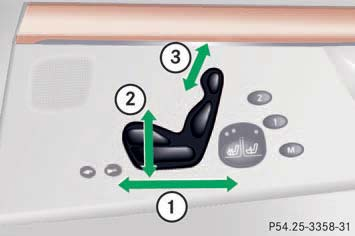
In vehicles equipped with option code [[Option_codes#224_-_INDIV.REAR_SEAT_AND_HEAD_RESTRAINTS.2C_ELEC.ADJUSTAB|224 - INDIV.REAR SEAT AND HEAD RESTRAINTS, ELEC.ADJUSTAB]] the switches can be used to adjust rear: | |||
* (1) Seat fore and aft adjustment | |||
* (2) Seat height | |||
* (3) Head restraint fold/place upright | |||
<!-- This comes from operator's manual --> | |||
=== Front passenger seat adjustment from rear === | |||
[[File:W220_adjust_front_passenger_seat_from_rear.png]] | |||
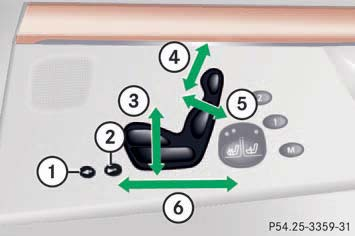
Vehicles equipped with option code [[Option_codes#247_-_SEAT_ADJUSTMENT_ELEC._ALSO_OPERABLE_FROM_REAR|247 - SEAT ADJUSTMENT ELEC. ALSO OPERABLE FROM REAR]] have two additional buttons (buttons (1) and (2)) on the rear [[door control module]] behind the front passenger seat, which can be used to adjust the front passenger seat. | |||
Note that it is not possible to adjust the seat cushion depth of the front seat, since the cushion depth adjustment button on the rear door control module is not functional. It is also not possible to adjust the front tilting of the front seat - front tilting adjustment button on the rear door control module will actually adjust the rear tilting of the front seat. | |||
'''None:''' Adjusting the passenger seat position from the rear is not possible if you deactivate the operation of the rear door windows (override switch in driver's door). | |||
===Lumbar support=== | |||
On rear seats basic lumbar support is available in vehicles | |||
with option code [[Option_codes#223_-_REAR_BACK_REST_ADJUSTMENT_AND_HEAD_RESTRAINTS.2C_ELE|223 - REAR BACK REST ADJUSTMENT AND HEAD RESTRAINTS, ELE]]. | |||
[[File:Remove_Rear_Seat_Lumbar_Adjustment_Control_and_Trim.jpg|thumb|none|Lumbar adjustment switch for outer rear seats.]] | |||
The thumbwheels are located on the sides of the rear seats. | |||
The seats have an inflatable air cushion built into the | |||
backrest to provide additional lumbar support. | |||
Turn the electronic key in starter switch to position 2. | |||
The inflation pressure of the air cushion can be | |||
continuously varied between position "0" (no pressure) and position "5" (maximum pressure) by changing the pressure regulator (1) setting. | |||
=== Adjusting rear seats function (CODE 223b/224c) === | |||
<!-- GF91.29-P-2009S, Adjusting rear seats, function, 29.4.98 | |||
MODEL 220 with CODE (223b) Electrically adjustable rear bench seat | |||
MODEL 220 with CODE (224c) Electrically adjustable rear single seats, with seat ventilation, seat heater and memory package | |||
--> | |||
Seat adjustment of rear bench seat/individual rear seats: | |||
{| | |||
|[[File:W220_seat_adjustment_block_diagram.png]] | |||
| | |||
* 1 - with rear bench seat | |||
* 2 - with individual rear seats | |||
* CAN-B - Passenger compartment CAN bus | |||
* M17/1 - Right rear seat bench adjustment motor | |||
* M17/2 - Right rear seat bench adjustment motor | |||
* M18/1 - Left rear seat adjustment motor group | |||
* M18/2 - Right rear seat adjustment motor group | |||
* N25/6 - Rear seats control module | |||
* N69/4 - right rear [[door control module]] | |||
* N69/3 - left rear [[door control module]] | |||
|} | |||
Function requirements: | |||
* No overvoltage or undervoltage | |||
* Term.15R or 15 ON | |||
* Respective vehicle door open | |||
* Position measurement works faultlessly (on account of locking recognition) | |||
====Rear bench seat seat adjustment without memory==== | |||
With the electrically adjustable rear bench seat without memory a | |||
manual longitudinal adjustment can be performed using one motor | |||
each on the left and right half of the rear bench seat. The | |||
adjustments are made via the adjustment switches in the left rear | |||
door control module (N69/3)/right rear door control module (N69/4). | |||
====Individual rear seats seat adjustment with memory==== | |||
The following can be adjusted separately in each case with the electrically adjustable individual rear seats with memory | |||
* The angle of the seat cushion | |||
* The fore/aft position of the seat cushion | |||
The adjustments are performed manually using the adjustment switches | |||
in the left rear door control module (N69/3)/right rear door control module (N69/4) or automatically using the memory feature. | |||
In this connection three complete seat adjustments can be stored and called up again for each rear seat (left and right). | |||
== Rear seat control module (CODE 223b/224c/402a/872) == | |||
<!-- GF91.29-P-2108S, Rear seat control module, location/task/design/function, 12.5.98 | |||
MODEL 220 with CODE (223b) Electrically adjustable rear bench seat | |||
MODEL 220 with CODE (224c) Electrically adjustable rear single seats, with seat ventilation, seat heater and memory package | |||
MODEL 220 with CODE (402a) Seat ventilation of rear seats | |||
MODEL 220 with CODE (872) Electrically heated left and right rear seats | |||
--> | |||
{| | |||
|[[File:W220_rear_seat_control_module.png]] | |||
| | |||
* N25/6 - Rear seats control module | |||
|} | |||
The rear seats control module (N25/6) is located under the right half of the rear bench seat/under the right rear seat. | |||
Task: | |||
* Control of heated rear seats (special equipment) | |||
* Control of rear seat ventilation (special equipment) | |||
* Reading in and actuation of components of these systems | |||
* Communication with the multicontour backrest control module (special equipment) | |||
The control module is accommodated in the stable plastic housing. Power semiconductors which actuate the consumers directly are located in the control module. The electrical connection is via eight connectors. | |||
=== Remove/install rear seat control module (CODE 223b/224c) === | |||
<!-- AR91.29-P-1570M, Remove/install rear seat control module, 2.2.98 | |||
MODELS 220.0 /1 | |||
with CODE (223b) Electrically adjustable rear bench seat | |||
with CODE (224c) Electrically adjustable rear single seats, with seat ventilation, seat heater and memory package | |||
--> | |||
{| | |||
|[[File:W220_rear_seat_control_module_2.jpg]] | |||
| | |||
* 1 - Bracket | |||
* 2 - Guides | |||
* 3 - Plug connections | |||
* 4 - Retaining lug | |||
* 5 - Mounting plate | |||
* N25/6 - Rear seats control module | |||
|} | |||
# Remove seat adjustment device on rear right seat | |||
# Unclip brackets (1) on rear seat control module (N25/6) on both sides from retainer tabs (4) | |||
# Lift up rear seat control module (N25/6) on connectors' male multipoint connector (3) and remove. Make sure that the cables to the connectors (3) are not stressed when pulling. Installation: insert guides (2, arrows) into assembly plate mounting (5). | |||
# Disconnect connectors (3) on male multipoint connector of control module for rear seats (N25/6) | |||
# Install in the reverse order | |||
# Perform function check on electric seat adjustment | |||
== Remove/install rear seat cushion == | |||
=== Remove/install rear seat cushion === | |||
<!-- AR91.12-P-1020MA, Remove/install rear seat cushion, 10.3.98 | |||
MODEL 220.0 /1 | |||
except CODE (223b) Electrically adjustable rear bench seat | |||
except CODE (224c) Electrically adjustable rear single seats, with seat ventilation, seat heater and memory package | |||
--> | |||
{| | |||
|[[File:W220_remove_install_rear_seat_cushion3.jpg]] | |||
| | |||
* 1 - Rear bench seat | |||
* 2 - Release lever | |||
|} | |||
{| | |||
|[[File:W220_remove_install_rear_seat_cushion3b.png]] | |||
| | |||
* 3 - Crash bracket | |||
|} | |||
# Pull release lever (2) upwards and lift up rear bench seat (1) | |||
# Disconnect electrical connector for heated seats (on vehicles with electric heated seats for left and right rear seat, code 872). | |||
# Remove rear bench seat (1). An assistant is needed for the rear bench seat with integral child seat. | |||
# Installation: Expose lap belt and seat belt buckles. Pay attention to pilot stud (arrow) and insert the rear bench seat at the rear left and right in the crash bracket (3). | |||
=== Remove/install rear seat cushion (CODE 223b) === | |||
<!-- AR91.12-P-1020M Remove/install rear seat cushion | |||
MODEL 220.0 /1 with CODE (223b) Electrically adjustable rear bench seat | |||
MODELS 220.875 /878 vis-à-vis seats | |||
30.1.98 --> | |||
{| | |||
|[[File:W220_remove_install_rear_seat_cushion.jpg]] | |||
|[[File:W220_rear_individual_seat_cushion_removed.jpg|300px]] | |||
* 1 - Springs for seat locking mechanism | |||
* 2 - Pins for locating rear seat cushion | |||
* 3 - Electrical connector for heated seats | |||
* 4 - Rear seat cushion | |||
* 5 - Electrical connector for seat ventilation | |||
|} | |||
# Move rear seat cushion (4) fully forwards | |||
# Press springs (1) below the rear seat cushion (4) outwards and remove seat cushion. Installation: Ensure that the pins (2) on the seat adjuster move in the guides on the seat. | |||
# Disconnect electrical connector for heated seats (3) (on vehicles with electric heated seats for left and right rear seat, code 872). | |||
# Disconnect electrical connector of seat ventilation (5) and heated seats (on vehicles with seat ventilation for rear seats, code 402a). | |||
# Install in the reverse order | |||
=== Remove/install rear seat cushion (CODE 224c) === | |||
<!-- AR91.12-P-1020MB Remove/install rear seat cushion, 5.11.02 | |||
MODEL 220.0 /1 with CODE (224c) Electrically adjustable rear single seats, with seat ventilation, seat heater and memory package | |||
--> | |||
{| | |||
|[[File:W220_remove_install_rear_seat_cushion2.jpg]] | |||
| | |||
* 1 - Rear seat cushion | |||
* 2 - Retaining strap | |||
* 3 - Arresting hooks | |||
* 4 - Springs | |||
* 5 - Electrical plug connection | |||
|} | |||
# Move rear seat cushion (1) fully forwards | |||
# Press the springs (4) under the rear seat cushion (1) outwards and unhook the rear seat from the locking hooks (3) | |||
# Disconnect electrical connector for heated seats (5) | |||
# Disconnect electrical connector of seat ventilation (5) and heated seats | |||
# Unhook tensioning strap (2) on the left and right of the locking hooks (3). Installation: Attach the tensioning straps (2) on the left and right in sequence and lock the rear seat cushion in position. | |||
# Remove front seat backrest (1) from seat adjuster. Installation: Ensure that the pins on the back of the seat adjuster move in the guides on the seat. | |||
# Install in the reverse order | |||
==Remove and install cover on rear seat cushion== | |||
===Remove and install cover on rear seat cushion=== | |||
<!-- AR91.18-P-1850MA, Remove and install cover on rear seat cushion, 16.4.98 | |||
MODEL 220.0 /1 | |||
except CODE (223b) Electrically adjustable rear bench seat | |||
except CODE (224c) Electrically adjustable rear single seats, with seat ventilation, seat heater and memory package | |||
except CODE (248) rear seat with integral child seat | |||
--> | |||
{| | |||
|[[File:W220_remove_install_cover_on_rear_seat_cushion.jpg]] | |||
| | |||
* 1 - Rear seat cushion | |||
* 2 - Foam padding | |||
* 3 - Cushion frame | |||
* 4 - Retaining clamp | |||
|} | |||
{| | |||
|[[File:W220_remove_install_cover_on_rear_seat_cushion_2.jpg]] | |||
| | |||
* 2 - Foam padding | |||
* 5 - Upholstery clips | |||
* 6 - Staple wire | |||
* 7 - Upholstery | |||
|} | |||
# Remove rear seat cushion (1). Place rear seat cushion (1) with the covering (7) downwards on a suitable base. | |||
# Press down cushion frame (3), pull out covering (7) from insert fold (arrows) and unhook at the hook-in tongues. Installation: Insert the retaining clamps (4) distributed in the insert fold. | |||
# Remove cushion frame (3) from the foam padding (2) | |||
# Turn round covering (7) on the outside of the foam padding (2) | |||
# Detach stapling clips (5) from the outside inwards, removing the covering (7) in pieces from the foam padding (2). Installation: Insert stapling wire (6) in the stapling clips (6) using the press-in tool. | |||
# Remove covering (7) from the foam padding (2) | |||
# Pull stapling wire (6) out of the foam sleeves on the covering (7) (only when replacing the covering). Insert and align stapling wires (6) in fabric sleeves. | |||
# Install in the reverse order | |||
===Remove and install cover on rear seat cushion (CODE 248)=== | |||
<!-- AR91.18-P-1850MB, Remove and install cover on rear seat cushion, 30.10.02 | |||
MODEL 220.0 /1 | |||
except CODE (223b) Electrically adjustable rear bench seat | |||
except CODE (224c) Electrically adjustable rear single seats, with seat ventilation, seat heater and memory package | |||
with CODE (248) rear seat with integral child seat --> | |||
{| | |||
|[[File:W220_remove_install_cover_on_rear_seat_cushion_3.jpg]] | |||
| | |||
* 1 - Rear seat cushion | |||
* 2 - Child seat | |||
* 3 - Footrest | |||
* 4 - Upholstery | |||
* 5 - Cushion frame | |||
* 6 - Foam padding | |||
* 7 - Upholstery clips | |||
* 8 - Staple wire | |||
|} | |||
# Remove rear seat cushion (1). An assistant is needed. | |||
# Let down child seat (2) and lock | |||
# Unclip footrest (3) | |||
# Place rear seat cushion (1) with the covering (4) facing downwards on a suitable base | |||
# Press down cushion frame (5), pull out covering (4) at the insert fold | |||
# Remove cushion frame (5) with child seat (2) from the foam padding (6) | |||
# Detach stapling clips (7) from the stapling wires (8) on the child seat recesses | |||
# Pull off covering (4) from outside over the foam support (6). Only turn around the corners of the covering (4). | |||
# Position the foam padding (6) with the covering (4) upwards. | |||
# Detach stapling clips (7, 2 pieces) from the stapling wire (8). Detach the covering (4) from the foam padding (6) from the outside inwards. | |||
# Remove covering (4) from the foam padding (6) | |||
# Install in the reverse order | |||
===Remove/install covering on child seat cushion (CODE 248)=== | |||
<!-- AR91.20-P-1855M, Remove/install covering on child seat cushion, 30.10.02 | |||
MODEL 220.0 /1 with CODE (248) rear seat with integral child seat | |||
--> | |||
{| | |||
|[[File:W220_remove_install_covering_on_child_seat_cushion.jpg]] | |||
| | |||
* 1 - Rear seat cushion | |||
* 2 - Child seat | |||
* 3 - Footrest | |||
* 4 - Visual protective material | |||
* 5 - Cushion frame | |||
* 6 - Child seat frame | |||
* 7 - Cover | |||
* 8 - Upholstery | |||
* 9 - Frame | |||
* 10 - Foam padding | |||
|} | |||
# Remove rear seat cushion (1). | |||
# Let down child seat (2) and lock | |||
# Unclip foot rest (3) | |||
# Place rear seat cushion (1) with the covering facing downwards on a suitable base. Fold in child seat (2) again. | |||
# Press down cushion frame (5), pull out covering (8) at insert fold. | |||
# Remove cushion frame (5) with child seat (2) from covering and foam padding of rear seat cushion (1) | |||
# Unclip visual protective material (4) at the rear of the cushion frame (5) (see arrow) and unhook the front from the child seat frame (6) | |||
# Pull off covering (7) from button | |||
# Remove tensioning wire from visual protective material (4) and draw visual protective material (4) over the child seat (2) | |||
# Turn over cushion frame (5) with child seat (2) and unclip the seat cushion of the child seat. Compress the two lugs (see enlarged section) very carefully. | |||
# Remove the seat cushion of the child seat (2) from the child seat frame (6). Push back and remove. | |||
# Unhook covering (8) from frame (9). Installation: Lugs are sharp-edged. | |||
# Pull covering (8) off frame (4) and foam padding (10). | |||
# Install in the reverse order | |||
===Remove and install cover on rear seat cushion (CODE 234b/224c)=== | |||
<!-- AR91.18-P-1850M, Remove and install cover on rear seat cushion, 30.1.98 | |||
MODEL 220.0 /1 | |||
with CODE (223b) Electrically adjustable rear bench seat | |||
with CODE (224c) Electrically adjustable rear single seats, with seat ventilation, seat heater and memory package | |||
--> | |||
Shown with electrically adjustable rear bench seat, code 223b: | |||
{| | |||
|[[File:W220_remove_install_cover_on_rear_seat_cushion_4.jpg]] | |||
| | |||
* 1 - Upholstery | |||
* 2 - Retaining lugs | |||
* 3 - Cushion frame | |||
* 4 - Staple wire | |||
* 5 - Stapling clips | |||
* 6 - Rubberized fiber matting/foam padding | |||
|} | |||
Covering shown on electrically adjustable individual rear seats, with seat ventilation, heated seats and memory package, code 224c: | |||
{| | |||
|[[File:W220_remove_install_cover_on_rear_seat_cushion_5.jpg]] | |||
| | |||
* 1 - Upholstery | |||
* 4 - Staple wire | |||
* 5 - Stapling clips | |||
* 6 - Rubberized fiber matting/foam padding | |||
|} | |||
# Remove rear seat cushion | |||
# Place rear cushion with covering (1) facing downwards on suitable, clean base | |||
# Detach upholstery (1) from retaining lugs (2) | |||
# Unclip upholstery (1) all way round from plug-in fold (arrows) in cushion frame (3). Relieve seat cushion cover (1) tension by pressing cushion frame (3) down. | |||
# Remove cushion frame (3) from rubberized fiber matting/foam padding (6). | |||
# Unhook stapling clips (5, 3 pieces) from the side stapling wires (4) pointing towards the rear door. Use special tool when installing (pulling hook). | |||
# Unhook the stapling clips (5, 2 pieces) from the side stapling wires (4) pointing towards the stowage box (for vehicles with electrically adjustable individual rear seats, with seat ventilation, heated seats and memory package, code 224c). | |||
# Detach stapling clips (5, 8 pieces) from stapling wires (4) out of the rubberized fiber matting/foam padding (6). Turn stapling clip (5) through 90° using flat pliers. Installation: Use pressing-in tool. | |||
# Remove covering (1) from rubberized fiber matting/foam padding (6). Installation: Align covering (1) and turn around at the side. | |||
# Pull stapling wires (4) out of the foam sleeves of covering (1) (only when replacing the covering (1)). | |||
# Install in the reverse order | |||
== Remove/install rear-seat backrest == | |||
=== Remove/install rear-seat backrest === | |||
<!-- AR91.12-P-1620MA, Remove/install rear-seat backrest, 10.3.98 | |||
MODEL 220.0 /1 | |||
except CODE (223b) Electrically adjustable rear bench seat | |||
except CODE (224c) Electrically adjustable rear single seats, with seat ventilation, seat heater and memory package | |||
--> | |||
{| | |||
|[[File:W220_remove_install_rear_seat_backrest.jpg]] | |||
| | |||
* 1 - Rear seat backrest | |||
* 2 - Bolts | |||
|} | |||
# Lower the rear head restraints | |||
# Remove rear seat cushion | |||
# Unscrew bolts (2) on the rear wall on the bottom, side left and right and in the middle. | |||
# Disconnect electrical connector for heated seats (on vehicles with electrically heated left and right rear seats, code 872). | |||
# Lift rear seat backrest (1) upwards and remove. | |||
# Installation: Insert plug-in bracket (arrows) at the top of the rear wall; expose rear seat belts and seat belt buckle. | |||
* Bolt for rear seat backrest to rear wall: Nm 25 | |||
=== Remove/install rear-seat backrest (CODE 223b) === | |||
<!-- AR91.12-P-1620M, Remove/install rear-seat backrest, 2.2.98 | |||
MODEL 220.0 /1 with CODE (223b) Electrically adjustable rear bench seat | |||
--> | |||
{| | |||
|[[File:W220_remove_install_rear_seat_backrest_1a.jpg]] | |||
| | |||
* 1 - Rear seat cushion | |||
* 2 - Rear seat backrest | |||
|} | |||
{| | |||
|[[File:W220_remove_install_rear_seat_backrest_1b.jpg]] | |||
| | |||
* 3 - Bolt | |||
* 4 - Control valve cover | |||
* 5 - Backrest side paneling | |||
* 6 - Upholstery on center armrest | |||
* 7 - Bolts | |||
* 8 - Bolts | |||
|} | |||
# Remove rear seat cushion (1). | |||
# Remove lumbar support control valve for rear seat backrest | |||
# Unscrew screw (3) and remove cover of control valve (4) | |||
# Remove rear door sill molding | |||
# Remove rubber door seals in the area of the backrest side paneling (5). | |||
# Remove backrest side paneling (5). Ensure that retaining clamps (arrows) are seated correctly. | |||
# Unlock upholstery above center armrest (6) and pull out upwards. Unlocking, accessible from above on the left and right. | |||
# Unscrew bolts (7) from seat adjuster. | |||
# Disconnect electrical connector for heated seats (on vehicles with electric heated seats for left and right rear seat, code 872). | |||
# Disconnect electrical connector of seat ventilation and heated seats (on vehicles with seat ventilation for rear seats, code 402a). | |||
# Expose pneumatic line from control valve to rear seat backrest. | |||
# Unscrew bolts (8) and lift up rear seat backrest (2) and remove. Installation: Check belts and seat belt buckle for clearance. | |||
# Install in the reverse order | |||
* Bolt for rear seat backrest to seat adjuster: Nm 25 | |||
* Bolt for rear seat backrest to rear wall: Nm 25 | |||
{| | |||
|[[File:W220_rear_seat_backrest_side_paneling_retaining_clamps.jpg|thumb|none|Backrest side paneling with retaining clamps.]] | |||
|[[File:W220_rear_seat_backrest_side_paneling_removed_inside.jpg|thumb|none|Backrest side paneling removed.]] | |||
|} | |||
=== Remove/install rear-seat backrest (CODE 224c) === | |||
<!-- AR91.12-P-1620MB, Remove/install rear-seat backrest, 5.11.02 | |||
MODELS 220.0 /1 with CODE (224c) Electrically adjustable rear single seats, with seat ventilation, seat heater and memory package | |||
--> | |||
{| | |||
|[[File:W220_remove_install_rear_seat_backrest_2.jpg]] | |||
| | |||
* 1 - Rear seat backrest | |||
* 2 - Storage box | |||
* 3 - Bolt | |||
* 4 - Cover | |||
* 5 - Backrest side paneling | |||
* 6 - Upholstery on center armrest | |||
* 7 - Bolt | |||
* 8 - Bolt | |||
* 9 - Pneumatic hoses | |||
|} | |||
# Removing rear seat multicontour backrest control module until pneumatic lines to rear seat backrests are easy to access. | |||
# Remove rear seat multicontour backrest control switch | |||
# Undo screw (3) and remove cover (4) from multicontour backrest control switch | |||
# Remove rubber door seals in vicinity of backrest side paneling (5). | |||
# Remove rear door sill molding | |||
# Remove backrest side paneling (5) | |||
# Release upholstery above center armrest (6) and pull out from above. Left and right release mechanisms, accessible from above. | |||
# Unscrew screw (7, 2 pcs.) from seat adjuster | |||
# Disconnect electrical connector for heater (on vehicles with code 872 for electric seat heater, left and right rear seats). | |||
# Disconnect electric connector for seat ventilation and heating (on vehicles with code 402a for rear seat ventilation). | |||
# Disconnect pneumatic hose (9) from rear seat multicontour backrest control module and reveal up to rear seat backrest (1) | |||
# Unscrew screws (8, 2 pcs.) and lift and remove rear seat backrest (1) | |||
# Installation: check clearance of seat belts and buckles. | |||
# Install in the reverse order | |||
* Bolt for rear seat backrest to seat adjuster: Nm 25 | |||
* Bolt for rear seat backrest to rear wall: Nm 25 | |||
==Remove and install rear seat backrest cover== | |||
===Remove and install rear seat backrest cover=== | |||
<!-- AR91.18-P-1870MA, Remove and install rear seat backrest cover, 22.2.99 | |||
MODELS 220.0 /1 | |||
except CODE (223b) Electrically adjustable rear bench seat | |||
except CODE (224c) Electrically adjustable rear single seats, with seat ventilation, seat heater and memory package | |||
--> | |||
{| | |||
|[[File:W220_remove_install_rear_seat_backrest_cover.jpg]] | |||
| | |||
* 1 - Rear seat | |||
* 2 - Rear seat backrest | |||
* 4 - Armrest | |||
* 5 - Upholstery | |||
* 6 - Rear backrest frame | |||
* 7 - Upholstery clips | |||
* 8 - Longitudinal stitching wire | |||
* 9 - Foam padding | |||
|} | |||
# Remove armrest (4) from rear seat backrest (2) | |||
# Place rear seat backrest (2) on suitable surface with upholstery (5) facing downwards. Open cover plate on underside of rear seat backrest (1), with ISOFIX (child restraint system) in rear, code 573. | |||
# Detach upholstery (5) at armrest recess (4) | |||
# Detach upholstery (5) from around rear backrest frame (6). Relieve seat cushion cover (5) tension by pressing cushion frame (6) down. | |||
# Pull upholstery (5) over foam rubber padding (9) at bottom and sides | |||
# Undo upholstery clips (7) at longitudinal stitching wire (8) by rotating upholstery clips (7) by 90°. Installation: Align upholstery clips (7) and attach to stitching wire (8). | |||
# Remove upholstery (5) from foam rubber padding (9) | |||
# Installation: Knock upholstery (5) in at side and align with longitudinal stapling on foam rubber padding (9). | |||
# Pull longitudinal stitching wire (8) out of material sleeves. Only when replacing upholstery (5). Installation: Do not damage material sleeves on upholstery (5) when inserting longitudinal stitching wires (8). | |||
# Install in the reverse order | |||
===Remove and install rear seat backrest cover (CODE 223b/224c)=== | |||
<!-- AR91.18-P-1870M, Remove and install rear seat backrest cover, 30.1.98 | |||
MODELS 220.0 /1 | |||
with CODE (223b) Electrically adjustable rear bench seat | |||
with CODE (224c) Electrically adjustable rear single seats, with seat ventilation, seat heater and memory package | |||
--> | |||
Shown on vehicle with electrically adjustable rear bench seat, code 223b: | |||
{| | |||
|[[File:W220_remove_install_rear_seat_backrest_cover_2.jpg]] | |||
| | |||
* 1 - Rear seat backrest | |||
* 2 - Upholstery | |||
* 3 - Backrest frame | |||
* 4 - Retaining lugs | |||
* 6 - Foam rubber | |||
* 10 - Staple wire | |||
|} | |||
{| | |||
|[[File:W220_remove_install_rear_seat_backrest_cover_3.jpg]] | |||
| | |||
* 2 - Upholstery | |||
* 3 - Backrest frame | |||
* 6 - Foam rubber | |||
* 7 - Backrest frame head piece | |||
* 8 - Upholstery clips | |||
* 9 - Upholstery clips | |||
* 10 - Stitching wire | |||
|} | |||
# Remove rear seat backrest (1) | |||
# Place rear seat backrest with upholstery (2) facing downwards on suitably clean surface. Open cover plate on underside of rear seat backrest (1), with ISOFIX (child restraint system) in rear, code 573. | |||
# Detach upholstery (2) all way round out of retaining lugs (4) and clip groove (arrows) in backrest frame (3). Relieve upholstery (2) by pressing down on backrest frame (3) | |||
# Detach upholstery (2) on head piece of backrest frame (7) of rear seat backrest (1) from clip groove (arrow) | |||
# Detach upholstery clips (8) from lateral stitching wires (10) | |||
# Fold in upholstery (2) to side so that upholstery clips (9) and stitching wires (10) are accessible. Pushing the foamed material (6) between the backrest frame (3) and the upholstery (2) at the stapling positions eases assembly. | |||
# Remove center upholstery clips (9) from stitching wire (10) | |||
# Remove upholstery (2) from foam rubber (6) | |||
# Pull stitching wires (10) out of material sleeves on upholstery (2). Only when replacing upholstery (2). | |||
Install: | |||
# Insert and align upholstery wires (10) in material sleeves in upholstery (2). Only when replacing upholstery (2). | |||
# Pull on upholstery (2) onto foamed material (6) and use a pressing-in tool to insert stitching wire (10) into upholstery clips (8, 9). Pushing the foamed material (6) between the backrest frame (3) and the upholstery (2) at the stapling positions eases assembly. | |||
# Slide upholstery (2) on head piece of backrest frame (7) of rear seat backrest (1) into clip groove (arrow) first. Relieve upholstery (2) by pressing down on backrest frame (3). | |||
# Insert upholstery (2) all way round into retaining lugs (4) and clip groove (arrows) in backrest frame (3). Ensure that the upholstery (2) is seated correctly. | |||
# Install rear seat backrest (1). | |||
# Perform function test of seat ventilation and heated seats | |||
==Remove/install armrest at rear seat backrest== | |||
===Remove/install armrest at rear seat backrest=== | |||
<!-- AR91.12-P-1745MA, Remove/install armrest at rear seat backrest, 8.4.98 | |||
MODELS 220.0 /1 | |||
except CODE (223b) Electrically adjustable rear bench seat | |||
except CODE (224c) Electrically adjustable rear single seats, with seat ventilation, seat heater and memory package | |||
--> | |||
{| | |||
|[[File:W220_remove_install_armrest_at_rear_seat_backrest.jpg]] | |||
| | |||
* 1 - Rear seat cushion | |||
* 2 - Rear seat backrest | |||
* 3 - Armrest | |||
* 4 - Bolts | |||
* 5 - Fabric cover | |||
|} | |||
# Remove rear seat backrest (2) | |||
# Place rear seat backrest (2) on suitable surface with upholstery facing downwards | |||
# Detach fabric cover (5) | |||
# Remove screws (4, 4 pcs.) | |||
# Remove arm rest (3). Installation: align armrest (3) on rear seat backrest (2). | |||
# Install in the reverse order. Armrest (3) must be able to be easily moved. | |||
===Remove/install armrest at rear seat backrest (CODE 223b/224c)=== | |||
<!-- AR91.12-P-1745MB, Remove/install armrest at rear seat backrest, 5.11.02 | |||
MODELS 220.0 /1 | |||
with CODE (223b) Electrically adjustable rear bench seat | |||
with CODE (224c) Electrically adjustable rear single seats, with seat ventilation, seat heater and memory package | |||
--> | |||
Shown on vehicle with electrically adjustable rear bench seat, code 223b: | |||
{| | |||
|[[File:W220_remove_install_armrest_at_rear_seat_backrest_2.jpg]] | |||
| | |||
* 1 - Armrest | |||
* 2 - Nut | |||
* 3 - Electrical plug connection | |||
* 4 - Armrest frame | |||
|} | |||
# Remove rear seat backrest | |||
# Unscrew nuts (2, 2 pcs.) from armrest frame (4) | |||
# Remove armrest frame (4) from rear wall. Upper fastening points are attached to seat backrests. | |||
# Separate electrical plug connection (3) (on vehicles with 2nd handset in rear armrest, code 856). | |||
# Remove armrest (1) with armrest frame (4). Installation: Align armrest frame (4) in relation to rear wall. | |||
# Install in the reverse order | |||
== Remove/install seat adjuster at rear seat (CODE 223b/224c) == | |||
<!-- AR91.12-P-1520M, Remove/install seat adjuster at rear seat, 2.2.98 | |||
MODEL 220.0 /1 /875 /878 | |||
with CODE (223b) Electrically adjustable rear bench seat | |||
with CODE (224c) Electrically adjustable rear single seats, with seat ventilation, seat heater and memory package | |||
MODELS 220.875 /878 vis-à-vis seats | |||
--> | |||
Shown on electrically adjustable rear bench seat, code 223b: | |||
{| | |||
|[[File:W220_remove_install_seat_adjuster_at_rear_seat.jpg]] | |||
| | |||
* 1 - Rear seat cushion | |||
* 2 - Bolt | |||
* 3 - Bolt | |||
* 4 - Rear seat forward/back adjustment motor | |||
* 5 - Seat adjustment mechanism | |||
|} | |||
# Remove rear seat cushion (1). | |||
# Remove screws (2) on rear seat backrest | |||
# Move seat adjuster (5) back as far as possible, until the screws (3) are accessible | |||
# Unscrew screws (3) on seat adjuster (5) and remove seat adjuster (5) | |||
# Disconnect electrical connector from rear seat adjustment motor, forward/backward (4) | |||
# Disconnect electrical connector from rear seat cushion inclination motor, up and down (on vehicles with electrically adjustable individual rear seats, with seat ventilation, heated seats and memory package, code 224c). | |||
# Install in the reverse order | |||
* Bolt for seat adjuster to frame floor: Nm 25 | |||
* Bolt for rear seat backrest to seat adjuster: Nm 25 | |||
==Remove/install rear seat adjustment motor== | |||
===Remove/install rear seat adjustment motor (CODE 223b)=== | |||
<!-- AR91.29-P-1440M, Remove/install rear seat adjustment motor, 28.5.98 | |||
MODEL 220.0 /1 with CODE (223b) Electrically adjustable rear bench seat | |||
--> | |||
{| | |||
|[[File:W220_remove_install_rear_seat_adjustment_motor.jpg]] | |||
| | |||
* 1 - Bolt | |||
* 2 - Rear seat cushion | |||
* M18/1 - Rear seat adjustment forward/back motor | |||
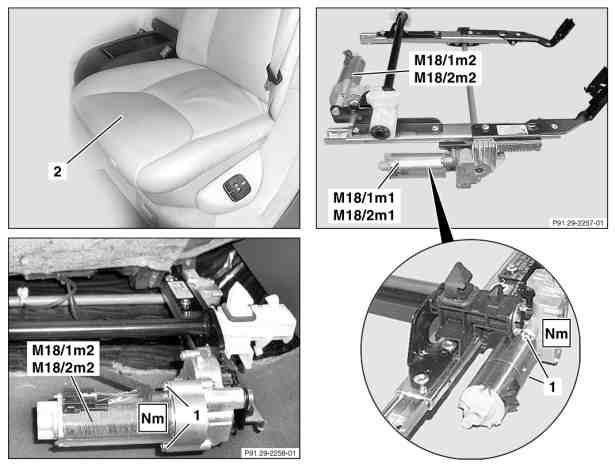
* M18/2m1 - Rear seat adjustment forward/back motor | |||
|} | |||
# Remove seat adjustment device on rear seat | |||
# Disconnect electrical connection from rear seat adjustment forward/back motor (M18/1m1, M18/2m1) | |||
# Unscrew bolts (1, 2 pieces) from rear seat adjustment forward/back motor (M18/1m1, M18/2m1) and remove motor | |||
# Install in the reverse order | |||
# Perform function check on electric seat adjustment | |||
* Bolt of seat adjustment motor: Nm 4 | |||
===Remove/install rear seat adjustment motor (CODE 224c)=== | |||
<!-- AR91.29-P-1440MA, Remove/install rear seat adjustment motor, 11.11.02 | |||
MODELS 220.0 /1 with CODE (224c) Electrically adjustable rear single seats, with seat ventilation, seat heater and memory package | |||
--> | |||
{| | |||
|[[File:W220_remove_install_rear_seat_adjustment_motor_2.jpg]] | |||
| | |||
* 1 - Bolt | |||
* 2 - Rear seat cushion | |||
* M18/1m1 - Rear seat adjustment forward/back motor | |||
* M18/1m2 - Rear seat cushion up/down motor | |||
* M18/2m1 - Rear seat adjustment forward/back motor | |||
* M18/2m2 - Rear seat cushion up/down motor | |||
|} | |||
# Remove seat adjustment device on rear seat | |||
# Remove electrical connector from rear seat adjustment forward/back motor (M18/1m1, M18/2m1). Only if replacing rear seat adjustment forward/back motor (M18/1m1, M18/2m1). | |||
# Unscrew bolt (1, 2 pcs.) from rear seat adjustment forward/back motor (M18/1m1, M18/2m1) and remove motor. Only if replacing rear seat adjustment forward/back motor (M18/1m1, M18/2m1). | |||
# Remove electrical connector from rear seat cushion angle adjustment up/down motor (M18/1m2, M18/2m2). Only if replacing rear seat cushion angle adjustment up/down motor (M18/1m2, M18/2m2). | |||
# Unscrew bolt (1, 2 pcs.) from rear seat cushion angle adjustment up/down motor M18/1m2, M18/2m2) and remove motor. Only if replacing rear seat cushion angle adjustment up/down motor (M18/1m2, M18/2m2). | |||
# Install in the reverse order | |||
# Perform function check on electric seat adjustment | |||
* Bolt of seat adjustment motor: Nm 4 | |||
== Removing and installing rear seat backrest lumbar support control valve (CODE 223b) == | |||
<!-- AR91.12-P-1670M, Removing and installing rear seat backrest lumbar support control valve, 2.2.98 | |||
MODELS 220.0 /1 with CODE (223b) Electrically adjustable rear bench seat | |||
--> | |||
{| | |||
|[[File:W220_remove_install_rear_seat_backrest_lumbar_support_control_valve.jpg]] | |||
| | |||
* 1 - Control valve | |||
* 2 - Pneumatic lines | |||
|} | |||
# Unclip control valve (1) from rear seat paneling using assembly wedge | |||
# Remove pneumatic lines (2). Pay attention to line routing. | |||
# Install in the reverse order | |||
# Perform lumbar support function check | |||
[[File:W220_rear_seat_lumbar_support_thumbwheel_disconnected_A2208000878.jpg|thumb|none|Thumbwheel (A220800087) partially removed.]] | |||
== Removing and installing rear seat multicontour backrest control switch (CODE 224c) == | |||
<!-- AR91.25-P-1765M, Removing and installing rear seat multicontour backrest control switch, 20.7.98 | |||
MODELS 220.0 /1 with CODE (224c) Electrically adjustable rear single seats, with seat ventilation, seat heater and memory package | |||
--> | |||
{| | |||
|[[File:W220_remove_install_rear_seat_multicontour_backrestr_control_switch.jpg]] | |||
| | |||
* 1 - Paneling | |||
* S103 - Right rear multicontour backrest switch | |||
* S104 - Left rear multicontour backrest switch | |||
* A - Multicontour backrest switch up to model refinement package 2003 | |||
* B - Multicontour backrest switch as of model refinement package 2003 | |||
|} | |||
# Unclip rear right (S103), left (S104) multicontour backrest switch from paneling (1) with assembly wedge | |||
# Disconnect electrical connector | |||
# Install in the reverse order | |||
# Perform multicontour backrest switch function check | |||
== Removing and installing rear seat lumbar support air cushions (CODE 223b) == | |||
<!-- AR91.12-P-1660M, Removing and installing rear seat lumbar support air cushions, 2.2.98 | |||
MODELS 220.0 /1 with CODE (223b) Electrically adjustable rear bench seat | |||
--> | |||
{| | |||
|[[File:W220_remove_install_rear_seat_lumbar_support_air_cushions.jpg]] | |||
| | |||
* 1 - Rear seat cushion | |||
* 2 - Rear seat backrest | |||
* 3 - Seat cover | |||
* 4 - Backrest frame | |||
* 5 - Foam rubber | |||
* 6 - Reinforcement plate | |||
* 7 - Air cushion | |||
|} | |||
# Remove rear seat backrest (2) | |||
# Place rear seat backrest (2) with upholstery (3) facing downwards on suitably clean surface | |||
# Unclip seat cover (3) from backrest frame (4) clip groove. Push backrest frame (4) down to relieve strain on seat cover (3). | |||
# Remove reinforcement plate (6) with air cushion (7). Ensure that reinforcement plate (6) is not damaged at clips (arrows). Push foam rubber (5) down to relieve strain on reinforcement plate (6). Installation: Hook clips (arrow) onto second cross-wire from top. | |||
# Install in the reverse order | |||
# Check pneumatic operation | |||
== Removing and installing rear seat multicontour backrest control module (CODE 224c) == | |||
<!-- AR91.25-P-1755M, Removing and installing rear seat multicontour backrest control module, 13.7.98 | |||
MODELS 220.0 /1 with CODE (224c) Electrically adjustable rear single seats, with seat ventilation, seat heater and memory package | |||
--> | |||
{| | |||
|[[File:W220_remove_install_rear_seat_multicontour_backrest_control_module.jpg]] | |||
| | |||
* 1 - Seat cushion | |||
* 2 - Stowage box, rear seats | |||
* 3 - Pneumatic line connecting rail | |||
* 4 - Supply lines | |||
* 5 - Torx bolt | |||
* 6 - Connector | |||
* 7 - Armrest frame | |||
* 8 - Retaining clamp | |||
* N32/14 - Rear multicontour backrest control module | |||
|} | |||
# Remove stowage box (2) in rear seats | |||
# Open catch and remove both pneumatic line onnecting rails (3) from rear multicontour backrest control module (N32/14). Release catch at pneumatic line connecting rail (3) using small screwdriver. | |||
# Detach supply lines (4) from rear multicontour backrest control module (N32/14) | |||
# Detach connector (6) from rear multicontour backrest control module (N32/14) | |||
# Unscrew Torx screw (5) | |||
# Swivel rear multicontour backrest control module (N32/14) with front upwards and move retaining clamps (8) downwards out of armrest frame (7) at same time. Do not break off retaining clamp (8). | |||
# Install in the reverse order | |||
# Perform multicontour backrest function check | |||
== Removing and installing rear seat stowage box (CODE 224c) == | |||
<!-- AR91.12-P-1760M, Removing and installing rear seat stowage box, 21.7.98 | |||
MODELS 220.0 /1 with CODE (224c) Electrically adjustable rear single seats, with seat ventilation, seat heater and memory package | |||
--> | |||
{| | |||
|[[File:W220_remove_install_rear_seat_stowage_box.jpg]] | |||
| | |||
* 1 - Stowage box, rear seats | |||
* 2 - Rear seat cushion | |||
* 3 - Retaining clamps | |||
* 4 - Bore | |||
* 5 - Bracket | |||
|} | |||
# Remove rear seat cushion (2) on left and right. | |||
# Release rear seat stowage box (1). Release front retaining clamps (3, 2 pcs.) at both sides using assembly wedge and raise front of rear seat stowage box (1) slightly. Release retaining clamps in rear area (3, 2 pcs.) using relevant drift. (Insert drift in hole (4) in bracket (5)). Ensure that the retaining clamps (3) are not damaged when releasing the rear seat stowage box (1). | |||
# Remove rear seat stowage box (1) from bracket (5). | |||
# Install in the reverse order. Installation: First place rear seat stowage box (1) onto rear seat backrest and clip into position. | |||
Latest revision as of 19:38, 30 August 2017
Rear seat adjustment
In vehicles equipped with option code 223 - REAR BACK REST ADJUSTMENT AND HEAD RESTRAINTS, ELE the switches can be used to adjust rear:
- (1) Seat bench fore and aft adjustment
- (2) Head restraint fold/place upright
In vehicles equipped with option code 224 - INDIV.REAR SEAT AND HEAD RESTRAINTS, ELEC.ADJUSTAB the switches can be used to adjust rear:
- (1) Seat fore and aft adjustment
- (2) Seat height
- (3) Head restraint fold/place upright
Front passenger seat adjustment from rear
Vehicles equipped with option code 247 - SEAT ADJUSTMENT ELEC. ALSO OPERABLE FROM REAR have two additional buttons (buttons (1) and (2)) on the rear door control module behind the front passenger seat, which can be used to adjust the front passenger seat. Note that it is not possible to adjust the seat cushion depth of the front seat, since the cushion depth adjustment button on the rear door control module is not functional. It is also not possible to adjust the front tilting of the front seat - front tilting adjustment button on the rear door control module will actually adjust the rear tilting of the front seat.
None: Adjusting the passenger seat position from the rear is not possible if you deactivate the operation of the rear door windows (override switch in driver's door).
Lumbar support
On rear seats basic lumbar support is available in vehicles with option code 223 - REAR BACK REST ADJUSTMENT AND HEAD RESTRAINTS, ELE.
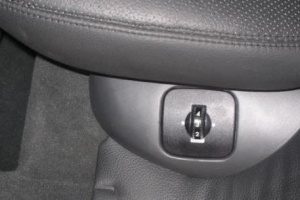
The thumbwheels are located on the sides of the rear seats. The seats have an inflatable air cushion built into the backrest to provide additional lumbar support.
Turn the electronic key in starter switch to position 2. The inflation pressure of the air cushion can be continuously varied between position "0" (no pressure) and position "5" (maximum pressure) by changing the pressure regulator (1) setting.
Adjusting rear seats function (CODE 223b/224c)
Seat adjustment of rear bench seat/individual rear seats:
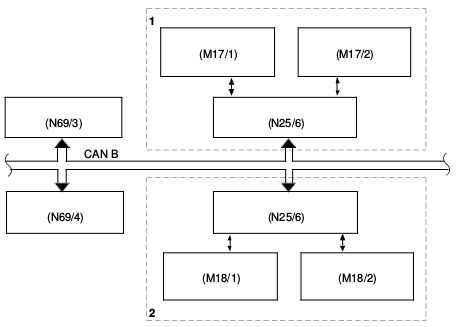
|
|
Function requirements:
- No overvoltage or undervoltage
- Term.15R or 15 ON
- Respective vehicle door open
- Position measurement works faultlessly (on account of locking recognition)
Rear bench seat seat adjustment without memory
With the electrically adjustable rear bench seat without memory a manual longitudinal adjustment can be performed using one motor each on the left and right half of the rear bench seat. The adjustments are made via the adjustment switches in the left rear door control module (N69/3)/right rear door control module (N69/4).
Individual rear seats seat adjustment with memory
The following can be adjusted separately in each case with the electrically adjustable individual rear seats with memory
- The angle of the seat cushion
- The fore/aft position of the seat cushion
The adjustments are performed manually using the adjustment switches in the left rear door control module (N69/3)/right rear door control module (N69/4) or automatically using the memory feature. In this connection three complete seat adjustments can be stored and called up again for each rear seat (left and right).
Rear seat control module (CODE 223b/224c/402a/872)
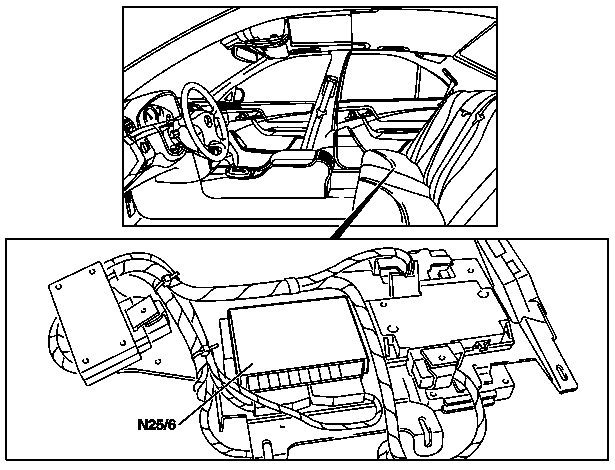
|
|
The rear seats control module (N25/6) is located under the right half of the rear bench seat/under the right rear seat.
Task:
- Control of heated rear seats (special equipment)
- Control of rear seat ventilation (special equipment)
- Reading in and actuation of components of these systems
- Communication with the multicontour backrest control module (special equipment)
The control module is accommodated in the stable plastic housing. Power semiconductors which actuate the consumers directly are located in the control module. The electrical connection is via eight connectors.
Remove/install rear seat control module (CODE 223b/224c)
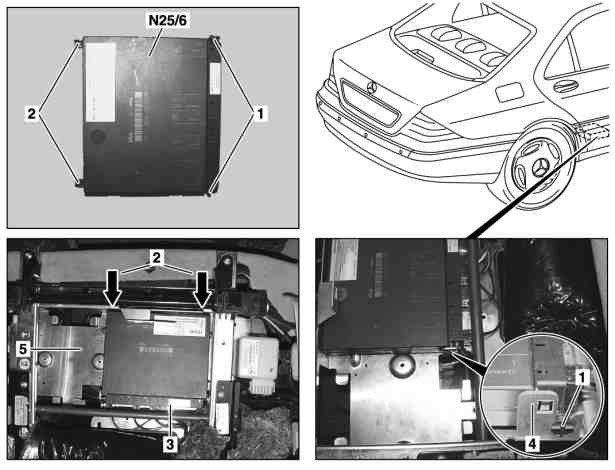
|
|
- Remove seat adjustment device on rear right seat
- Unclip brackets (1) on rear seat control module (N25/6) on both sides from retainer tabs (4)
- Lift up rear seat control module (N25/6) on connectors' male multipoint connector (3) and remove. Make sure that the cables to the connectors (3) are not stressed when pulling. Installation: insert guides (2, arrows) into assembly plate mounting (5).
- Disconnect connectors (3) on male multipoint connector of control module for rear seats (N25/6)
- Install in the reverse order
- Perform function check on electric seat adjustment
Remove/install rear seat cushion
Remove/install rear seat cushion
|
|
|
|
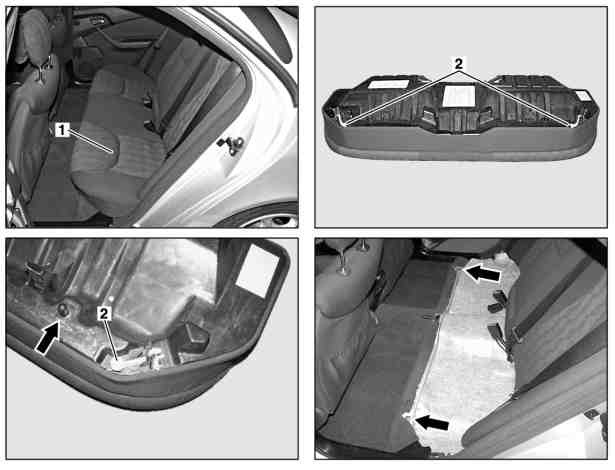
- Pull release lever (2) upwards and lift up rear bench seat (1)
- Disconnect electrical connector for heated seats (on vehicles with electric heated seats for left and right rear seat, code 872).
- Remove rear bench seat (1). An assistant is needed for the rear bench seat with integral child seat.
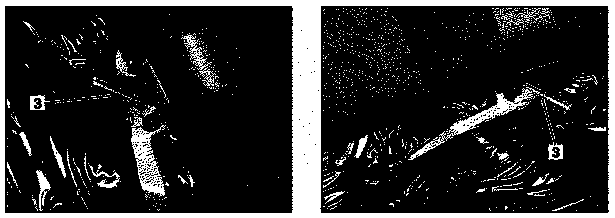
- Installation: Expose lap belt and seat belt buckles. Pay attention to pilot stud (arrow) and insert the rear bench seat at the rear left and right in the crash bracket (3).
Remove/install rear seat cushion (CODE 223b)
|
|
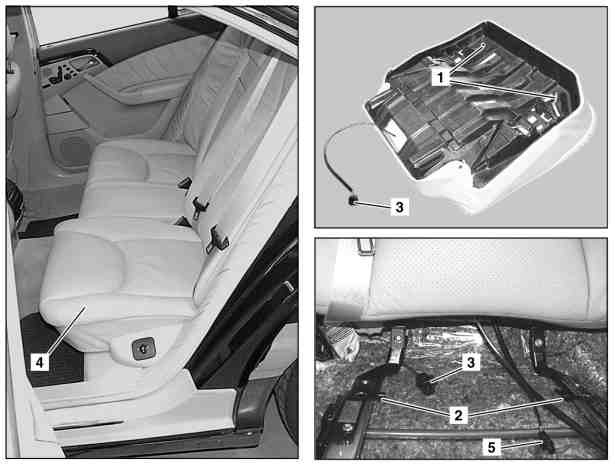
- Move rear seat cushion (4) fully forwards
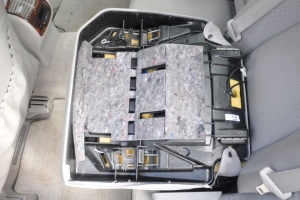
- Press springs (1) below the rear seat cushion (4) outwards and remove seat cushion. Installation: Ensure that the pins (2) on the seat adjuster move in the guides on the seat.
- Disconnect electrical connector for heated seats (3) (on vehicles with electric heated seats for left and right rear seat, code 872).
- Disconnect electrical connector of seat ventilation (5) and heated seats (on vehicles with seat ventilation for rear seats, code 402a).
- Install in the reverse order
Remove/install rear seat cushion (CODE 224c)
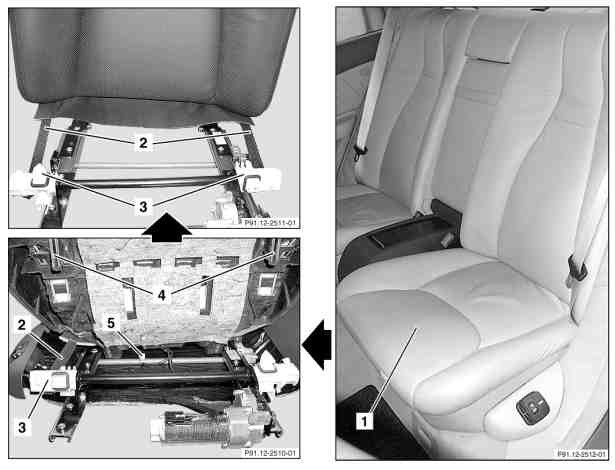
|
|
- Move rear seat cushion (1) fully forwards
- Press the springs (4) under the rear seat cushion (1) outwards and unhook the rear seat from the locking hooks (3)
- Disconnect electrical connector for heated seats (5)
- Disconnect electrical connector of seat ventilation (5) and heated seats
- Unhook tensioning strap (2) on the left and right of the locking hooks (3). Installation: Attach the tensioning straps (2) on the left and right in sequence and lock the rear seat cushion in position.
- Remove front seat backrest (1) from seat adjuster. Installation: Ensure that the pins on the back of the seat adjuster move in the guides on the seat.
- Install in the reverse order
Remove and install cover on rear seat cushion
Remove and install cover on rear seat cushion
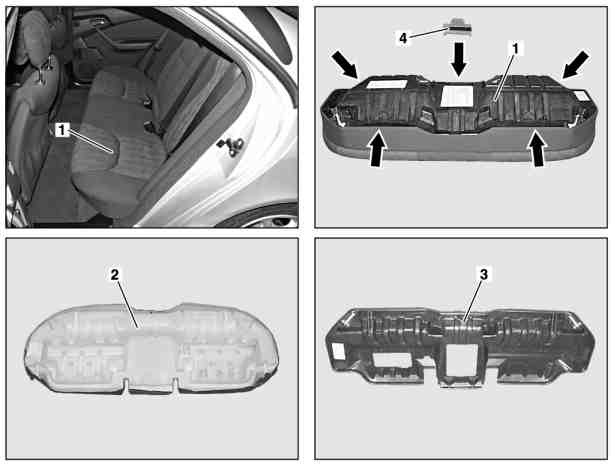
|
|
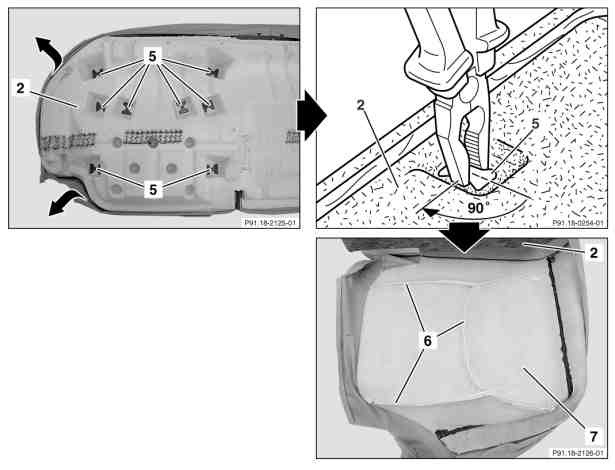
|
|
- Remove rear seat cushion (1). Place rear seat cushion (1) with the covering (7) downwards on a suitable base.
- Press down cushion frame (3), pull out covering (7) from insert fold (arrows) and unhook at the hook-in tongues. Installation: Insert the retaining clamps (4) distributed in the insert fold.
- Remove cushion frame (3) from the foam padding (2)
- Turn round covering (7) on the outside of the foam padding (2)
- Detach stapling clips (5) from the outside inwards, removing the covering (7) in pieces from the foam padding (2). Installation: Insert stapling wire (6) in the stapling clips (6) using the press-in tool.
- Remove covering (7) from the foam padding (2)
- Pull stapling wire (6) out of the foam sleeves on the covering (7) (only when replacing the covering). Insert and align stapling wires (6) in fabric sleeves.
- Install in the reverse order
Remove and install cover on rear seat cushion (CODE 248)
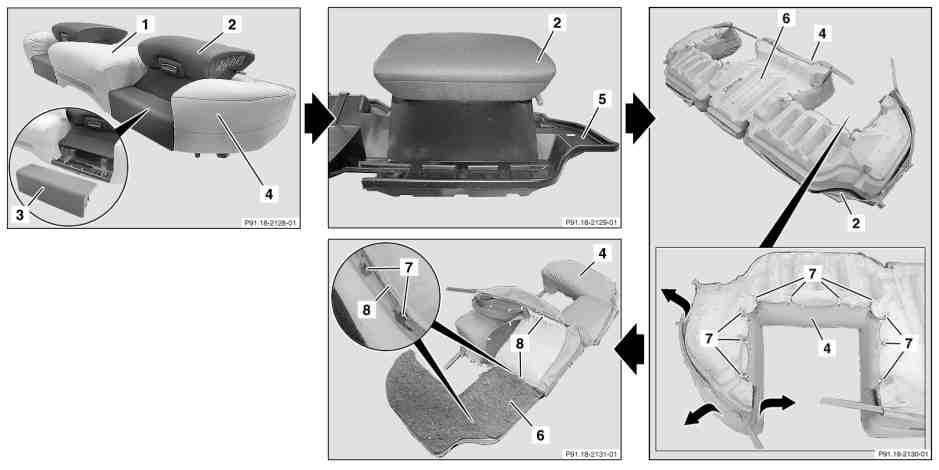
|
|
- Remove rear seat cushion (1). An assistant is needed.
- Let down child seat (2) and lock
- Unclip footrest (3)
- Place rear seat cushion (1) with the covering (4) facing downwards on a suitable base
- Press down cushion frame (5), pull out covering (4) at the insert fold
- Remove cushion frame (5) with child seat (2) from the foam padding (6)
- Detach stapling clips (7) from the stapling wires (8) on the child seat recesses
- Pull off covering (4) from outside over the foam support (6). Only turn around the corners of the covering (4).
- Position the foam padding (6) with the covering (4) upwards.
- Detach stapling clips (7, 2 pieces) from the stapling wire (8). Detach the covering (4) from the foam padding (6) from the outside inwards.
- Remove covering (4) from the foam padding (6)
- Install in the reverse order
Remove/install covering on child seat cushion (CODE 248)
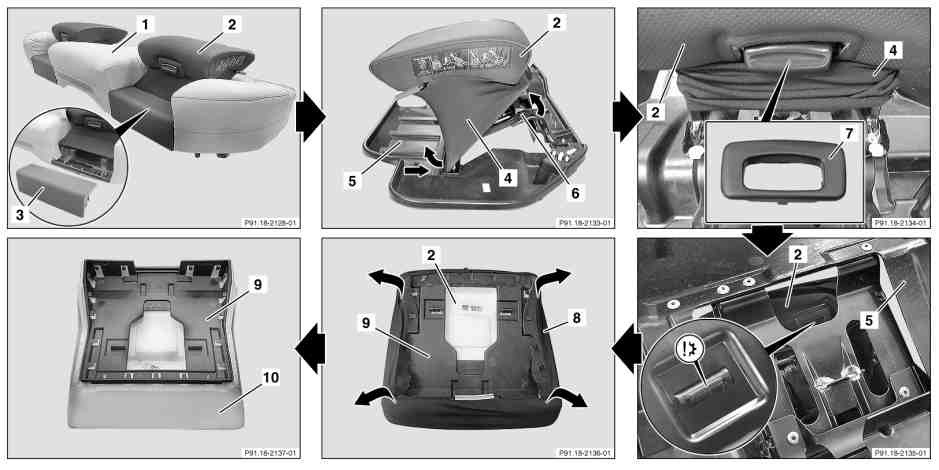
|
|
- Remove rear seat cushion (1).
- Let down child seat (2) and lock
- Unclip foot rest (3)
- Place rear seat cushion (1) with the covering facing downwards on a suitable base. Fold in child seat (2) again.
- Press down cushion frame (5), pull out covering (8) at insert fold.
- Remove cushion frame (5) with child seat (2) from covering and foam padding of rear seat cushion (1)
- Unclip visual protective material (4) at the rear of the cushion frame (5) (see arrow) and unhook the front from the child seat frame (6)
- Pull off covering (7) from button
- Remove tensioning wire from visual protective material (4) and draw visual protective material (4) over the child seat (2)
- Turn over cushion frame (5) with child seat (2) and unclip the seat cushion of the child seat. Compress the two lugs (see enlarged section) very carefully.
- Remove the seat cushion of the child seat (2) from the child seat frame (6). Push back and remove.
- Unhook covering (8) from frame (9). Installation: Lugs are sharp-edged.
- Pull covering (8) off frame (4) and foam padding (10).
- Install in the reverse order
Remove and install cover on rear seat cushion (CODE 234b/224c)
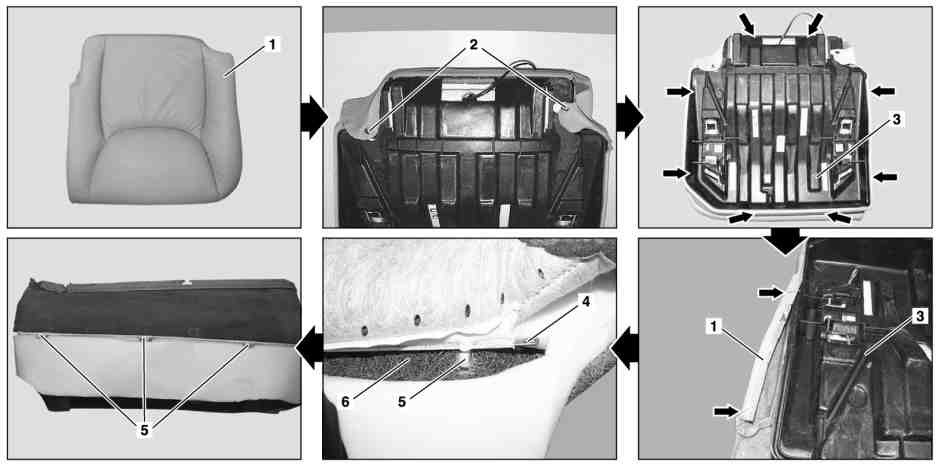
Shown with electrically adjustable rear bench seat, code 223b:
|
|
Covering shown on electrically adjustable individual rear seats, with seat ventilation, heated seats and memory package, code 224c:
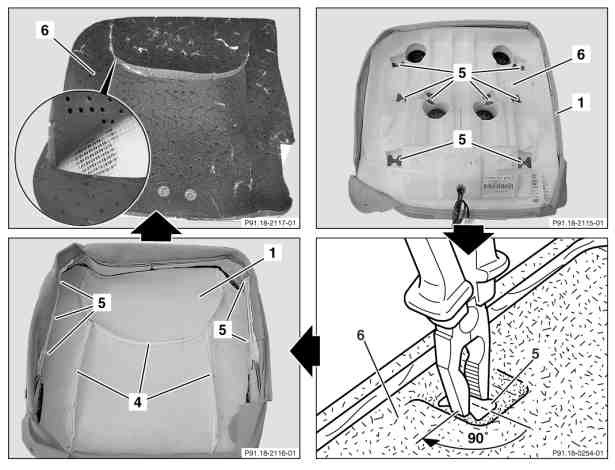
|
|
- Remove rear seat cushion
- Place rear cushion with covering (1) facing downwards on suitable, clean base
- Detach upholstery (1) from retaining lugs (2)
- Unclip upholstery (1) all way round from plug-in fold (arrows) in cushion frame (3). Relieve seat cushion cover (1) tension by pressing cushion frame (3) down.
- Remove cushion frame (3) from rubberized fiber matting/foam padding (6).
- Unhook stapling clips (5, 3 pieces) from the side stapling wires (4) pointing towards the rear door. Use special tool when installing (pulling hook).
- Unhook the stapling clips (5, 2 pieces) from the side stapling wires (4) pointing towards the stowage box (for vehicles with electrically adjustable individual rear seats, with seat ventilation, heated seats and memory package, code 224c).
- Detach stapling clips (5, 8 pieces) from stapling wires (4) out of the rubberized fiber matting/foam padding (6). Turn stapling clip (5) through 90° using flat pliers. Installation: Use pressing-in tool.
- Remove covering (1) from rubberized fiber matting/foam padding (6). Installation: Align covering (1) and turn around at the side.
- Pull stapling wires (4) out of the foam sleeves of covering (1) (only when replacing the covering (1)).
- Install in the reverse order
Remove/install rear-seat backrest
Remove/install rear-seat backrest
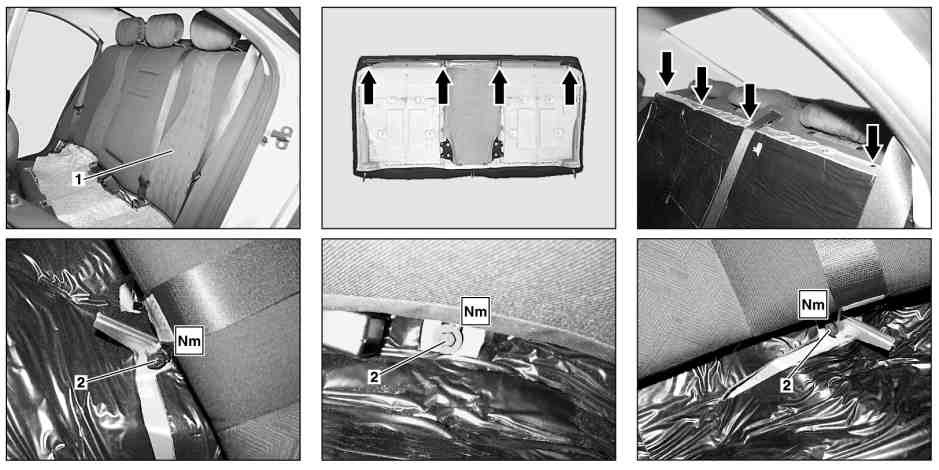
|
|
- Lower the rear head restraints
- Remove rear seat cushion
- Unscrew bolts (2) on the rear wall on the bottom, side left and right and in the middle.
- Disconnect electrical connector for heated seats (on vehicles with electrically heated left and right rear seats, code 872).
- Lift rear seat backrest (1) upwards and remove.
- Installation: Insert plug-in bracket (arrows) at the top of the rear wall; expose rear seat belts and seat belt buckle.
- Bolt for rear seat backrest to rear wall: Nm 25
Remove/install rear-seat backrest (CODE 223b)
|
|
|
|
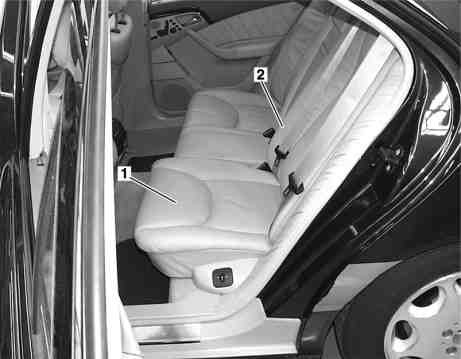
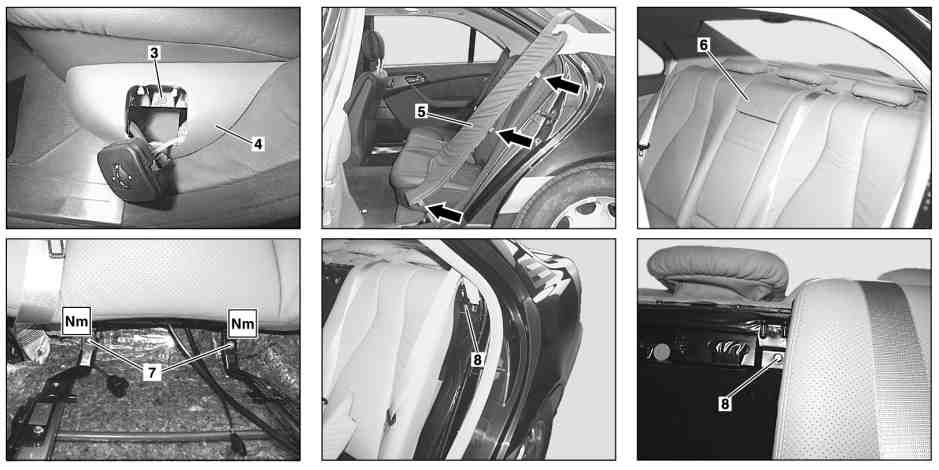
- Remove rear seat cushion (1).
- Remove lumbar support control valve for rear seat backrest
- Unscrew screw (3) and remove cover of control valve (4)
- Remove rear door sill molding
- Remove rubber door seals in the area of the backrest side paneling (5).
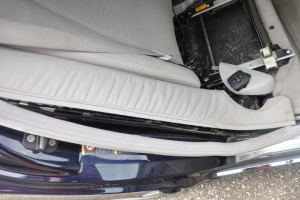
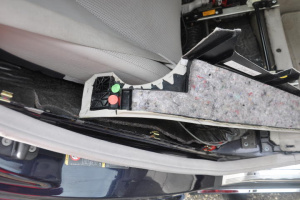
- Remove backrest side paneling (5). Ensure that retaining clamps (arrows) are seated correctly.
- Unlock upholstery above center armrest (6) and pull out upwards. Unlocking, accessible from above on the left and right.
- Unscrew bolts (7) from seat adjuster.
- Disconnect electrical connector for heated seats (on vehicles with electric heated seats for left and right rear seat, code 872).
- Disconnect electrical connector of seat ventilation and heated seats (on vehicles with seat ventilation for rear seats, code 402a).
- Expose pneumatic line from control valve to rear seat backrest.
- Unscrew bolts (8) and lift up rear seat backrest (2) and remove. Installation: Check belts and seat belt buckle for clearance.
- Install in the reverse order
- Bolt for rear seat backrest to seat adjuster: Nm 25
- Bolt for rear seat backrest to rear wall: Nm 25
 |
 |
Remove/install rear-seat backrest (CODE 224c)
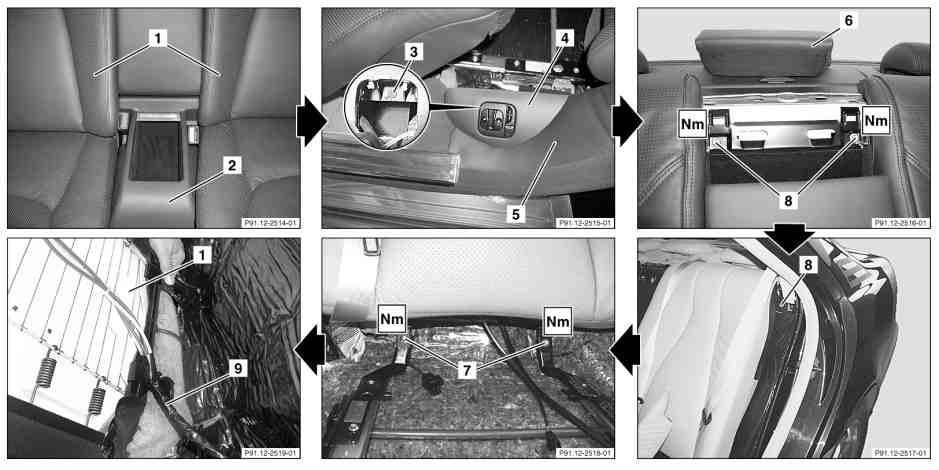
|
|
- Removing rear seat multicontour backrest control module until pneumatic lines to rear seat backrests are easy to access.
- Remove rear seat multicontour backrest control switch
- Undo screw (3) and remove cover (4) from multicontour backrest control switch
- Remove rubber door seals in vicinity of backrest side paneling (5).
- Remove rear door sill molding
- Remove backrest side paneling (5)
- Release upholstery above center armrest (6) and pull out from above. Left and right release mechanisms, accessible from above.
- Unscrew screw (7, 2 pcs.) from seat adjuster
- Disconnect electrical connector for heater (on vehicles with code 872 for electric seat heater, left and right rear seats).
- Disconnect electric connector for seat ventilation and heating (on vehicles with code 402a for rear seat ventilation).
- Disconnect pneumatic hose (9) from rear seat multicontour backrest control module and reveal up to rear seat backrest (1)
- Unscrew screws (8, 2 pcs.) and lift and remove rear seat backrest (1)
- Installation: check clearance of seat belts and buckles.
- Install in the reverse order
- Bolt for rear seat backrest to seat adjuster: Nm 25
- Bolt for rear seat backrest to rear wall: Nm 25
Remove and install rear seat backrest cover
Remove and install rear seat backrest cover
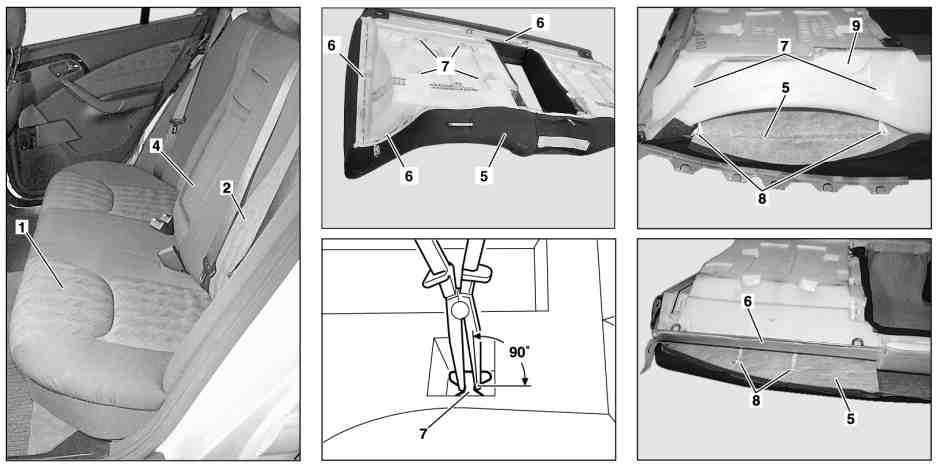
|
|
- Remove armrest (4) from rear seat backrest (2)
- Place rear seat backrest (2) on suitable surface with upholstery (5) facing downwards. Open cover plate on underside of rear seat backrest (1), with ISOFIX (child restraint system) in rear, code 573.
- Detach upholstery (5) at armrest recess (4)
- Detach upholstery (5) from around rear backrest frame (6). Relieve seat cushion cover (5) tension by pressing cushion frame (6) down.
- Pull upholstery (5) over foam rubber padding (9) at bottom and sides
- Undo upholstery clips (7) at longitudinal stitching wire (8) by rotating upholstery clips (7) by 90°. Installation: Align upholstery clips (7) and attach to stitching wire (8).
- Remove upholstery (5) from foam rubber padding (9)
- Installation: Knock upholstery (5) in at side and align with longitudinal stapling on foam rubber padding (9).
- Pull longitudinal stitching wire (8) out of material sleeves. Only when replacing upholstery (5). Installation: Do not damage material sleeves on upholstery (5) when inserting longitudinal stitching wires (8).
- Install in the reverse order
Remove and install rear seat backrest cover (CODE 223b/224c)
Shown on vehicle with electrically adjustable rear bench seat, code 223b:
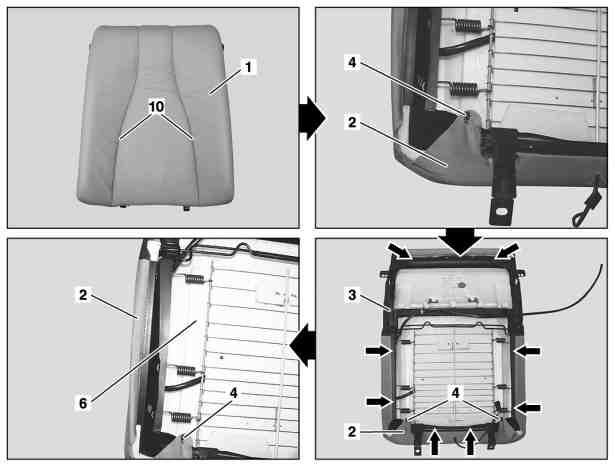
|
|
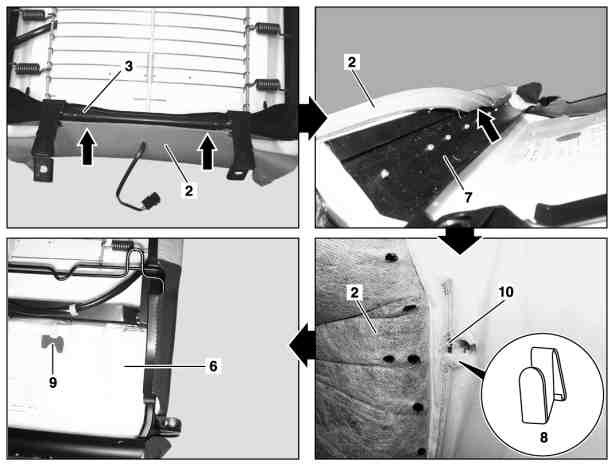
|
|
- Remove rear seat backrest (1)
- Place rear seat backrest with upholstery (2) facing downwards on suitably clean surface. Open cover plate on underside of rear seat backrest (1), with ISOFIX (child restraint system) in rear, code 573.
- Detach upholstery (2) all way round out of retaining lugs (4) and clip groove (arrows) in backrest frame (3). Relieve upholstery (2) by pressing down on backrest frame (3)
- Detach upholstery (2) on head piece of backrest frame (7) of rear seat backrest (1) from clip groove (arrow)
- Detach upholstery clips (8) from lateral stitching wires (10)
- Fold in upholstery (2) to side so that upholstery clips (9) and stitching wires (10) are accessible. Pushing the foamed material (6) between the backrest frame (3) and the upholstery (2) at the stapling positions eases assembly.
- Remove center upholstery clips (9) from stitching wire (10)
- Remove upholstery (2) from foam rubber (6)
- Pull stitching wires (10) out of material sleeves on upholstery (2). Only when replacing upholstery (2).
Install:
- Insert and align upholstery wires (10) in material sleeves in upholstery (2). Only when replacing upholstery (2).
- Pull on upholstery (2) onto foamed material (6) and use a pressing-in tool to insert stitching wire (10) into upholstery clips (8, 9). Pushing the foamed material (6) between the backrest frame (3) and the upholstery (2) at the stapling positions eases assembly.
- Slide upholstery (2) on head piece of backrest frame (7) of rear seat backrest (1) into clip groove (arrow) first. Relieve upholstery (2) by pressing down on backrest frame (3).
- Insert upholstery (2) all way round into retaining lugs (4) and clip groove (arrows) in backrest frame (3). Ensure that the upholstery (2) is seated correctly.
- Install rear seat backrest (1).
- Perform function test of seat ventilation and heated seats
Remove/install armrest at rear seat backrest
Remove/install armrest at rear seat backrest
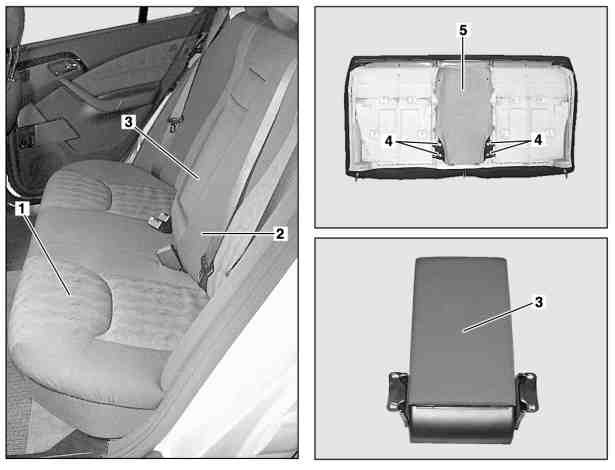
|
|
- Remove rear seat backrest (2)
- Place rear seat backrest (2) on suitable surface with upholstery facing downwards
- Detach fabric cover (5)
- Remove screws (4, 4 pcs.)
- Remove arm rest (3). Installation: align armrest (3) on rear seat backrest (2).
- Install in the reverse order. Armrest (3) must be able to be easily moved.
Remove/install armrest at rear seat backrest (CODE 223b/224c)
Shown on vehicle with electrically adjustable rear bench seat, code 223b:
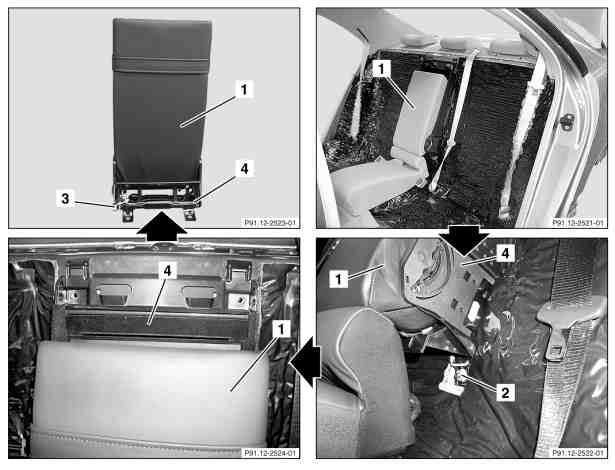
|
|
- Remove rear seat backrest
- Unscrew nuts (2, 2 pcs.) from armrest frame (4)
- Remove armrest frame (4) from rear wall. Upper fastening points are attached to seat backrests.
- Separate electrical plug connection (3) (on vehicles with 2nd handset in rear armrest, code 856).
- Remove armrest (1) with armrest frame (4). Installation: Align armrest frame (4) in relation to rear wall.
- Install in the reverse order
Remove/install seat adjuster at rear seat (CODE 223b/224c)
Shown on electrically adjustable rear bench seat, code 223b:
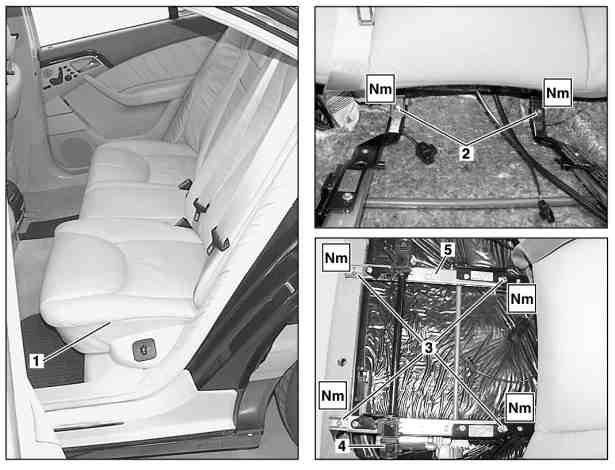
|
|
- Remove rear seat cushion (1).
- Remove screws (2) on rear seat backrest
- Move seat adjuster (5) back as far as possible, until the screws (3) are accessible
- Unscrew screws (3) on seat adjuster (5) and remove seat adjuster (5)
- Disconnect electrical connector from rear seat adjustment motor, forward/backward (4)
- Disconnect electrical connector from rear seat cushion inclination motor, up and down (on vehicles with electrically adjustable individual rear seats, with seat ventilation, heated seats and memory package, code 224c).
- Install in the reverse order
- Bolt for seat adjuster to frame floor: Nm 25
- Bolt for rear seat backrest to seat adjuster: Nm 25
Remove/install rear seat adjustment motor
Remove/install rear seat adjustment motor (CODE 223b)
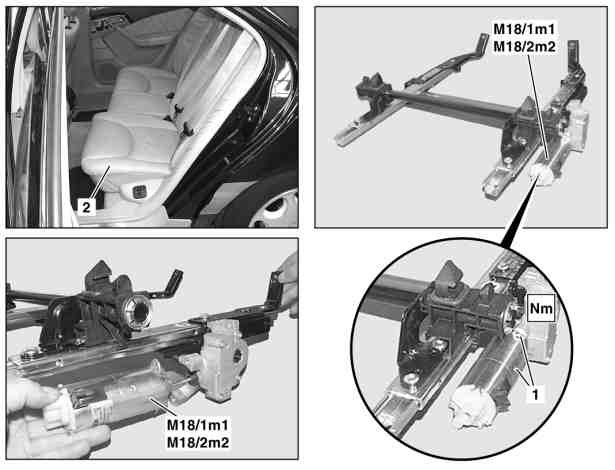
|
|
- Remove seat adjustment device on rear seat
- Disconnect electrical connection from rear seat adjustment forward/back motor (M18/1m1, M18/2m1)
- Unscrew bolts (1, 2 pieces) from rear seat adjustment forward/back motor (M18/1m1, M18/2m1) and remove motor
- Install in the reverse order
- Perform function check on electric seat adjustment
- Bolt of seat adjustment motor: Nm 4
Remove/install rear seat adjustment motor (CODE 224c)
- Remove seat adjustment device on rear seat
- Remove electrical connector from rear seat adjustment forward/back motor (M18/1m1, M18/2m1). Only if replacing rear seat adjustment forward/back motor (M18/1m1, M18/2m1).
- Unscrew bolt (1, 2 pcs.) from rear seat adjustment forward/back motor (M18/1m1, M18/2m1) and remove motor. Only if replacing rear seat adjustment forward/back motor (M18/1m1, M18/2m1).
- Remove electrical connector from rear seat cushion angle adjustment up/down motor (M18/1m2, M18/2m2). Only if replacing rear seat cushion angle adjustment up/down motor (M18/1m2, M18/2m2).
- Unscrew bolt (1, 2 pcs.) from rear seat cushion angle adjustment up/down motor M18/1m2, M18/2m2) and remove motor. Only if replacing rear seat cushion angle adjustment up/down motor (M18/1m2, M18/2m2).
- Install in the reverse order
- Perform function check on electric seat adjustment
- Bolt of seat adjustment motor: Nm 4
Removing and installing rear seat backrest lumbar support control valve (CODE 223b)
|
|
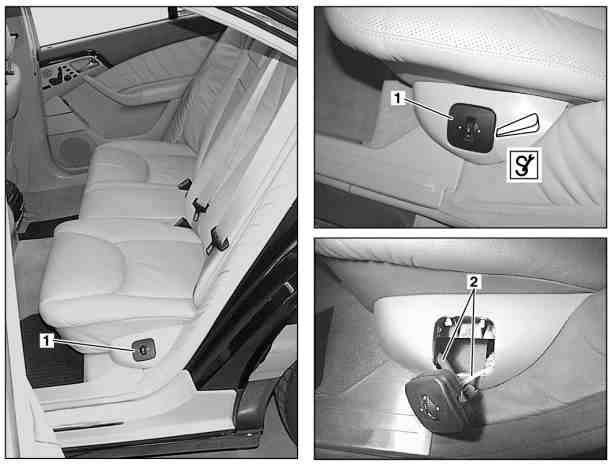
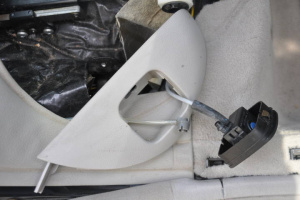
- Unclip control valve (1) from rear seat paneling using assembly wedge
- Remove pneumatic lines (2). Pay attention to line routing.
- Install in the reverse order
- Perform lumbar support function check
Removing and installing rear seat multicontour backrest control switch (CODE 224c)
- Unclip rear right (S103), left (S104) multicontour backrest switch from paneling (1) with assembly wedge
- Disconnect electrical connector
- Install in the reverse order
- Perform multicontour backrest switch function check
Removing and installing rear seat lumbar support air cushions (CODE 223b)
|
|
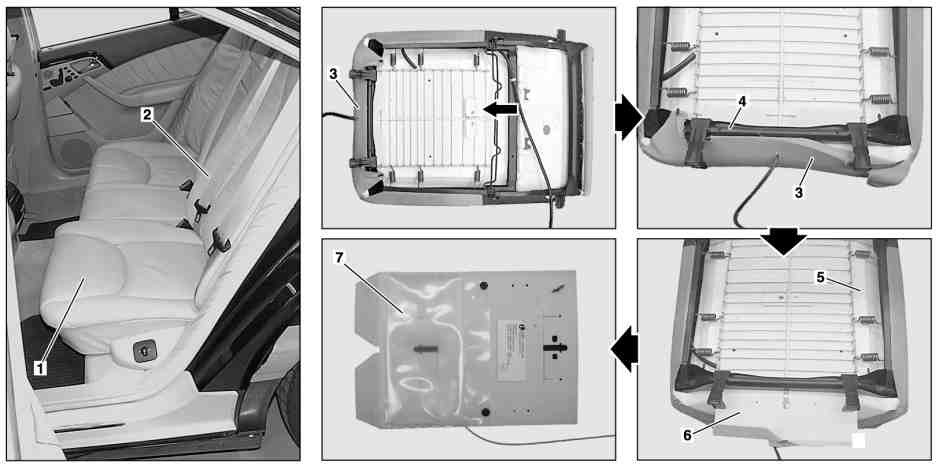
- Remove rear seat backrest (2)
- Place rear seat backrest (2) with upholstery (3) facing downwards on suitably clean surface
- Unclip seat cover (3) from backrest frame (4) clip groove. Push backrest frame (4) down to relieve strain on seat cover (3).
- Remove reinforcement plate (6) with air cushion (7). Ensure that reinforcement plate (6) is not damaged at clips (arrows). Push foam rubber (5) down to relieve strain on reinforcement plate (6). Installation: Hook clips (arrow) onto second cross-wire from top.
- Install in the reverse order
- Check pneumatic operation
Removing and installing rear seat multicontour backrest control module (CODE 224c)
- Remove stowage box (2) in rear seats
- Open catch and remove both pneumatic line onnecting rails (3) from rear multicontour backrest control module (N32/14). Release catch at pneumatic line connecting rail (3) using small screwdriver.
- Detach supply lines (4) from rear multicontour backrest control module (N32/14)
- Detach connector (6) from rear multicontour backrest control module (N32/14)
- Unscrew Torx screw (5)
- Swivel rear multicontour backrest control module (N32/14) with front upwards and move retaining clamps (8) downwards out of armrest frame (7) at same time. Do not break off retaining clamp (8).
- Install in the reverse order
- Perform multicontour backrest function check
Removing and installing rear seat stowage box (CODE 224c)
|
|
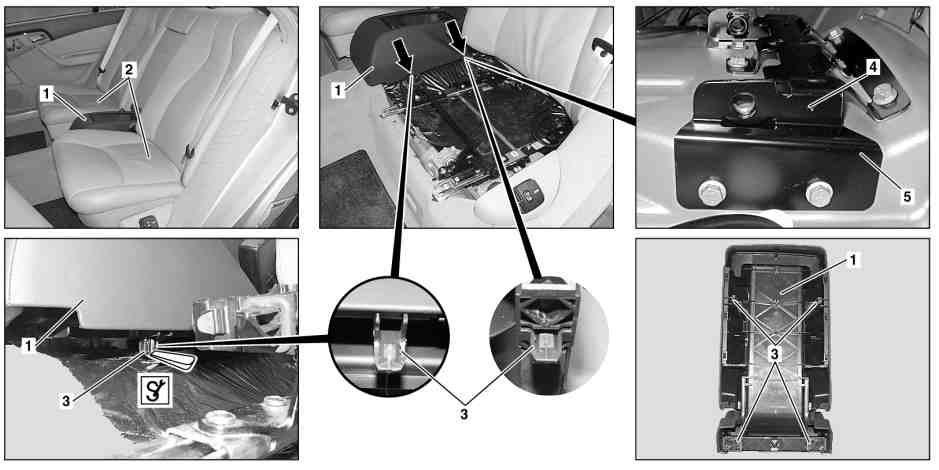
- Remove rear seat cushion (2) on left and right.
- Release rear seat stowage box (1). Release front retaining clamps (3, 2 pcs.) at both sides using assembly wedge and raise front of rear seat stowage box (1) slightly. Release retaining clamps in rear area (3, 2 pcs.) using relevant drift. (Insert drift in hole (4) in bracket (5)). Ensure that the retaining clamps (3) are not damaged when releasing the rear seat stowage box (1).
- Remove rear seat stowage box (1) from bracket (5).
- Install in the reverse order. Installation: First place rear seat stowage box (1) onto rear seat backrest and clip into position.
