WIS 20.20 Radiator, Coolant Hoses: Difference between revisions
Ricebubbles (talk | contribs) mNo edit summary |
Ricebubbles (talk | contribs) m (→Removal: Added more photos.) |
||
| (12 intermediate revisions by the same user not shown) | |||
| Line 1: | Line 1: | ||
Back to '''[[Index]]''' | |||
==Description - Radiator== | ==Description - Radiator== | ||
TBD | TBD | ||
| Line 8: | Line 10: | ||
==Part Numbers - Coolant Hoses== | ==Part Numbers - Coolant Hoses== | ||
* #10 | * #10 A2208321794 or A 220 832 17 94 Hose from engine to connecting tube. | ||
* #20 | * #20 A2208320015 or A 220 832 00 15 Pipeline: feed thru partition panel with option 875 (heated screen washing system). | ||
* #25 | * #25 A2208320115 or A 220 832 01 15 Pipeline: feed thru partition panel with options 228/490/582 (auxiliary heater, elimination windshield heating, air conditioner in rear). | ||
* #25 | * #25 A2208320115 or A 220 832 01 15 Pipeline: feed thru partition panel. | ||
* #30 | * #30 A2208320194 or A 220 832 01 94 Hose from connecting tube to heat exchanger with option 228 (auxiliary heater). | ||
* #30 | * #30 A2208320194 or A 220 832 01 94 Hose from connecting tube to heat exchanger. | ||
* #170 | * #170 A2208320994 or A 220 832 09 94 Hose feed pane washer water heating. | ||
* #170 | * #170 A2208320994 or A 220 832 09 94 Hose feed pane washer water heating with option 582+875 (air conditioning in the rear, heated screen washing system). | ||
==Issues - Radiator== | |||
For how to drain radiator and replace coolant see [[WIS 20.00 General]]. | |||
==Issues - Coolant Hoses== | ==Issues - Coolant Hoses== | ||
===Leak in Pipeline feed thru partition panel=== | ===Leak in Pipeline feed thru partition panel=== | ||
A common fault with the Hot Water Lines is a slight coolant leak caused by a small crack in the #25 Pipeline: feed thru partition panel. | A common fault with the Hot Water Lines is a slight coolant leak caused by a small crack in the #20 or #25 Pipeline: feed thru partition panel, depending on options fitted. | ||
The feed thru pipe is made of plastic and must get brittle with age and heat and develops a slight split or crack. | The feed thru pipe is made of plastic and must get brittle with age and heat and develops a slight split or crack. | ||
| Line 25: | Line 30: | ||
[[File:S500 Coolant Leak Engine Side.JPG|500px|center]] | [[File:S500 Coolant Leak Engine Side.JPG|500px|center]] | ||
And with thanks to BenzWorld Member 'SChalmers' here is the location for the #25 Pipeline: feed thru partition panel. It seems to be the same for both RHD and LHD cars. | The issue can manifest itself by either, the low coolant warning light coming on, or smoke coming from the left front wheel area as the coolant sprays on the exhaust, or both. Thorough inspection of the pipe location from above with a bright flashlight will most likely show coolant leaking from the feed through pipe. Inspection from underneath the vehicle will reveal coolant baked onto the left exhaust system. | ||
The whole replacement process can progress with no major problems, but at almost every step expect to encounter a minor issue. The method below should help overcome these irritations. STAR WIS is useless for this procedure. | |||
Sometimes it is not necessary to drain the remaining coolant if the level has reached below the feed thru pipe. In that case there is no more leakage when the fitting is disconnected. Expect a total coolant loss from driving and repair of about 3L (3 quarts) and have some new fluid on hand before starting. | |||
And with thanks to BenzWorld Member 'SChalmers' here is the location for the #20 and #25 Pipeline: feed thru partition panel. It seems to be the same for both RHD and LHD cars. | |||
[[File:W220 Pipeline feed thru partition panel location.jpg|500px|center]] | [[File:W220 Pipeline feed thru partition panel location.jpg|500px|center]] | ||
| Line 31: | Line 42: | ||
The diameter of the feed thru pipe is 20mm and some enthusiasts have fashioned a replacement using copper pipe and a 45 degree elbow. | The diameter of the feed thru pipe is 20mm and some enthusiasts have fashioned a replacement using copper pipe and a 45 degree elbow. | ||
However a genuine M-B replacement part is about $ | However a genuine M-B replacement part is about US$11. | ||
[[File:W220 Pipeline feed thru partition panel closeup.jpg|500px|center]] | [[File:W220 Pipeline feed thru partition panel closeup.jpg|500px|center]] | ||
===DIY Replacement for Pipeline feed thru partition panel=== | ===DIY Replacement for Pipeline feed thru partition panel=== | ||
====Location==== | |||
The Pipeline feed thru partition panel is connected to a heater hose with a hose clamp inside the fake firewall chamber. | |||
[[File:W220 Heater hose inside fake firewll area.JPG|500px|center|thumb|none|Heater hose inside fake firewall chamber]] | |||
====Removal==== | |||
# Firstly note the position of the wiper blades. There are two marks on the front windscreen which identify the parked positions of the windscreen wiper blades. The marks are a tiny window in the black undercoating, about a 1.5mm x 10mm clear slit in the black coating. One mark is on the right side and one in the centre of the windscreen. There is no mark on the left side. The two marks can be used to reinstall the wiper mechanisms if they have been removed. Note it is obvious that the same windscreen is used for LHD and RHD vehicles, hence the marks are only really useful for LHD cars. For RHD cars the position of the right mark can be measured and transferred to the left side as a guide. If necessary (RHD cars) mark the wiper positions on masking tape on the windscreen and the plastic panel. See [https://w220.ee/Windshield_wiper#Windshield_wiper_park_position] '''TIP:''' If there is a dirt mark on the windscreen produced by the wiper blades, this will serve the same purpose. | |||
#: [[File:W220 Windscreen Wiper Park Position Markings.JPG|500px|center|thumb|none|Right side and center mark (RHD vehicle)]] | |||
# Remove the windscreen wipers. Note the wipers may be hard to remove. A small two-arm puller had them off quickly, with no damage. When replacing them add a small bit of anti-seize grease to make it easier next time. | |||
#: [[File:W220 Windscreen Wiper Assembly Removed.JPG|500px|center|thumb|none|Windscreen Wiper Assembly Removed From Car]] | |||
# Remove the plastic panel below the windscreen wipers. '''Note:''' Removing the Windscreen Wiper Rain Protector/Panel/Guard can be rather difficult to fully release without doing some damage as the Rain Protector/Panel/Guard is under a rubber surround on both ends. The technique is to gently pry the flange on the back of the protector out of a channel at the bottom of the windshield. | |||
#: [[File:W220 plastic panel beneath windscreen wipers.JPG|500px|center|thumb|none|Rain Protector/Panel/Guard beneath windscreen wipers (RHD car)]] | |||
# Undo the four plastic screw/rivets. | |||
# Carefully prise up the panel starting from the center with a wide plastic spatula type tool, levering in a direction normal or away from the glass windscreen. '''Note:''' The panel is held in place by a 6mm strip which is a friction fit into a groove in the channel at the bottom of the windscreen. | |||
# Gingerly bend the Rain Protector/Panel/Guard up in the center enough to slip the ends out from under the rubber. | |||
#: [[File:W220 Groove in channel for plastic panel beneath windscreen wipers.JPG|500px|center]] | |||
# Then on a RHD car remove the ACC air intake chamber. | |||
#: [[File:W220 ACC air intake box.JPG|500px|center]] | |||
# On LHD cars you may need more room to work on the hose clamps, so disconnect the brake booster vacuum line, and remove the short piece from the booster and the bulkhead. It is also a good idea to take off the electrical harness from its clamp just over the plastic fitting. | |||
# Open the drain valve under the radiator and catch the coolant in a clean container of at least 10L capacity. '''TIP:''' Some enthisiasts have found it is not necessary to drain the coolant as it is probably already below the level where it will spill out. | |||
# Release the hose clamps on either side of the feed thru pipe. '''TIP:''' A pair of long pliers with bent needle-nose jaws do a good job of squeezing the hose clamps. | |||
#: [[File:W220 Pipeline Hose Clamp Removal.JPG|500px|center]] | |||
#: [[File:W220 Pipeline Hose Clamp Removal 2.JPG|500px|center]] | |||
# Release the feed thru pipe by twisting it a few degrees clockwise looking from the front and then remove it by pulling it towards the engine bay. | |||
#: [[File:W220 Pipeline Feed Through Pipe.JPG|500px|center]] | |||
Filter the recycled coolant into a suitable clean container and then reintroduce into the cooling system using a vacuum refiller to eliminate any trapped air. For the vacuum method see [[WIS 20.00 General|WIS 20.00 General]]. | ====Reinstallation==== | ||
Reinstallation of the replacement feed thru pipe is the reverse of the above but note these extra points. | |||
# The Pipeline feed thru partition panel is locked into the fake firewall panel with tabs. It can be a pain to reinstall. Inserting the replacement is no problem, but it can stoutly resist rotating to the locked position so be careful to avoid breaking it. A close examination will show tiny ridges at the bottom of the slots on the locking tabs. '''TIP:''' If you are prepared to take the small risk and decide that there is no way that the fitting could ever rotate enough to be a problem with three hoses attached, then a minute or so with a small file will remove the ridges, and the fitting will turn easily to the locked position. | |||
# Reinstallation of the Rain Protector/Panel/Guard is a real pain and is much easier done with two people. It is difficult to bend the protector under the hood to get the holes over the wiper spindles without damaging the rubber around the holes. '''TIP:''' Use a flat blade to hold up the rubber on the windshield while bending the protector enough to work its end under the rubber. | |||
# Filter the recycled coolant into a suitable clean container and then reintroduce into the cooling system using a vacuum refiller to eliminate any trapped air. For the vacuum method see [[WIS 20.00 General|WIS 20.00 General]]. | |||
Latest revision as of 12:07, 30 July 2020
Back to Index
Description - Radiator
TBD
Description - Coolant Hoses
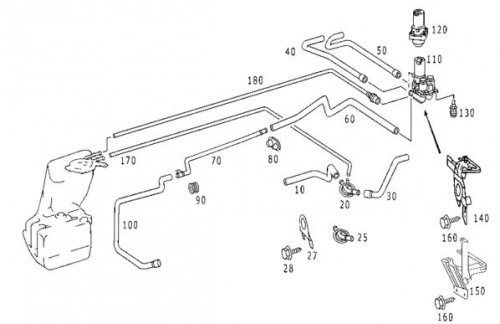
These are the Coolant Hoses including the Hot Water lines in a W220 M113 engine.
Part Numbers - Coolant Hoses
- #10 A2208321794 or A 220 832 17 94 Hose from engine to connecting tube.
- #20 A2208320015 or A 220 832 00 15 Pipeline: feed thru partition panel with option 875 (heated screen washing system).
- #25 A2208320115 or A 220 832 01 15 Pipeline: feed thru partition panel with options 228/490/582 (auxiliary heater, elimination windshield heating, air conditioner in rear).
- #25 A2208320115 or A 220 832 01 15 Pipeline: feed thru partition panel.
- #30 A2208320194 or A 220 832 01 94 Hose from connecting tube to heat exchanger with option 228 (auxiliary heater).
- #30 A2208320194 or A 220 832 01 94 Hose from connecting tube to heat exchanger.
- #170 A2208320994 or A 220 832 09 94 Hose feed pane washer water heating.
- #170 A2208320994 or A 220 832 09 94 Hose feed pane washer water heating with option 582+875 (air conditioning in the rear, heated screen washing system).
Issues - Radiator
For how to drain radiator and replace coolant see WIS 20.00 General.
Issues - Coolant Hoses
Leak in Pipeline feed thru partition panel
A common fault with the Hot Water Lines is a slight coolant leak caused by a small crack in the #20 or #25 Pipeline: feed thru partition panel, depending on options fitted.
The feed thru pipe is made of plastic and must get brittle with age and heat and develops a slight split or crack.
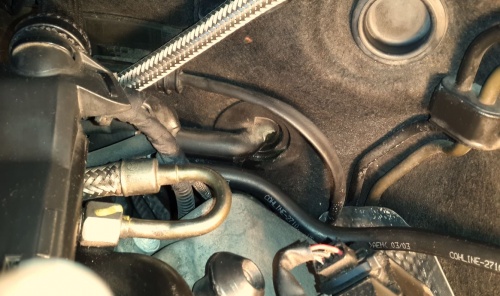
The issue can manifest itself by either, the low coolant warning light coming on, or smoke coming from the left front wheel area as the coolant sprays on the exhaust, or both. Thorough inspection of the pipe location from above with a bright flashlight will most likely show coolant leaking from the feed through pipe. Inspection from underneath the vehicle will reveal coolant baked onto the left exhaust system.
The whole replacement process can progress with no major problems, but at almost every step expect to encounter a minor issue. The method below should help overcome these irritations. STAR WIS is useless for this procedure.
Sometimes it is not necessary to drain the remaining coolant if the level has reached below the feed thru pipe. In that case there is no more leakage when the fitting is disconnected. Expect a total coolant loss from driving and repair of about 3L (3 quarts) and have some new fluid on hand before starting.
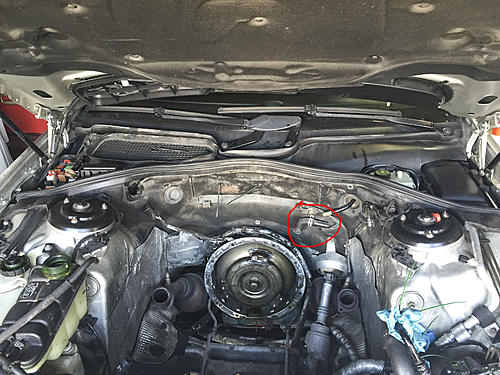
And with thanks to BenzWorld Member 'SChalmers' here is the location for the #20 and #25 Pipeline: feed thru partition panel. It seems to be the same for both RHD and LHD cars.
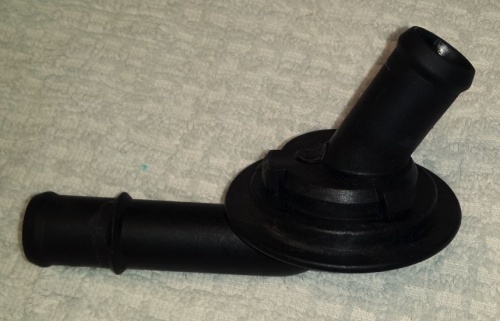
The diameter of the feed thru pipe is 20mm and some enthusiasts have fashioned a replacement using copper pipe and a 45 degree elbow.
However a genuine M-B replacement part is about US$11.
DIY Replacement for Pipeline feed thru partition panel
Location
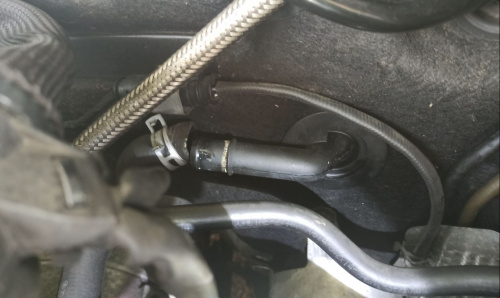
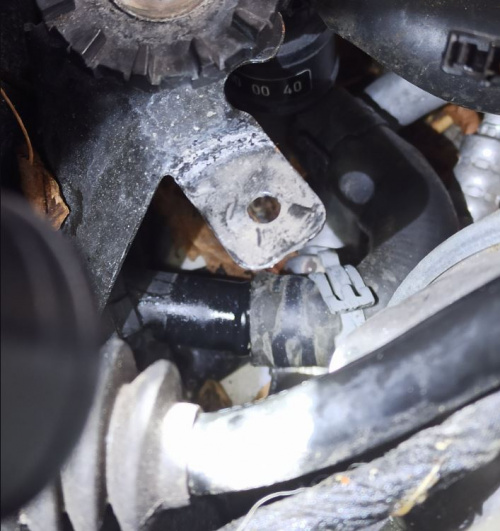
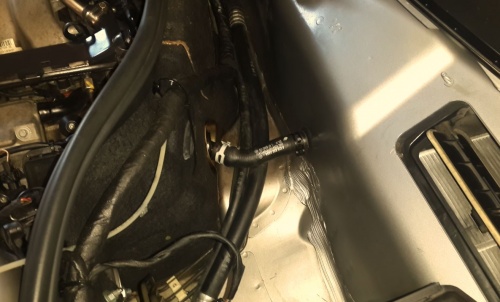
The Pipeline feed thru partition panel is connected to a heater hose with a hose clamp inside the fake firewall chamber.
Removal
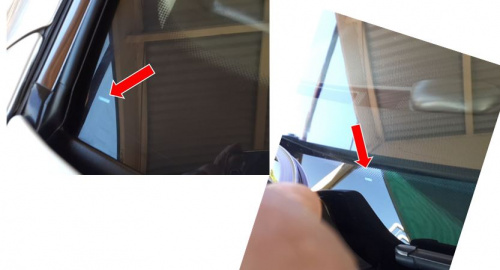
- Firstly note the position of the wiper blades. There are two marks on the front windscreen which identify the parked positions of the windscreen wiper blades. The marks are a tiny window in the black undercoating, about a 1.5mm x 10mm clear slit in the black coating. One mark is on the right side and one in the centre of the windscreen. There is no mark on the left side. The two marks can be used to reinstall the wiper mechanisms if they have been removed. Note it is obvious that the same windscreen is used for LHD and RHD vehicles, hence the marks are only really useful for LHD cars. For RHD cars the position of the right mark can be measured and transferred to the left side as a guide. If necessary (RHD cars) mark the wiper positions on masking tape on the windscreen and the plastic panel. See [1] TIP: If there is a dirt mark on the windscreen produced by the wiper blades, this will serve the same purpose.
- Remove the windscreen wipers. Note the wipers may be hard to remove. A small two-arm puller had them off quickly, with no damage. When replacing them add a small bit of anti-seize grease to make it easier next time.
- Remove the plastic panel below the windscreen wipers. Note: Removing the Windscreen Wiper Rain Protector/Panel/Guard can be rather difficult to fully release without doing some damage as the Rain Protector/Panel/Guard is under a rubber surround on both ends. The technique is to gently pry the flange on the back of the protector out of a channel at the bottom of the windshield.
- Undo the four plastic screw/rivets.
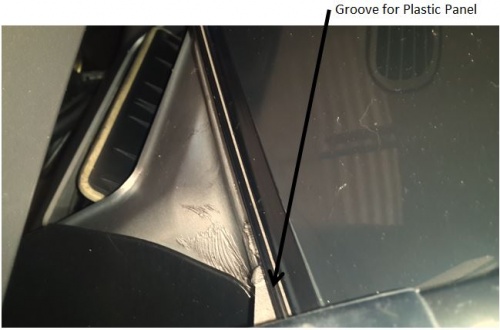
- Carefully prise up the panel starting from the center with a wide plastic spatula type tool, levering in a direction normal or away from the glass windscreen. Note: The panel is held in place by a 6mm strip which is a friction fit into a groove in the channel at the bottom of the windscreen.
- Gingerly bend the Rain Protector/Panel/Guard up in the center enough to slip the ends out from under the rubber.
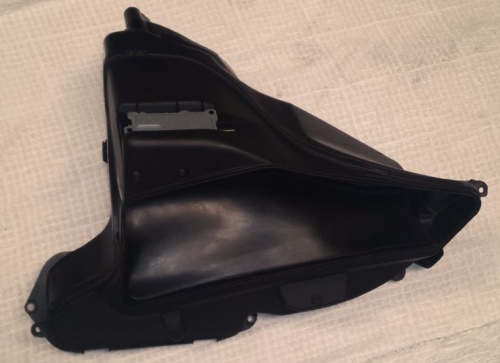
- Then on a RHD car remove the ACC air intake chamber.
- On LHD cars you may need more room to work on the hose clamps, so disconnect the brake booster vacuum line, and remove the short piece from the booster and the bulkhead. It is also a good idea to take off the electrical harness from its clamp just over the plastic fitting.
- Open the drain valve under the radiator and catch the coolant in a clean container of at least 10L capacity. TIP: Some enthisiasts have found it is not necessary to drain the coolant as it is probably already below the level where it will spill out.
- Release the hose clamps on either side of the feed thru pipe. TIP: A pair of long pliers with bent needle-nose jaws do a good job of squeezing the hose clamps.
- Release the feed thru pipe by twisting it a few degrees clockwise looking from the front and then remove it by pulling it towards the engine bay.
Reinstallation
Reinstallation of the replacement feed thru pipe is the reverse of the above but note these extra points.
- The Pipeline feed thru partition panel is locked into the fake firewall panel with tabs. It can be a pain to reinstall. Inserting the replacement is no problem, but it can stoutly resist rotating to the locked position so be careful to avoid breaking it. A close examination will show tiny ridges at the bottom of the slots on the locking tabs. TIP: If you are prepared to take the small risk and decide that there is no way that the fitting could ever rotate enough to be a problem with three hoses attached, then a minute or so with a small file will remove the ridges, and the fitting will turn easily to the locked position.
- Reinstallation of the Rain Protector/Panel/Guard is a real pain and is much easier done with two people. It is difficult to bend the protector under the hood to get the holes over the wiper spindles without damaging the rubber around the holes. TIP: Use a flat blade to hold up the rubber on the windshield while bending the protector enough to work its end under the rubber.
- Filter the recycled coolant into a suitable clean container and then reintroduce into the cooling system using a vacuum refiller to eliminate any trapped air. For the vacuum method see WIS 20.00 General.
