Radiator: Difference between revisions
(→Transmission cooling hoses: Rusted transmission cooler supply hose) |
|||
| (9 intermediate revisions by the same user not shown) | |||
| Line 1: | Line 1: | ||
==Radiator== | |||
== | === Parts === | ||
Radiator part number is A2205002403. MAHLE/BEHR CR304000S (180 EUR) should be OEM. | |||
[[File:W220_radiator_A2205002403_MAHLE_CR304000S.jpg|thumb|none|MAHLE CR304000S radiator]] | |||
A new radiator unit comes as a bare metal/plastic part. | |||
The package includes only two replacement sealing rings (A0279971848) for coolant hoses. | |||
This means that other radiator attachment parts must be taken from the old radiator. | |||
In particular: | |||
* top (A2205050186) and bottom (A2205050386) boots; | |||
* left (A2205051188) and right (A2205051288) covers; | |||
* 4 square nuts (A1409900052) for attaching condenser and [[engine fan]] to radiator; | |||
* 1 square nut for attaching AC condenser line to radiator. | |||
==== Square nuts (condenser and fan to radiator) ==== | |||
Condenser and [[engine fan]] is attached to radiator with M6 bolts that | |||
are screwed into square (rectangular) nuts placed into radiator openings. | |||
In total, there are 4 rectangular nuts: | |||
* 2 nuts for attaching [[engine fan]] (installed vertically); | |||
* and 2 nuts for attaching condenser (installed horizontally). | |||
The part number for a single nut is A1409900052 (5 EUR). | |||
Non-OE nuts can be purchased by searching for "Threaded plate M6, 15x10x5". | |||
{| | |||
|[[File:W220_radiator_square_nuts_A1409900052.jpg|thumb|none|Square nut (A1409900052)]] | |||
|[[File:W220_radiator_square_nut_A1409900052_installed.jpg|thumb|none|Nut installed into radiator opening]] | |||
|} | |||
==== Square nut (AC lines to radiator) ==== | |||
AC lines are attached to radiator with a single square M6 nut 10x10x3. | |||
[[EPC]] does not seem to have a part number for it. | |||
{| | |||
|[[File:W220_radiator_square_nut_AC_condenser_lines.jpg|thumb|none|Square nut (for AC lines)]] | |||
|[[File:W220_radiator_square_nut_AC_condenser_lines_installed.jpg|thumb|none|Nut installed into radiator opening]] | |||
|[[File:W220_radiator_AC_condenser_lines_bolt.jpg|thumb|none|AC lines attached to radiator)]] | |||
|} | |||
=== Remove/install radiator === | === Remove/install radiator === | ||
| Line 28: | Line 70: | ||
* 7 - Connection of coolant line (radiator coolant pump) | * 7 - Connection of coolant line (radiator coolant pump) | ||
* 8 - Retaining nuts for condenser | * 8 - Retaining nuts for condenser | ||
* 9 - | * 9 - [[Engine fan]] shroud | ||
* 10 - Connection for coolant line (radiator expansion reservoir) | * 10 - Connection for coolant line (radiator expansion reservoir) | ||
|} | |} | ||
| Line 35: | Line 77: | ||
# Remove lower engine compartment paneling | # Remove lower engine compartment paneling | ||
# Drain coolant at radiator (1). Open radiator drain plug (3). | # Drain coolant at radiator (1). Open radiator drain plug (3). | ||
# Disconnect automatic oil lines at connection (5, 6) at radiator (1). Seal off oil lines. | # Disconnect automatic transmission oil lines at connection (5, 6) at radiator (1). Seal off oil lines. | ||
# Disconnect coolant line (radiator-thermostat housing) (2) at radiator (1) | # Disconnect coolant line (radiator-thermostat housing) (2) at radiator (1) | ||
# Disconnect connection of coolant line (radiator-coolant pump) (7), connection of coolant line (radiator-expansion reservoir) (10) at radiator (1) | # Disconnect connection of coolant line (radiator-coolant pump) (7), connection of coolant line (radiator-expansion reservoir) (10) at radiator (1) | ||
# Remove fan shroud (9) | # Remove [[engine fan]] shroud (9) | ||
# Detach condenser at nuts (8) at radiator | # Detach condenser at nuts (8) at radiator | ||
# Detach bracket of radiator (4) | # Detach AC line at nut (arrow) at radiator | ||
# Detach bracket of radiator (4) | |||
# Take out radiator (1). Installation: the studs on the radiator must be located at the bottom in the rubber mounts on the crossmember. | # Take out radiator (1). Installation: the studs on the radiator must be located at the bottom in the rubber mounts on the crossmember. | ||
# Install in the reverse order | # Install in the reverse order | ||
| Line 46: | Line 89: | ||
# Inspect cooling system for leaks | # Inspect cooling system for leaks | ||
==Description - | {| | ||
|{{#ev:youtube|https://www.youtube.com/watch?v=3gYMXxspheU|320|center|W220 Mercedes Radiator Removal|frame}} | |||
|} | |||
== Transmission cooling hoses == | |||
[[File:W220_radiator_transmission_cooling_pipes.png|500px]] | |||
The radiator includes a built-in transmission fluid chamber, which is used to cool the hot transmission fluid coming from the automatic transmission. The upper port on the radiator serves as the supply line (hot fluid in), while the lower port functions as the return line, sending the cooled fluid back to the transmission. | |||
{| class="wikitable" | |||
! Part | |||
! Part no. | |||
! Image | |||
! Description | |||
|- | |||
|45 | |||
|A0249978182 | |||
A2209971652 | |||
A0199978382 (replaced by A2209971652) | |||
TRUCKTEC AUTOMOTIVE 02.67.101 (10 EUR) | |||
|[[File:W220_transmission-oil-cooler-return-hose-A0249978182.jpg|200px]] | |||
|Transmission oil cooler return hose (bottom). From engine junction to oil cooler. (Used on 5-speed transmission only.) | |||
|- | |||
|40 | |||
|A2202700196 | |||
|[[File:W220_line_from_engine_junction_to_transmission_A2202700196.jpg|200px]] | |||
|Transmission oil cooler return hose (bottom). From engine junction to transmission. (Used on 5-speed transmission only.) | |||
|- | |||
|40 | |||
|A2202704096 | |||
|[[File:W220_return_line_from_transmission_to_oil_cooler_A2202704096.jpg|200px]] | |||
|Transmission oil cooler return hose (bottom). From oil cooler to transmission. (Used on 7-speed transmission only.) | |||
|- | |||
|910 | |||
|A2202700696 (155 EUR) | |||
|[[File:W220_transmission-oil-cooler-supply-hose-A2202700696.jpg|200px]] | |||
|Transmission oil cooler supply hose (top). (Used on both 5-speed and 7-speed transmissions.) | |||
|} | |||
=== Broken transmission cooler hose at radiator === | |||
The aluminum connections on a car radiator that serve as ports for the transmission fluid cooler often oxidize and become fragile over time due to a combination of chemical, environmental, and mechanical factors. | |||
It’s not uncommon for the transmission cooler port on a radiator to weaken and break off over time, either on its own or during an attempt to remove the cooler line fitting. | |||
When this happens, it can lead to a significant transmission fluid leak. If the hexagonal fitting (the radiator port nut) breaks off (as shown in the image below ) the internal transmission cooler (sometimes referred to as the "transmission fluid chamber" or "cooler tube") can become loose. | |||
This may result in coolant leaking from the area between the transmission cooler tube and the main body (or tank) of the radiator. | |||
To remove the oxidized remnants of the radiator port from the transmission cooler hose fitting, position the flat side of the fitting nut against a vise. Gently tap the top edge of the nut with a hammer, rotating the nut gradually and repeating the process around its entire circumference. This helps break down the corroded aluminum residue. Once the aluminum has been loosened sufficiently, you should be able to extract the broken port using pliers. | |||
{| | |||
|[[File:W220_transmission_cooler_connector_broken_on_radiator.jpg|thumb|none|Hose fitting broken off at radiator]] | |||
|[[File:W220_radiator_broken_transmission_cooler_connector.jpg|thumb|none|Broken transmission cooler port on radiator]] | |||
[[File:W220_extracting_radiator_remains_from_hose_connector.jpg|thumb|none|Radiator port remnants extracted from hose fitting]] | |||
|} | |||
=== Rusted transmission cooler supply hose === | |||
[[ | Transmission cooler supply line, which is attached to [[engine fan]], over years develop rust and can lead to transmission fluid leaks. | ||
== | {| | ||
* #10 A2208321794 | |[[File:W220_rusted_transmission_cooler_supply_line.jpg|thumb|none|Rusted transmission cooler line]] | ||
* #20 A2208320015 | |} | ||
* #25 A2208320115 | |||
* #25 A2208320115 | The original W220 part (A2202700696) costs more than 150 EUR. | ||
* #30 A2208320194 | However, companies providing hoses and fittings for hydraulics (e.g., Hydroscand) | ||
* #30 A2208320194 | can make an aftermarket rubber hose with metal fittings for ~25 EUR. | ||
* #170 A2208320994 | |||
* #170 A2208320994 | Parts: | ||
* Hose: 16mm 75cm 1SN 3/8" | |||
* Fitting: male 3/8" AGM M16x1,5 (60° cone) | |||
* Fitting: female 3/8" 90° DKM M16x1,5 (60° cone) | |||
{| | |||
|[[File:W220_transmission_cooler_supply_line_original_and_rubber.jpg|thumb|none|Original and rubber hoses]] | |||
|[[File:W220_transmission_cooler_supply_line_original_and_rubber2.jpg|thumb|none|Male fitting]] | |||
|[[File:W220_transmission_cooler_supply_line_original_and_rubber3.jpg|thumb|none|Female fitting]] | |||
|} | |||
{| | |||
|[[File:W220_rubber_transmission_cooler_supply_line_installed1.jpg|thumb|none|Rubber hose attached to radiator]] | |||
|[[File:W220_rubber_transmission_cooler_supply_line_installed2.jpg|thumb|none|Rubber hose attached to fan]] | |||
|} | |||
== Coolant hoses == | |||
[[File:S500 Hot Water Lines.JPG|thumb|none|Hot water lines on [[M113]]]] | |||
Part numbers: | |||
* #10 A2208321794 - Hose from engine to connecting tube | |||
* #20 A2208320015 - Pipeline: feed thru partition panel with option 875 (heated screen washing system). | |||
* #25 A2208320115 - Pipeline: feed thru partition panel with options 228/490/582 (auxiliary heater, elimination windshield heating, air conditioner in rear). | |||
* #25 A2208320115 - Pipeline: feed thru partition panel. | |||
* #30 A2208320194 - Hose from connecting tube to heat exchanger with option 228 (auxiliary heater). | |||
* #30 A2208320194 - Hose from connecting tube to heat exchanger. | |||
* #170 A2208320994 - Hose feed pane washer water heating. | |||
* #170 A2208320994 - Hose feed pane washer water heating with option 582+875 (air conditioning in the rear, heated screen washing system). | |||
=== Rusted coolant hose c-clip === | |||
The large coolant hoses are attached to radiator with a quickfix type c-clip. | |||
Rust can damage the original c-clip leading to risk of hose detachment. | |||
[[EPC]] does not have a separate part for c-clip only. | |||
However, a compatible aftermarket 41.5mm c-clip can be purchased on eBay. | |||
{| | |||
|[[File:W220_coolant_hose_rusted_c-clip.jpg|thumb|none|Hose with rusted c-clip]] | |||
|[[File:W220_coolant_hose_c-clip_41.5mm.png|thumb|none|Aftermarket 41.5mm c-clip]] | |||
|} | |||
{| | |||
|[[File:W220_coolant_hose_rusted_new_c-clip.jpg|thumb|none|Rusty original and aftermarket c-clips]] | |||
|[[File:W220_coolant_hose_c-clip_installed.jpg|thumb|none|C-clip installed on hose (in locked position)]] | |||
|} | |||
== | === Leak in pipeline feed thru partition panel === | ||
A common fault with the hot water lines is a slight coolant leak caused by a small crack in the #20 or #25 Pipeline: feed thru partition panel, depending on options fitted. | |||
A common fault with the | |||
The feed thru pipe is made of plastic and must get brittle with age and heat and develops a slight split or crack. | The feed thru pipe is made of plastic and must get brittle with age and heat and develops a slight split or crack. | ||
[[File:S500 Coolant Leak Engine Side.JPG| | [[File:S500 Coolant Leak Engine Side.JPG|thumb|none]] | ||
The issue can manifest itself by either, the low coolant warning light coming on, or smoke coming from the left front wheel area as the coolant sprays on the exhaust, or both. Thorough inspection of the pipe location from above with a bright flashlight will most likely show coolant leaking from the feed through pipe. Inspection from underneath the vehicle will reveal coolant baked onto the left exhaust system. | The issue can manifest itself by either, the low coolant warning light coming on, or smoke coming from the left front wheel area as the coolant sprays on the exhaust, or both. Thorough inspection of the pipe location from above with a bright flashlight will most likely show coolant leaking from the feed through pipe. Inspection from underneath the vehicle will reveal coolant baked onto the left exhaust system. | ||
| Line 80: | Line 226: | ||
And with thanks to BenzWorld Member 'SChalmers' here is the location for the #20 and #25 Pipeline: feed thru partition panel. It seems to be the same for both RHD and LHD cars. | And with thanks to BenzWorld Member 'SChalmers' here is the location for the #20 and #25 Pipeline: feed thru partition panel. It seems to be the same for both RHD and LHD cars. | ||
[[File:W220 Pipeline feed thru partition panel location.jpg| | [[File:W220 Pipeline feed thru partition panel location.jpg|thumb|none]] | ||
The diameter of the feed thru pipe is 20mm and some enthusiasts have fashioned a replacement using copper pipe and a 45 degree elbow. | The diameter of the feed thru pipe is 20mm and some enthusiasts have fashioned a replacement using copper pipe and a 45 degree elbow. | ||
| Line 86: | Line 232: | ||
However a genuine M-B replacement part is about US$11. | However a genuine M-B replacement part is about US$11. | ||
[[File:W220 Pipeline feed thru partition panel closeup.jpg| | [[File:W220 Pipeline feed thru partition panel closeup.jpg|thumb|none]] | ||
'''DIY Replacement for Pipeline feed thru partition panel:''' | |||
The Pipeline feed thru partition panel is connected to a heater hose with a hose clamp inside the fake firewall chamber. | The Pipeline feed thru partition panel is connected to a heater hose with a hose clamp inside the fake firewall chamber. | ||
[[File:W220 Heater hose inside fake firewll area.JPG | [[File:W220 Heater hose inside fake firewll area.JPG|thumb|none|Heater hose inside fake firewall chamber]] | ||
'''Removal:''' | |||
# Firstly note the position of the wiper blades. There are two marks on the front windscreen which identify the parked positions of the windscreen wiper blades. The marks are a tiny window in the black undercoating, about a 1.5mm x 10mm clear slit in the black coating. One mark is on the right side and one in the centre of the windscreen. There is no mark on the left side. The two marks can be used to reinstall the wiper mechanisms if they have been removed. Note it is obvious that the same windscreen is used for LHD and RHD vehicles, hence the marks are only really useful for LHD cars. For RHD cars the position of the right mark can be measured and transferred to the left side as a guide. If necessary (RHD cars) mark the wiper positions on masking tape on the windscreen and the plastic panel. See [https://w220.ee/Windshield_wiper#Windshield_wiper_park_position] '''TIP:''' If there is a dirt mark on the windscreen produced by the wiper blades, this will serve the same purpose. | # Firstly note the position of the wiper blades. There are two marks on the front windscreen which identify the parked positions of the windscreen wiper blades. The marks are a tiny window in the black undercoating, about a 1.5mm x 10mm clear slit in the black coating. One mark is on the right side and one in the centre of the windscreen. There is no mark on the left side. The two marks can be used to reinstall the wiper mechanisms if they have been removed. Note it is obvious that the same windscreen is used for LHD and RHD vehicles, hence the marks are only really useful for LHD cars. For RHD cars the position of the right mark can be measured and transferred to the left side as a guide. If necessary (RHD cars) mark the wiper positions on masking tape on the windscreen and the plastic panel. See [https://w220.ee/Windshield_wiper#Windshield_wiper_park_position] '''TIP:''' If there is a dirt mark on the windscreen produced by the wiper blades, this will serve the same purpose. | ||
#: [[File:W220 Windscreen Wiper Park Position Markings.JPG | #: [[File:W220 Windscreen Wiper Park Position Markings.JPG|thumb|none|Right side and center mark (RHD vehicle)]] | ||
# Remove the windscreen wipers. Note the wipers may be hard to remove. A small two-arm puller had them off quickly, with no damage. When replacing them add a small bit of anti-seize grease to make it easier next time. | # Remove the windscreen wipers. Note the wipers may be hard to remove. A small two-arm puller had them off quickly, with no damage. When replacing them add a small bit of anti-seize grease to make it easier next time. | ||
#: [[File:W220 Windscreen Wiper Assembly Removed.JPG | #: [[File:W220 Windscreen Wiper Assembly Removed.JPG|thumb|none|Windscreen Wiper Assembly Removed From Car]] | ||
# Remove the plastic panel below the windscreen wipers. '''Note:''' Removing the Windscreen Wiper Rain Protector/Panel/Guard can be rather difficult to fully release without doing some damage as the Rain Protector/Panel/Guard is under a rubber surround on both ends. The technique is to gently pry the flange on the back of the protector out of a channel at the bottom of the windshield. | # Remove the plastic panel below the windscreen wipers. '''Note:''' Removing the Windscreen Wiper Rain Protector/Panel/Guard can be rather difficult to fully release without doing some damage as the Rain Protector/Panel/Guard is under a rubber surround on both ends. The technique is to gently pry the flange on the back of the protector out of a channel at the bottom of the windshield. | ||
#: [[File:W220 plastic panel beneath windscreen wipers.JPG | #: [[File:W220 plastic panel beneath windscreen wipers.JPG|thumb|none|Rain Protector/Panel/Guard beneath windscreen wipers (RHD car)]] | ||
# Undo the four plastic screw/rivets. | # Undo the four plastic screw/rivets. | ||
# Carefully prise up the panel starting from the center with a wide plastic spatula type tool, levering in a direction normal or away from the glass windscreen. '''Note:''' The panel is held in place by a 6mm strip which is a friction fit into a groove in the channel at the bottom of the windscreen. | # Carefully prise up the panel starting from the center with a wide plastic spatula type tool, levering in a direction normal or away from the glass windscreen. '''Note:''' The panel is held in place by a 6mm strip which is a friction fit into a groove in the channel at the bottom of the windscreen. | ||
# Gingerly bend the Rain Protector/Panel/Guard up in the center enough to slip the ends out from under the rubber. | # Gingerly bend the Rain Protector/Panel/Guard up in the center enough to slip the ends out from under the rubber. | ||
#: [[File:W220 Groove in channel for plastic panel beneath windscreen wipers.JPG| | #: [[File:W220 Groove in channel for plastic panel beneath windscreen wipers.JPG|thumb|none]] | ||
# Then on a RHD car remove the ACC air intake chamber. | # Then on a RHD car remove the ACC air intake chamber. | ||
#: [[File:W220 ACC air intake box.JPG| | #: [[File:W220 ACC air intake box.JPG|thumb|none]] | ||
# On LHD cars you may need more room to work on the hose clamps, so disconnect the brake booster vacuum line, and remove the short piece from the booster and the bulkhead. It is also a good idea to take off the electrical harness from its clamp just over the plastic fitting. | # On LHD cars you may need more room to work on the hose clamps, so disconnect the brake booster vacuum line, and remove the short piece from the booster and the bulkhead. It is also a good idea to take off the electrical harness from its clamp just over the plastic fitting. | ||
# Open the drain valve under the radiator and catch the coolant in a clean container of at least 10L capacity. '''TIP:''' Some enthisiasts have found it is not necessary to drain the coolant as it is probably already below the level where it will spill out. | # Open the drain valve under the radiator and catch the coolant in a clean container of at least 10L capacity. '''TIP:''' Some enthisiasts have found it is not necessary to drain the coolant as it is probably already below the level where it will spill out. | ||
# Release the hose clamps on either side of the feed thru pipe. '''TIP:''' A pair of long pliers with bent needle-nose jaws do a good job of squeezing the hose clamps. | # Release the hose clamps on either side of the feed thru pipe. '''TIP:''' A pair of long pliers with bent needle-nose jaws do a good job of squeezing the hose clamps. | ||
#: [[File:W220 Pipeline Hose Clamp Removal.JPG| | #: [[File:W220 Pipeline Hose Clamp Removal.JPG|thumb|none]] | ||
#: [[File:W220 Pipeline Hose Clamp Removal 2.JPG| | #: [[File:W220 Pipeline Hose Clamp Removal 2.JPG|thumb|none]] | ||
# Release the feed thru pipe by twisting it a few degrees clockwise looking from the front and then remove it by pulling it towards the engine bay. | # Release the feed thru pipe by twisting it a few degrees clockwise looking from the front and then remove it by pulling it towards the engine bay. | ||
#: [[File:W220 Pipeline Feed Through Pipe.JPG| | #: [[File:W220 Pipeline Feed Through Pipe.JPG|thumb|none]] | ||
'''Reinstallation:''' | |||
Reinstallation of the replacement feed thru pipe is the reverse of the above but note these extra points. | Reinstallation of the replacement feed thru pipe is the reverse of the above but note these extra points. | ||
# The Pipeline feed thru partition panel is locked into the fake firewall panel with tabs. It can be a pain to reinstall. Inserting the replacement is no problem, but it can stoutly resist rotating to the locked position so be careful to avoid breaking it. A close examination will show tiny ridges at the bottom of the slots on the locking tabs. '''TIP:''' If you are prepared to take the small risk and decide that there is no way that the fitting could ever rotate enough to be a problem with three hoses attached, then a minute or so with a small file will remove the ridges, and the fitting will turn easily to the locked position. | # The Pipeline feed thru partition panel is locked into the fake firewall panel with tabs. It can be a pain to reinstall. Inserting the replacement is no problem, but it can stoutly resist rotating to the locked position so be careful to avoid breaking it. A close examination will show tiny ridges at the bottom of the slots on the locking tabs. '''TIP:''' If you are prepared to take the small risk and decide that there is no way that the fitting could ever rotate enough to be a problem with three hoses attached, then a minute or so with a small file will remove the ridges, and the fitting will turn easily to the locked position. | ||
# Reinstallation of the Rain Protector/Panel/Guard is a real pain and is much easier done with two people. It is difficult to bend the protector under the hood to get the holes over the wiper spindles without damaging the rubber around the holes. '''TIP:''' Use a flat blade to hold up the rubber on the windshield while bending the protector enough to work its end under the rubber. | # Reinstallation of the Rain Protector/Panel/Guard is a real pain and is much easier done with two people. It is difficult to bend the protector under the hood to get the holes over the wiper spindles without damaging the rubber around the holes. '''TIP:''' Use a flat blade to hold up the rubber on the windshield while bending the protector enough to work its end under the rubber. | ||
# Filter the recycled coolant into a suitable clean container and then reintroduce into the cooling system using a vacuum refiller to eliminate any trapped air. For the vacuum method see [[WIS 20.00 General|WIS 20.00 General]]. | # Filter the recycled coolant into a suitable clean container and then reintroduce into the cooling system using a vacuum refiller to eliminate any trapped air. For the vacuum method see [[WIS 20.00 General|WIS 20.00 General]]. | ||
Latest revision as of 13:00, 21 August 2025
Radiator
Parts
Radiator part number is A2205002403. MAHLE/BEHR CR304000S (180 EUR) should be OEM.

A new radiator unit comes as a bare metal/plastic part. The package includes only two replacement sealing rings (A0279971848) for coolant hoses. This means that other radiator attachment parts must be taken from the old radiator.
In particular:
- top (A2205050186) and bottom (A2205050386) boots;
- left (A2205051188) and right (A2205051288) covers;
- 4 square nuts (A1409900052) for attaching condenser and engine fan to radiator;
- 1 square nut for attaching AC condenser line to radiator.
Square nuts (condenser and fan to radiator)
Condenser and engine fan is attached to radiator with M6 bolts that are screwed into square (rectangular) nuts placed into radiator openings.
In total, there are 4 rectangular nuts:
- 2 nuts for attaching engine fan (installed vertically);
- and 2 nuts for attaching condenser (installed horizontally).
The part number for a single nut is A1409900052 (5 EUR). Non-OE nuts can be purchased by searching for "Threaded plate M6, 15x10x5".
 |
 |
Square nut (AC lines to radiator)
AC lines are attached to radiator with a single square M6 nut 10x10x3. EPC does not seem to have a part number for it.
 |
 |
 |
Remove/install radiator

|
|
Install/remove:
- Remove lower engine compartment paneling
- Drain coolant at radiator (1). Open radiator drain plug (3).
- Disconnect automatic transmission oil lines at connection (5, 6) at radiator (1). Seal off oil lines.
- Disconnect coolant line (radiator-thermostat housing) (2) at radiator (1)
- Disconnect connection of coolant line (radiator-coolant pump) (7), connection of coolant line (radiator-expansion reservoir) (10) at radiator (1)
- Remove engine fan shroud (9)
- Detach condenser at nuts (8) at radiator
- Detach AC line at nut (arrow) at radiator
- Detach bracket of radiator (4)
- Take out radiator (1). Installation: the studs on the radiator must be located at the bottom in the rubber mounts on the crossmember.
- Install in the reverse order
- Pour in coolant
- Inspect cooling system for leaks
Transmission cooling hoses
![]()
The radiator includes a built-in transmission fluid chamber, which is used to cool the hot transmission fluid coming from the automatic transmission. The upper port on the radiator serves as the supply line (hot fluid in), while the lower port functions as the return line, sending the cooled fluid back to the transmission.
| Part | Part no. | Image | Description |
|---|---|---|---|
| 45 | A0249978182
A2209971652 A0199978382 (replaced by A2209971652) TRUCKTEC AUTOMOTIVE 02.67.101 (10 EUR) |
Transmission oil cooler return hose (bottom). From engine junction to oil cooler. (Used on 5-speed transmission only.) | |
| 40 | A2202700196 | Transmission oil cooler return hose (bottom). From engine junction to transmission. (Used on 5-speed transmission only.) | |
| 40 | A2202704096 | Transmission oil cooler return hose (bottom). From oil cooler to transmission. (Used on 7-speed transmission only.) | |
| 910 | A2202700696 (155 EUR) | Transmission oil cooler supply hose (top). (Used on both 5-speed and 7-speed transmissions.) |
Broken transmission cooler hose at radiator
The aluminum connections on a car radiator that serve as ports for the transmission fluid cooler often oxidize and become fragile over time due to a combination of chemical, environmental, and mechanical factors.
It’s not uncommon for the transmission cooler port on a radiator to weaken and break off over time, either on its own or during an attempt to remove the cooler line fitting. When this happens, it can lead to a significant transmission fluid leak. If the hexagonal fitting (the radiator port nut) breaks off (as shown in the image below ) the internal transmission cooler (sometimes referred to as the "transmission fluid chamber" or "cooler tube") can become loose. This may result in coolant leaking from the area between the transmission cooler tube and the main body (or tank) of the radiator.
To remove the oxidized remnants of the radiator port from the transmission cooler hose fitting, position the flat side of the fitting nut against a vise. Gently tap the top edge of the nut with a hammer, rotating the nut gradually and repeating the process around its entire circumference. This helps break down the corroded aluminum residue. Once the aluminum has been loosened sufficiently, you should be able to extract the broken port using pliers.
 |
Rusted transmission cooler supply hose
Transmission cooler supply line, which is attached to engine fan, over years develop rust and can lead to transmission fluid leaks.
The original W220 part (A2202700696) costs more than 150 EUR. However, companies providing hoses and fittings for hydraulics (e.g., Hydroscand) can make an aftermarket rubber hose with metal fittings for ~25 EUR.
Parts:
- Hose: 16mm 75cm 1SN 3/8"
- Fitting: male 3/8" AGM M16x1,5 (60° cone)
- Fitting: female 3/8" 90° DKM M16x1,5 (60° cone)
Coolant hoses

Part numbers:
- #10 A2208321794 - Hose from engine to connecting tube
- #20 A2208320015 - Pipeline: feed thru partition panel with option 875 (heated screen washing system).
- #25 A2208320115 - Pipeline: feed thru partition panel with options 228/490/582 (auxiliary heater, elimination windshield heating, air conditioner in rear).
- #25 A2208320115 - Pipeline: feed thru partition panel.
- #30 A2208320194 - Hose from connecting tube to heat exchanger with option 228 (auxiliary heater).
- #30 A2208320194 - Hose from connecting tube to heat exchanger.
- #170 A2208320994 - Hose feed pane washer water heating.
- #170 A2208320994 - Hose feed pane washer water heating with option 582+875 (air conditioning in the rear, heated screen washing system).
Rusted coolant hose c-clip
The large coolant hoses are attached to radiator with a quickfix type c-clip. Rust can damage the original c-clip leading to risk of hose detachment.
EPC does not have a separate part for c-clip only. However, a compatible aftermarket 41.5mm c-clip can be purchased on eBay.
 |
 |
 |
 |
Leak in pipeline feed thru partition panel
A common fault with the hot water lines is a slight coolant leak caused by a small crack in the #20 or #25 Pipeline: feed thru partition panel, depending on options fitted.
The feed thru pipe is made of plastic and must get brittle with age and heat and develops a slight split or crack.

The issue can manifest itself by either, the low coolant warning light coming on, or smoke coming from the left front wheel area as the coolant sprays on the exhaust, or both. Thorough inspection of the pipe location from above with a bright flashlight will most likely show coolant leaking from the feed through pipe. Inspection from underneath the vehicle will reveal coolant baked onto the left exhaust system.
The whole replacement process can progress with no major problems, but at almost every step expect to encounter a minor issue. The method below should help overcome these irritations. STAR WIS is useless for this procedure.
Sometimes it is not necessary to drain the remaining coolant if the level has reached below the feed thru pipe. In that case there is no more leakage when the fitting is disconnected. Expect a total coolant loss from driving and repair of about 3L (3 quarts) and have some new fluid on hand before starting.
And with thanks to BenzWorld Member 'SChalmers' here is the location for the #20 and #25 Pipeline: feed thru partition panel. It seems to be the same for both RHD and LHD cars.

The diameter of the feed thru pipe is 20mm and some enthusiasts have fashioned a replacement using copper pipe and a 45 degree elbow.
However a genuine M-B replacement part is about US$11.

DIY Replacement for Pipeline feed thru partition panel: The Pipeline feed thru partition panel is connected to a heater hose with a hose clamp inside the fake firewall chamber.

Removal:
- Firstly note the position of the wiper blades. There are two marks on the front windscreen which identify the parked positions of the windscreen wiper blades. The marks are a tiny window in the black undercoating, about a 1.5mm x 10mm clear slit in the black coating. One mark is on the right side and one in the centre of the windscreen. There is no mark on the left side. The two marks can be used to reinstall the wiper mechanisms if they have been removed. Note it is obvious that the same windscreen is used for LHD and RHD vehicles, hence the marks are only really useful for LHD cars. For RHD cars the position of the right mark can be measured and transferred to the left side as a guide. If necessary (RHD cars) mark the wiper positions on masking tape on the windscreen and the plastic panel. See [1] TIP: If there is a dirt mark on the windscreen produced by the wiper blades, this will serve the same purpose.
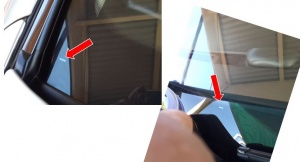
Right side and center mark (RHD vehicle)
- Remove the windscreen wipers. Note the wipers may be hard to remove. A small two-arm puller had them off quickly, with no damage. When replacing them add a small bit of anti-seize grease to make it easier next time.
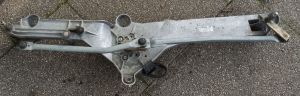
Windscreen Wiper Assembly Removed From Car
- Remove the plastic panel below the windscreen wipers. Note: Removing the Windscreen Wiper Rain Protector/Panel/Guard can be rather difficult to fully release without doing some damage as the Rain Protector/Panel/Guard is under a rubber surround on both ends. The technique is to gently pry the flange on the back of the protector out of a channel at the bottom of the windshield.
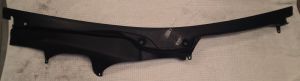
Rain Protector/Panel/Guard beneath windscreen wipers (RHD car)
- Undo the four plastic screw/rivets.
- Carefully prise up the panel starting from the center with a wide plastic spatula type tool, levering in a direction normal or away from the glass windscreen. Note: The panel is held in place by a 6mm strip which is a friction fit into a groove in the channel at the bottom of the windscreen.
- Gingerly bend the Rain Protector/Panel/Guard up in the center enough to slip the ends out from under the rubber.
- Then on a RHD car remove the ACC air intake chamber.
- On LHD cars you may need more room to work on the hose clamps, so disconnect the brake booster vacuum line, and remove the short piece from the booster and the bulkhead. It is also a good idea to take off the electrical harness from its clamp just over the plastic fitting.
- Open the drain valve under the radiator and catch the coolant in a clean container of at least 10L capacity. TIP: Some enthisiasts have found it is not necessary to drain the coolant as it is probably already below the level where it will spill out.
- Release the hose clamps on either side of the feed thru pipe. TIP: A pair of long pliers with bent needle-nose jaws do a good job of squeezing the hose clamps.
- Release the feed thru pipe by twisting it a few degrees clockwise looking from the front and then remove it by pulling it towards the engine bay.


Reinstallation: Reinstallation of the replacement feed thru pipe is the reverse of the above but note these extra points.
- The Pipeline feed thru partition panel is locked into the fake firewall panel with tabs. It can be a pain to reinstall. Inserting the replacement is no problem, but it can stoutly resist rotating to the locked position so be careful to avoid breaking it. A close examination will show tiny ridges at the bottom of the slots on the locking tabs. TIP: If you are prepared to take the small risk and decide that there is no way that the fitting could ever rotate enough to be a problem with three hoses attached, then a minute or so with a small file will remove the ridges, and the fitting will turn easily to the locked position.
- Reinstallation of the Rain Protector/Panel/Guard is a real pain and is much easier done with two people. It is difficult to bend the protector under the hood to get the holes over the wiper spindles without damaging the rubber around the holes. TIP: Use a flat blade to hold up the rubber on the windshield while bending the protector enough to work its end under the rubber.
- Filter the recycled coolant into a suitable clean container and then reintroduce into the cooling system using a vacuum refiller to eliminate any trapped air. For the vacuum method see WIS 20.00 General.