Workspace: Difference between revisions
| Line 1,057: | Line 1,057: | ||
The seat ventilation for the driver's seat is automatically set to the highest level if activated via summer opening feature. | The seat ventilation for the driver's seat is automatically set to the highest level if activated via summer opening feature. | ||
==Interior lighting== | ==Interior lighting== | ||
Revision as of 18:28, 30 August 2017
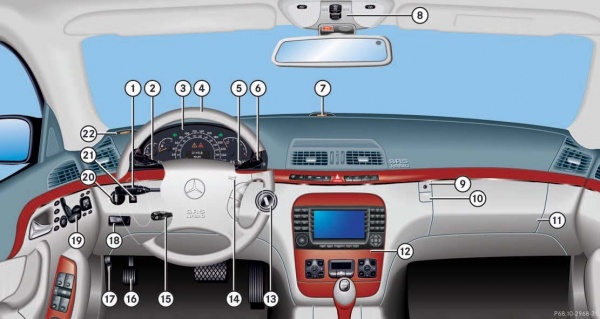
Cockpit
- (1) Combination switch
- Turn signals
- Windshield wipers
- High beam
- (2) Cruise control lever
- Cruise control
- Distronic
- (3) Instrument cluster
- (4) Multifunction steering wheel
- (5) Gear range indicator, clock
- (6) Lever for voice control system
- (7) Front Parktronic warning indicator for right front area
- (8) Overhead control panel
- (9) Glove box lock
- (10) Glove box lid release
- (11) Glove box
- (12) Center console
- (13) Starter switch
- (14) Horn
- (15) Steering wheel adjustment stalk, Heated steering wheel
- (16) Parking brake pedal
- (17) Hood lock release
- (18) Parking brake release
- (19) Door control panel
- (20) Exterior lamp switch
- (21) Headlamp washer button
- (22) Front Parktronic warning indicator for left front area
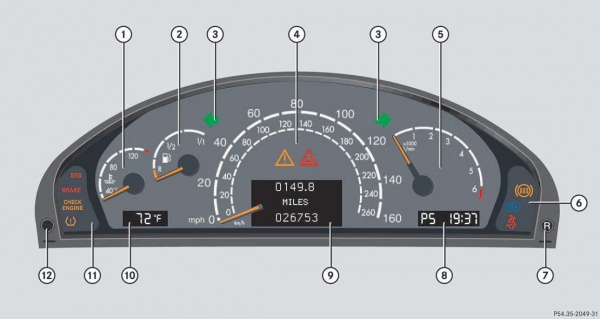
Instrument cluster
- (1) Coolant temperature gauge
- (2) Fuel gauge with: Fuel reserve warning lamp
- (3) Left turn signal indicator lamp, Right turn signal indicator lamp
- (4) Speedometer with: ESP warning lamp, Distance warning lamp (Vehicles without Distronic: Warning lamp without function. It illuminates when the ignition is on. It should go out when the engine is running.)
- (5) Tachometer
- (6) Right display with: Seat belt telltale, High beam headlamp indicator, Antilock Brake System (ABS) warning lamp
- (7) Reset button
- (8) Display with:
- Program mode
- Gear range indicator
- Digital clock (see COMAND operating in structions)
- (9) Multifunction display with:
- Trip odometer
- Main odometer
- Stored speed for: Cruise control, Distronic
- (10) Outside temperature indicator
- (11) Left display with:
- Supplemental restraint system indicator lamp
- Brake warning lamp
- Engine malfunction indicator lamp
- Tire pressure warning lamp
- (12) Knob for instrument cluster illumination
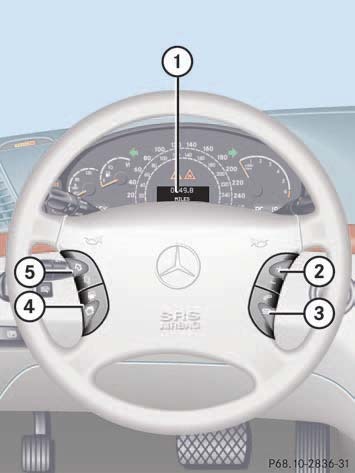
Multifunction steering wheel
- (1) Multifunction display, Operating control system
- (2) Selecting the submenu or setting the volume
- (3) Telephone: Press button
- to take a call, to dial a call
- to end a call, to reject an incoming call
- (4) Menu systems: Press button
- for next system
- for previous system
- (5) Moving within a menu: Press button
- for next display
- for previous display
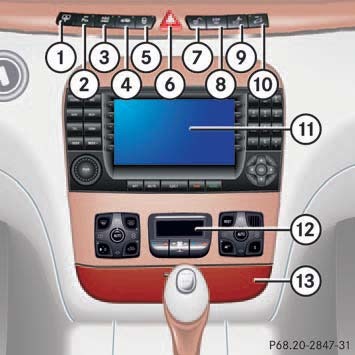
Center console
Upper part
- (1) Switch for rear window sunshade
- (2) Parktronic system deactivation switch
- (3) Airmatic or ABC switch
- (4) Level control switch
- (5) Central locking switch, Anti-theft alarm system indicator lamp
- (6) Hazard warning flasher on/off switch
- (7) Central unlocking switch
- (8) ESP control switch
- (9) Rear seat head restraints, switch for folding down
- (10) Tow-away alarm switch
- (11) COMAND system
- (12) Automatic climate control
- (13) Ashtray, Lighter
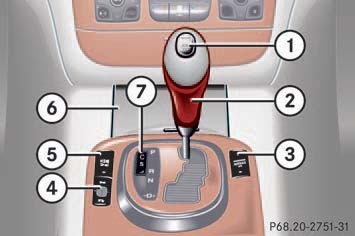
Lower part
- (1) KEYLESS-GO start/stop button
- (2) Gear selector lever for automatic transmission
- (3) PASSENGER AIRBAG OFF indicator lamp
- (4) Thumbwheel for setting distance in Distronic
- (5) Distronic distance warning function on/off switch
- (6) Lower storage compartments
- (7) Program mode selector for automatic transmission
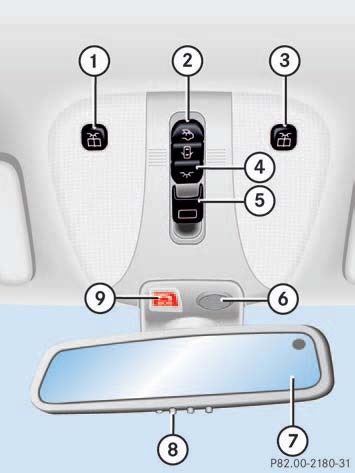
Overhead control panel
- (1) Left reading lamp on/off
- (2) Rear interior lighting on/off
- (3) Right reading lamp on/off
- (4) Interior lighting control
- (5) Sliding/pop-up roof
- (6) Hands-free microphone for Tele Aid (emergency call system), telephone, and voice control system
- (7) Rear view mirror
- (8) Garage door opener
- (9) Tele Aid (emergency call system) button
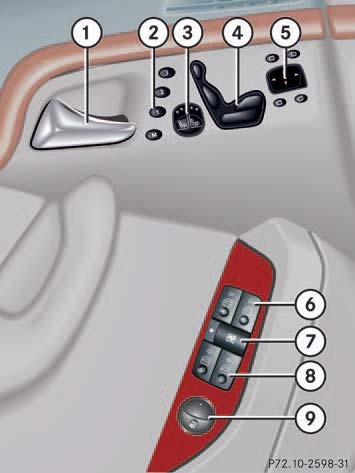
Door control panel
- (1) Door handle
- (2) Memory function (for storing seat, exterior mirror, and steering wheel settings)
- (3) Seat heating, Seat ventilation
- (4) Seat adjustment
- (5) Exterior mirror adjustment
- (6) Switches for opening/closing front door windows
- (7) Rear passenger compartment override switch
- (8) Switches for opening/closing rear windows
- (9) Remote trunk lid release switch, Trunk lid opening/closing system switch
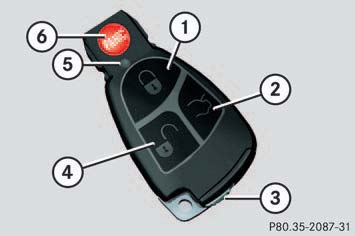
Unlocking with the SmartKey
- (1) Lock button
- (2) Unlock button for trunk lid
- (3) Unlock button
- (4) Panic button
- Press unlock button on the SmartKey. All turn signal lamps flash once. The locking knobs in the doors move up.
- Get in the vehicle and insert the SmartKey in the starter switch.
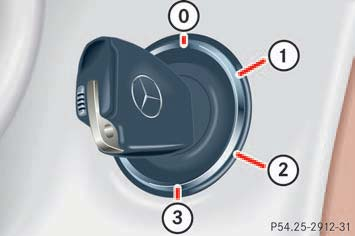
Starter switch positions
- 0 For removing SmartKey
- 1 Power supply to some electrical consumers, such as seat adjustment
- 2 Ignition (power supply for all electrical consumers) and driving position
- 3 Starting position
- The SmartKey can only be removed from the starter switch with the gear selector lever in position P.
- If the SmartKey cannot be turned in the starter switch, the battery may not be sufficiently charged.
- Check the battery and charge it if necessary.
- Get a jump start.
- To prevent accelerated battery discharge or a completely discharged battery, always remove the SmartKey from the starter switch when the engine is not in operation.
Unlocking with KEYLESS-GO
If your vehicle is equipped with the KEYLESS-GO function, your vehicle checks whether the SmartKey with KEYLESS-GO is valid when you grasp the door handle. If your SmartKey with KEYLESS-GO is valid, the doors will unlock, and you can open them. The function of the SmartKey overrules the KEYLESS-GO function.
To unlock the vehicle, the SmartKey with KEYLESS-GO must be outside the vehicle, no further than approximately 3 feet (1 meter) away from the door. Grasp the outside door handle. All turn signal lamps flash once. The locking knobs in the doors move up.
If the SmartKey is inside the vehicle, pressing the KEYLESS-GO start/stop button on the gear selector lever corresponds to turning the SmartKey to the various starter switch positions.
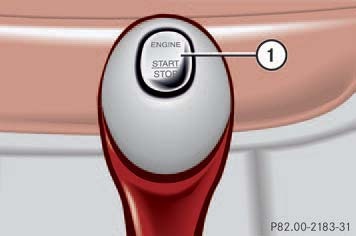
Before you press the KEYLESS-GO start/stop button (1), the vehicle's on-board electronics have status 0 (as with SmartKey removed). The SmartKey with KEYLESS-GO must be located in the vehicle.
- Make sure the gear selector lever is set to P.
- Do not depress the brake pedal.
Position 1 Press the KEYLESS-GO start/stop button (1) once. This supplies power to some electrical consumers, such as seat adjustment. If you now press the KEYLESS-GO start/stop button once again, the ignition (position 2) is switched on. Twice, the power supply is again switched off.
Ignition (or position 2) Press the KEYLESS-GO start/stop button (1) twice. This supplies power to all electrical consumers. All the lamps in the instrument cluster come on. If you now press the KEYLESS-GO start/stop button once, the power supply is again switched off.
Steering wheel adjustment
The stalk for steering wheel adjustment is located on the steering column (lower left).
To adjust the steering column switch on ignition or open the driver's door.
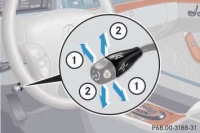
- (1) Adjusting steering column, in or out. Move stalk forward or back in the direction of arrow (1) until a comfortable steering wheel position is reached with your arms slightly bent at the elbow.
- (2) Adjusting steering column, up or down. Move the stalk up or down in the direction of arrow (2). Make sure your legs can move freely and all the displays (incl. malfunction and indicator lamps) on the instrument cluster are clearly visible.
Memory ...
The memory function lets you store settings for the steering wheel together with the settings for the exterior rear view mirrors and the seat position.
Adjusting mirrors
Adjust the interior and exterior rear view mirrors before driving so that you have a good view of the road and traffic conditions.
Interior rear view mirror Manually adjust the interior rear view mirror.
Exterior rear view mirror
The buttons are located on the driver’s door.
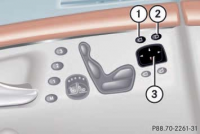
- (1) Driver’s side exterior rear view mirror button
- (2) Passenger-side exterior rear view mirror button
- (3) Adjustment button
- Switch on ignition.
- Press button (1) for the left mirror or button (2) for the right mirror.
- Push adjustment button (3) up, down, left, or right according to the desired setting.
Heating At low ambient temperatures, the mirrors will be heated automatically.
Fastening the seat belts
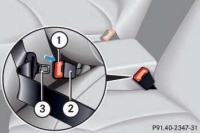
- (1) Release button
- (2) Buckle
- (3) Latch plate
- Pull the seat belt smoothly from the seat belt outlet.
- Place the shoulder portion of the belt across the top of your shoulder and the lap portion across your hips.
- Push latch plate (3) into buckle (2) until it clicks.
- If necessary, tighten the lap portion to a snug fit by pulling shoulder portion up.
Proper use of seat belts
- Do not twist the belt when fastening.
- Adjust seat belt so that the shoulder portion is located as close as possible to the middle of the shoulder (it should not touch the neck). Never pass the shoulder portion of the belt under your arm.
- Position the lap belt as low as possible on your hips (over hip joint) and not across the abdomen.
- Place the seat backrest in a nearly upright position. Never use a seat belt for more than one person at a time.
- Do not fasten a seat belt around a person and another object at the same time.
- Check your seat belt during travel to make sure that it is properly positioned.
- Make sure that the seat belt is always fitted snugly. Take special care of this when wearing loose clothing.
Press the seat belt release button. Allow the retractor to completely rewind the seat belt by guiding the latch plate.
Automatic transmission
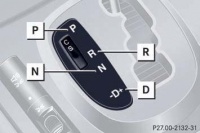 Gearshift pattern for automatic transmission:
- P Park position with gear selector lever lock
- R Reverse gear
- N Neutral
- D Drive position
Driving
- Depress the brake pedal.
- Move gear selector lever to position D or R.
- Release the brake pedal.
- Carefully depress the accelerator pedal.
Once the vehicle is in motion, the automatic central locking system engages and the locking knobs drop down. You can open a locked door from the inside. Open doors only when conditions are safe to do so. You can deactivate the automatic locking using the control system.
Turning off the engine
- Place the gear selector lever in position P.
Always set the parking brake in addition to shifting to position P. On steep slopes, turn the front wheels towards the curb.
Turning off with the SmartKey
- Turn the SmartKey in the starter switch to position 0 and remove it. The immobilizer is activated.
The SmartKey can only be removed from the starter switch with the gear selector lever in position P.
Turning off the engine with KEYLESS-GO
- Place the gear selector lever in position P.
- Press the KEYLESS-GO start/stop button to shut off the engine.
With the driver's door closed, the starter switch is now in position 1. With the driver’s door opened, the starter switch is set to position 0, same as SmartKey removed from starter switch.
In order to avoid damaging the transmission,
- wait for the gear selection process to complete before setting the vehicle in motion.
- place the gear selector lever in position R only when the vehicle is stopped.
After a cold start, the automatic transmission shifts at a higher engine revolution. This allows the catalytic converter to reach its operating temperature earlier.
Do not run cold engine at high engine speeds. Running a cold engine at high engine speeds may shorten the service life of the engine.
If you hear a warning signal, you have tried to turn off the engine while the gear selector lever is not in P.
Starting with the SmartKey
- Make sure the gear selector lever is set to P.
- Do not depress accelerator.
- Turn the SmartKey in the starter switch to position 3 and hold until the engine starts. You can also use the "touch-start" function. Turn the SmartKey to position 3 and release it again immediately. The engine then starts automatically.
- Depress the brake pedal. The gear selector lever lock is released.
Starting with KEYLESS-GO
You can start your vehicle without the SmartKey in the starter switch using the KEYLESS-GO start/stop button on the gear selector lever. The SmartKey with KEYLESS-GO must be located in the vehicle.
- Make sure the gear selector lever is set to P.
- Depress the brake pedal during the starting procedure. Do not depress accelerator.
- Press KEYLESS-GO start/stop button (1) once. The engine starts automatically if the SmartKey with KEYLESS-GO is in the vehicle.
Starting difficulties If the engine does not start as described, carry out the following steps:
- If you are starting the engine with the SmartKey, turn SmartKey in starter switch to position 0 and repeat starting procedure.
- If you are starting the engine with KEYLESS-GO: Close any doors that may be open to allow for better detection of the SmartKey with KEYLESS-GO or start the engine with the SmartKey as radio signals from another source may be interfering with the SmartKey with KEYLESS-GO.
Parking brake
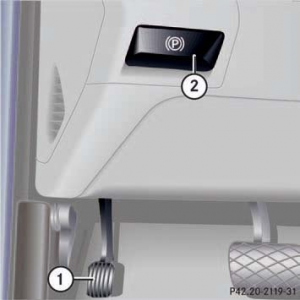
- (1) Parking brake pedal
- (2) Parking brake release handle
Release the parking brake by pulling handle (2). The indicator lamp in the instrument cluster goes out.
Step firmly on parking brake (1). When the engine is running, the indicator lamp in the instrument cluster illuminates.
If you hear a warning signal and a message appears in the multifunction display when driving off, you have forgotten to release the parking brake. Release the parking brake.
Windshield wipers
The combination switch is located on the left of the steering column.
Combination switch
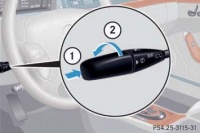
- (1) Single wipe
- (2) Switching on windshield wipers
Switching on windshield wipers
- Make sure the ignition is switched on. All the lamps in the instrument cluster come on.
- Turn the combination switch to the desired position depending on the intensity of the rain.
- 0 Windshield wipers off
- I Intermittent wiping (interval dependent on wetness of windshield)
- II Normal wiper speed
- III Fast wiper speed
Wiping will not occur with a door open.
Single wipe Press switch briefly in the direction of arrow (1). The windshield wipers wipe one time without washer fluid.
Wiping with windshield washer fluid Press switch in the direction of arrow (1) past the resistance point. The windshield wiper operates with washer fluid.
Coolant
The coolant temperature is above 248°F (120°C) The coolant is too hot and is no longer cooling the engine.
- Stop the vehicle as soon as possible and turn off the engine. Allow engine and coolant to cool.
- Check the coolant level and add coolant if necessary.
Excessive coolant temperatures trigger a warning message in the multifunction display.
Locking
After exiting the vehicle press the lock button on the SmartKey. All turn signal lamps flash three times. The locking knobs on the doors move down.
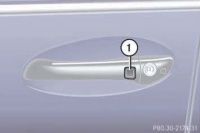
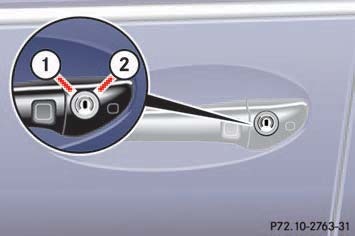
- (1) Lock button on the door handle.
After exiting the vehicle, press lock button 1 on the door handle or on the trunk lid. All turn signal lamps flash three times. The locking knobs on the doors move down.
Occupant safety
In this section you will learn the most important facts about the restraint systems of the vehicle. The restraint systems are:
- Seat belts
- Emergency tensioning device
- Airbags
- Child seats
- Child seat recognition
- Lower anchors and tethers for children (LATCH)
As independent systems, their protective effects work in conjunction with each other.
The SRS indicator lamp in the instrument cluster comes on
- for about four seconds when you turn the SmartKey in the starter switch to position 1 or press the KEYLESS-GO start/stop button once. It then goes out briefly, comes on again and remains lit until you start the engine.
- for about four seconds when you start the engine by turning the SmartKey or pressing the KEYLESS-GO start/stop button.
- The SRS indicator lamp remains lit if the SmartKey is turned to position 2 and left there or the KEYLESS-GO start/stop button is pressed twice. The
indicator lamp will go out when you start the engine.
The restraint systems are fully operational if the SRS indicator lamp is not lit when the engine is running. A malfunction in the system has been detected if the SRS indicator lamp:
- fails to extinguish after approximately four seconds.
- does not come on at all.
- comes on after the engine was started or while driving.
In the event that the SRS indicator lamp comes on during driving or does not come on at all, the SRS self-check has detected a malfunction. For your safety, we strongly recommend that you visit an authorized Mercedes-Benz Center immediately to have the system checked; otherwise the SRS may not be activated when needed in an accident, which could result in serious or fatal injury, or it might deploy unexpectedly and unnecessarily which could also result in injury.
Airbags are designed to reduce the potential of injury and fatality in certain frontal impacts (front airbags), side impacts (side impact airbags and head protection window curtain airbags) or rollovers (head protection window curtain airbags). However, no system available today can totally eliminate injuries and fatalities. The activation of the airbags temporarily releases a small amount of dust from the airbags. This dust, however, is neither injurious to your health, nor does it indicate a fire in the vehicle. The dust might cause some temporary breathing difficulty for people with asthma or other breathing trouble. To avoid this, you may wish to get out of the vehicle as soon as it is safe to do so. If you have any breathing difficulty but cannot get out of the vehicle after the airbag inflates, then get fresh air by opening a window or door.
For maximum protection in the event of a collision always be in normal seated position with your back against the seat backrest. Fasten your seat belt and ensure that it is properly positioned on your body. Since the airbag inflates with considerable speed and force, a proper seating and hands on steering wheel position will help to keep you at a safe distance from the airbag. Occupants who are unbelted, out of position or too close to the airbag can be seriously injured by an airbag as it inflates with great force in the blink of an eye:
- Sit properly belted in a nearly upright position with your back against the seat backrest.
- Adjust the driver seat as far as possible
rearward, still permitting proper operation of vehicle controls. The distance from the center of the driver’s breastbone to the center of the airbag cover on the steering wheel must be at least 10 in (25 cm) or more. You should be able to accomplish this by a combination of adjustments to the seat and steering wheel.
- Do not lean with your head or chest close to the steering wheel or dashboard.
- Keep hands on the outside of steering wheel rim. Placing hands and arms inside the rim can increase the risk and potential severity of hand/arm injury when driver front airbag inflates.
- Adjust the front passenger seat as far as possible rearward from the dashboard when the seat is occupied.
- Occupants, especially children, should never lean their heads in the area of the door where the side airbag inflates.
This could result in serious injuries or death should the airbag be triggered. Always sit nearly upright, properly use the seat belts and appropriate size infant or child restraint system.
- Children 12 years old and under must never ride in the front seat, except in a Mercedes-Benz authorized BabySmart TM compatible child seat, which operates with the BabySmart TM system installed in the vehicle to deactivate the passenger front airbag when it is properly installed. Otherwise they will be struck by the airbag when it inflates in a crash. If this happens, serious or fatal injury will result.
Accident research shows that the safest place for children in an automobile is in the rear seat. Should you choose to place a child 12 years old or under in the front passenger seat of your vehicle, you must properly use a BabySmart TM child restraint which will turn off the passenger front airbag. BabySmart TM will not, however, turn off any side impact airbag.
Airbags are designed to activate only in certain frontal (front airbags) impacts, side impacts (side impact and head protection window curtain airbags) which exceed preset thresholds, and in certain rollovers (head protection window curtain airbags). Only during these events will they provide their supple- mental protection. The driver and passengers should always wear their seat belts. Otherwise it is not possible for airbags to provide their supplemental protection.
In case of other types of impacts and impacts below airbag deployment thresholds, airbags will not be activated. The driver and passengers will then be protected to the extent possible by a properly fastened seat belt. A properly fastened seat belt is also needed to provide the best possible protection in a rollover.
- Airbags and pyrotechnic emergency tensioning devices (ETDs) are designed to function on a one-time only basis. An airbag or ETD that was activated must be replaced. PRE-SAFE has electrically operated reversible pre-tensioners in addition to the pyrotechnic ETDs.
- An airbag system component within the steering wheel gets hot after the airbag has inflated. Do not touch.
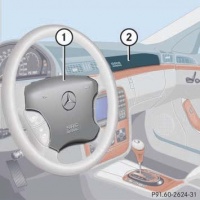
Front airbags
- (1) Driver airbag
- (2) Passenger front airbag
Driver and passenger front airbags are deployed:
- in the event of a frontal impact
- if impact exceeds a preset deployment threshold
- independently of the side impact airbags
The airbags will not deploy in impacts which do not exceed the system’s deployment thresholds. You will then be protected by the fastened seat belts.
The passenger front airbag will only be deployed if:
- the front passenger seat is occupied
- the PASSENGER AIRBAG OFF indicator lamp in the center console is not lit
- the impact exceeds a preset deployment threshold
Do not place objects heavier than 20 lbs (9 kg) on the front passenger seat. This could cause the front or side impact airbag on the front passenger side to deploy in a crash which exceeds the system's deployment threshold.
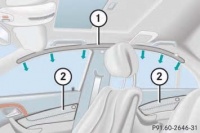
Side impact airbags, window curtain airbags
- (1) Window curtain airbag
- (2) Side impact airbags
The side impact airbags and window curtain airbags are deployed:
- on the impacted side of the vehicle
- in impacts exceeding a preset deployment threshold
- independently of the front airbags
In addition, the window curtain airbags are deployed:
- in certain vehicle rollovers
The side impact airbags and window curtain airbags are not deployed in impacts which do not exceed the system’s deployment threshold. The front passenger side impact airbag will only deploy if the system senses that the front passenger seat is occupied.
Emergency tensioning device (ETD), seat belt force limiter The seat belts for the front and rear outer seats are equipped with emergency tensioning devices and belt force limiters.
The ETD is designed to activate in the following cases:
- in frontal or rear-end impact exceeding a preset severity level
- in certain vehicle rollovers
- if the restraint systems are operational and functioning correctly (see SRS indicator lamp)
The ETDs for the front seats will only activate if the respective front seat belt is fastened (latch plate properly inserted into buckle). The ETDs for the rear outer seats will activate with or without the respective seat belt fastened.
In an impact, emergency tensioning devices remove slack from the belts in such a way that the seat belts fit more snugly against the body. Belt force limiters reduce the force exerted by the seat belts on occupants during a crash.
A pyrotechnic emergency tensioning device (ETD) that was activated must be replaced.
PRE-SAFE has electrically operated reversible pre-tensioners that do not require replacement after activation.
Automatic comfort-fit feature seat belt An automatic comfort-fit feature for front seats and for the rear outer seats (only for vehicles with electrically adjustable rear bench seat or with individual seats in the rear) reduces the retracting force of the seat belts when they are in normal use.
Preventive occupant safety (PRE-SAFE) The PRE-SAFE system is intended to reduce the effects of an accident on properly seat belted vehicle occupants.
Your vehicle automatically takes preventive measures to better protect the occupants in the following hazardous situations:
- You execute an emergency braking maneuver and the Brake Assist System is activated.
- The PRE-SAFE system detects a critical driving dynamics situation.
The PRE-SAFE systems are activated in the previously described circumstances only at speeds exceeding 22 mph (35 km/h).
In such cases, the following systems are automatically activated:
- A front seat belt with the seat belt buckled is pre-tensioned electrically.
- If the occupied front passenger seat or rear seats are in an unfavorable position,
they are adjusted to a better position. Rear seat adjustment occurs only in vehicles with individual seats in the rear.
- The sliding/pop-up roof closes if the vehicle is in a severe skid or is spinning.
When the driving dynamic situation has passed without an accident occurring, the pre-tensioning on the seat belts is deactivated. You can then adjust the seats and the sliding sunroof to their previous position.
If the seat belts do not release: Adjust the backrest or seat slightly to the rear until the seat belt tension is diminished. The locking mechanism releases.
Seat belts
When the engine is started, the seat belt telltale
illuminates to remind you and
your passengers to fasten your seat belts.
If the driver’s seat belt is not fastened before the engine is started, the seat belt
telltale illuminates and a warning
chime sounds for approximately six seconds when the engine is started.
Never ride in a moving vehicle with the seat
backrest in an excessively reclined position
as this can be dangerous. You could slide
under the seat belt in a collision. If you slide
under it, the belt would apply force at the abdomen or neck. That could cause serious or
even fatal injuries. The seat backrest and
seat belt provide the best restraint when the
wearer is in a nearly upright position and the
belt is properly positioned on the body.
Occupant safety
Children 12 years old and under must never ride in the front seat, except in a Mercedes-Benz authorized BabySmart TM compatible child seat, which operates with the BabySmart TM system installed in the vehicle to deactivate the passenger front airbag when it is properly installed. Otherwise they will be struck by the airbag when it inflates in a crash. If this happens, serious or fatal injury will result. According to accident statistics, children are safer when properly restrained in the rear seating positions than in the front seating positions. Infants and small children must ride in back seats and be seated in an appropriate infant or child restraint system, which is properly secured with the vehicle's seat belt and top tether strap, or secured via lower anchors and top tether strap, fully in accordance with the child seat manufacturer’s instructions.
Children too big for child restraint systems must ride in back seats using regular seat belts. A booster seat may be necessary to achieve proper belt positioning for children from 41 lbs until they reach a height where a lap/shoulder belt fits properly without a booster.
BabySmart TM1 airbag deactivation system
Special BabySmart TM compatible child seats, designed for use with the Mercedes-Benz system and available at any authorized Mercedes-Benz Center are required for use with the BabySmart TM airbag deactivation system. With the special child seat properly installed, the passenger front airbag will not deploy. Note, that the system does not deactivate the side impact airbag or the emergency tensioning device. BabySmart TM is a trademark of Siemens Automotive Corp.
Never place anything between seat cushion and child seat (e.g. pillow), since it reduces the effectiveness of the deactivation system. The bottom of the child seat must make full contact with the passenger seat cushion. An incorrectly mounted child seat could cause injuries to the child in case of an accident, instead of protecting the child.
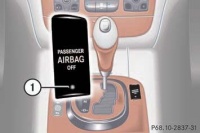
If the child seat is installed the "PASSENGER AIRBAG OFF" indicator lamp (1) located in the center console will be illuminated, except with the SmartKey removed or in starter switch position 0.
Self-test BabySmart TM without special child seat installed: After turning the SmartKey in the starter switch to position 1 or 2 or pressing the KEYLESS-GO start/stop button once or twice, the PASSENGER AIRBAG OFF indicator lamp (1) located in the center console comes on for approximately six seconds and then goes out.
If the indicator lamp should not come on or is continuously lit, the system is not functioning. You must see an authorized Mercedes-Benz Center before seating any child on the front passenger seat.
Make sure to check the indicator every time you use the special system child seat. Should the light go out while the restraint is installed, please check installation. If the light remains out, do not use the BabySmart TM restraint to transport children on the front passenger seat until the system has been repaired. Do not place powered-on laptops, cell phones and like electronic devices on the front passenger seat. Signals from such devices may interfere with the BabySmart TM system. Such signal interference may cause the PASSENGER AIRBAG OFF indicator lamp not to come on during self-test or be continuously lit, indicating that the system is not functioning.
Installation of infant and child restraint systems
This vehicle is equipped with tether anchorages for a top tether strap at each of the rear seating positions.
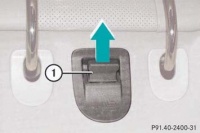
- (1) Cover of top anchorage ring
- Remove cover (1) from anchorage ring.
- Store cover (1) in a convenient place (e.g. glove box).
- Guide tether strap between head restraint and top of seat back.
Head restraints must be positioned such that the top tether strap can pass freely between the head restraint and top of seat back. Make sure the tether strap is not twisted.
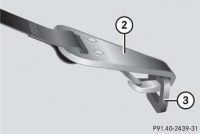
- (2) Hook
- (3) Anchorage ring
Securely fasten hook (2), which is part of the tether strap, to anchorage ring (3). For safety reasons, make sure the hook has attached to the ring beyond the safety catch, as illustrated.
Once the top tether anchorage hook is attached, the child restraint itself can be secured. Tighten the top tether strap according to the child restraint manufacturer’s instructions.
Child seat anchors – LATCH type
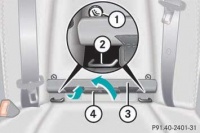
This vehicle is equipped with two LATCH (Lower Anchors and Tethers for CHildren) type anchors (at each of the rear seats) for the installation of a LATCH child seat with the matching anchor fittings. If you have not installed a child seat, the LATCH anchor fittings are covered with an upholstery blend.
- (1) Indicates the position of the anchors
- (2) Anchors
- (3) Upholstery blend
- (4) Installation device
- Move rear power seats*/bench* to the rearmost position.
- Fold upholstery blend (3) upward.
- Turn installation device 4 to a vertical position so that upholstery blend (3) does not fold down.
- Install child seat according to the manufacturer’s instructions.
A solid connection is established between the child seat and the body of the vehicle. Do not adjust rear power seat*/bench* position after installing child restraint.
The child seat must be firmly attached in the right and left side anchor fittings. Make sure the seat belt for the center seat can operate freely with a child seat installed. Non-LATCH type child seats may also be used and can be installed using the vehicle’s seat belt system.
You can disable select functions in the rear
passenger compartment for added safety
(for instance when you have children riding
in the rear passenger compartment).
You can disable the following functions in
the rear passenger compartment:
- rear door window operation
- adjustment of front passenger seat from the rear
- cigarette lighter in rear
The override switch is located on the driver’s door.
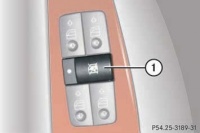 To activating override switch slide override switch (1) to the right. A dot becomes visible. The functions in the rear are disabled.
Operation of the rear door windows with the switches located in the driver’s door is still possible.
Driving safety systems
ABS
The Antilock Brake System (ABS) regulates the brake pressure so that the wheels do not lock during braking. This allows you to maintain the ability to steer your vehicle. The ABS is functional above a speed of approximately 5 mph (8 km/h) independent of road surface conditions. On slippery road surfaces, the ABS will respond even with light brake pressure.
The ABS indicator lamp in the instrument cluster comes on when you turn the SmartKey in the starter switch to position 2 or press the KEYLESS-GO start/stop button twice. It goes out when the engine is running.
Braking
At the instant one of the wheels is about to lock up, a slight pulsation can be felt in the brake pedal, indicating that the ABS is in the regulating mode. Keep firm and steady pressure on the brake pedal while experiencing the pulsation. Continuous, steady brake pedal pressure yields the advantages provided by the ABS, namely braking power and the ability to steer the vehicle. The pulsating brake pedal can be an indication of hazardous road conditions and functions as a reminder to take extra care while driving.
In emergency brake maneuver Keep continuous full pressure on the brake pedal.
BAS
The Brake Assist System (BAS) operates in emergency situations. If you apply the brakes very quickly, the BAS automatically provides full brake boost, thereby potentially reducing the braking distance. Apply continuous full braking pressure until the emergency braking situation is over. The ABS will prevent the wheels from locking. When you release the brake pedal, the brakes function again as normal. The BAS is then deactivated.
ESP
The Electronic Stability Program (ESP) monitors the vehicle's traction (force of adhesive friction between the tires and the road surface) and handling. The ESP recognizes when a wheel is spinning or if the vehicle starts to skid. By applying brakes to the appropriate wheel and by limiting engine output, the ESP works to stabilize the vehicle. The ESP is especially useful while driving off and on wet or slippery road surfaces. The ESP warning lamp in the instrument cluster flashes when the ESP is engaged. The ESP warning lamp in the instrument cluster comes on when you turn the SmartKey in the starter switch to position 2 or press the KEYLESS-GO start/stop button twice. It goes out when the engine is running.
Never switch off the ESP when you see the ESP warning lamp flashing in the instrument cluster. In this case proceed as follows:
- While driving off, apply as little throttle as possible.
- While driving, ease up on the accelerator.
- Adapt your speed and driving style to the prevailing road conditions.
Failure to observe these guidelines could cause the vehicle to skid. The ESP cannot prevent accidents resulting from excessive speed.
Distronic is switched off when ESP is activated. Distronic cannot be activated when the ESP has been deactivated.
Vehicles without 4MATIC: Because of the ESP’s automatic operation, the engine and ignition must be shut off (SmartKey in starter switch position 0 or 1 or KEYLESS-GO start/stop button* in position 0 or 1) when:
- the parking brake is being tested on a brake test dynamometer
- the vehicle is being towed with the front/rear axle raised
Active braking action through the ESP may otherwise seriously damage the brake system.
To improve the vehicle's traction, turn off the ESP in driving situations where it would be advantageous to have the drive wheels spin and thus cut into surfaces for better grip such as:
- starting out on slippery surfaces and in deep snow in conjunction with snow chains
- in sand or gravel
The switch is located on the center console.
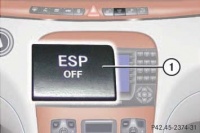 To deactivate ESP press ESP switch (1) until the ESP warning lamp in the speedometer comes on.
If one or more wheels are spinning, the ESP warning lamp in the speedometer flashes, regardless of the speed.
Traction control brakes a spinning wheel even when the ESP is deactivated.
The ESP always operates when you are braking, even when it has been deactivated.
Avoid spinning of a drive wheel for an extended period with the ESP switched off. This may cause serious damage to the drivetrain which is not covered by the Mercedes-Benz Limited Warranty.
Models with all-wheel drive only: The 4MATIC improves the vehicle’s ability to use available traction, e.g. during winter operation in mountains under snowy conditions, by applying power to all four wheels. Do not tow with one axle raised. Otherwise the transfer case can be damaged, which is not covered by the Mercedes-Benz Limited Warranty. Performance testing must only be conducted on a two-axle dynamometer.
Because of the ESP’s automatic operation, the engine and ignition must be shut off (SmartKey in starter switch position 0 or 1 or KEYLESS-GO start/stop button in position 0 or 1) when the parking brake is being tested on a brake test dynamometer. Active braking action through the ESP may otherwise seriously damage the front or rear axle brake system. Operational tests with the engine running can only be conducted on a two-axle dynamometer.
Anti-theft systems
Immobilizer
The immobilizer prevents unauthorized persons from starting your vehicle.
Activating:
- Removing the SmartKey from the starter switch activates the immobilizer
- Turning off the engine by means of the KEYLESS-GO* start/stop button on the gear selector lever activates the immobilizer.
Deactivating:
- Inserting the SmartKey in the starter switch deactivates the immobilizer.
- Starting the engine by means of the KEYLESS-GO start/stop button on the gear selector lever deactivates the immobilizer.
Anti-theft alarm system
Once the alarm system has been armed, a visual and audible alarm is triggered when someone:
- opens a door
- opens the trunk
- opens the hood
The alarm will stay on even if the activating element (a door, for example) is immediately closed. The alarm system will also be triggered when
- someone attempts to raise the vehicle
- the vehicle is opened with the mechanical key
If the alarm stays on for more than 20 seconds, an emergency call is initiated automatically by the Tele Aid system.
The alarm system is armed after locking the vehicle with the SmartKey or KEYLESS-GO. The turn signal lamps flashes three times to indicate that the alarm system is activated. The indicator lamp in the central locking switch will flash after approximately ten seconds when the alarm system is completely armed.
If the turn signal lamps does not flash three times one of the following ele- ments may not be properly closed:
- a door
- the trunk lid
- the hood
Close the respective element and lock the vehicle again.
The alarm system is disarmed when you unlock your vehicle with the SmartKey or KEYLESS-GO. The turn signal lamps flash once to indicate that the alarm system is deactivated.
To cancel the alarm insert the SmartKey in the starter switch or press the unlock or lock button on the SmartKey. With KEYLESS-GO grasp the outside door handle or press the KEYLESS-GO start/stop button.
Tow-away alarm
Once the tow-away alarm is armed, a visual and audible alarm will be triggered when someone attempts to raise the vehicle. The tow-away protection alarm is triggered, for example, if the vehicle is lifted on one side. If the alarm stays on for more than 20 seconds, an emergency call is initiated automatically by the Tele Aid system.
When you lock your vehicle, the tow-away alarm is automatically armed after about 30 seconds. When you unlock your vehicle, the tow-away protection disarms automatically.
To prevent triggering the tow-away alarm, switch off the tow-away alarm feature before towing the vehicle, or when parking on a surface subject to movement, such as a ferry or auto train. The switch is located on the center console. File:...
- (1) Indicator lamp
- (2) Tow-away alarm off switch
- Switch off the ignition and remove the SmartKey. You cannot disarm the tow-away alarm if the ignition is switched on.
- Press switch (2). The indicator lamp (1) in the button comes on briefly.
- Exit vehicle and lock your vehicle with the SmartKey or (vehicles with KEYLESS-GO) the lock button at each door handle.
The tow-away alarm remains disarmed until you lock your vehicle again.
Locking and unlocking
SmartKey
Your vehicle comes supplied with two SmartKeys, each with remote control and a removable mechanical key. The locking tabs for the mechanical key portion of the two SmartKeys are a different color to help distinguish each SmartKey unit. The SmartKey provides an extended operating range. To prevent theft, however, it is advisable to only unlock the vehicle when you are in close proximity to it. The SmartKey centrally locks and unlocks:
- the doors
- the trunk
- the fuel filler flap
- (1) - Lock button
- (2) - Unlock button for trunk lid
- (3) - Locking tab for mechanical key
- (4) - Unlock button
- (5) - Battery check lamp
- (6) - Panic button
Factory setting
Global unlocking
Press unlock button. All turn signal lamps flash once. The locking knobs in the doors move up. The vehicle will lock again automatically within approximately 40 seconds of unlocking if:
- neither door nor trunk is opened
- the SmartKey is not inserted in the starter switch
- the central locking switch is not activated
Global locking
Press lock button. All turn signal lamps flash three times. The locking knobs in the doors move down.
Selective setting
If you frequently travel alone, you may wish to reprogram the SmartKey so that pressing "unlock" once only unlocks the driver’s door and the fuel filler flap, but if pressed twice unlocks all doors and trunk.
To activate press and hold buttons "unlock" and "lock" simultaneously for about six seconds until battery check lamp (5) flashes twice. To deactivate perform activation procedure again.
Checking the batteries
Press lock or unlock button. Battery check lamp 5 comes on briefly to indicate that the SmartKey batteries are in order. If battery check lamp 5 does not come on briefly during check, then the SmartKey batteries are discharged. Replace the batteries.
If the batteries are ckecked within signal range of the vehicle, pressing the lock or unlock button will lock or unlock the vehicle accordingly.
Loss of SmartKey or mechanical key
If you lose a SmartKey or mechanical key, you should do the following:
- Have the SmartKey deactivated by an authorized Mercedes-Benz Center.
- Report the loss of the SmartKey or the mechanical key immediately to your car insurance company.
- If necessary, have the mechanical lock replaced.
Your authorized Mercedes-Benz Center will be glad to supply you with a replacement.
SmartKey with KEYLESS-GO
Vehicles equipped with KEYLESS-GO come with two SmartKeys with KEYLESS-GO, each with remote control and a removable mechanical key. The locking tabs for the mechanical key portion of the two SmartKeys are a different color to help distinguish each SmartKey unit. The KEYLESS-GO function is integrated into the SmartKey. On these vehicles, the validity of the SmartKey with KEYLESS-GO is checked every time you grasp a door handle. If the SmartKey with KEYLESS-GO is valid, your vehicle unlocks:
- the doors
- the trunk lid
- the fuel filler flap
If the vehicle has been parked for a longer period of time, you must pull the door handle in order to activate the KEYLESS-GO function.
Important notes on using KEYLESS-GO
- You can also use the SmartKey with KEYLESS-GO like a normal SmartKey
- You can combine KEYLESS-GO functions with normal SmartKey functions
(e.g. unlocking with KEYLESS-GO and locking with the remote control).
- To lock or unlock the vehicle, the SmartKey with KEYLESS-GO must be
located outside the vehicle within approximately 3 ft. (1 m) of a door or the trunk.
In order to start the engine with the SmartKey with KEYLESS-GO:
- The SmartKey with KEYLESS-GO must be located in the vehicle.
- All doors must be closed.
- The brake pedal must be firmly depresed. Do not depress the accelerator.
- If you have started the engine with the KEYLESS-GO start/stop button, you
can only turn it off again with this button, even if you have put the SmartKey in the starter switch in the meantime.
- This does not apply if, after starting, the gear selector lever is still in position P
and the SmartKey is then inserted in the starter switch. The SmartKey will then have priority over the SmartKey with KEYLESS-GO and the vehicle's electrical system will operate according to the position of the SmartKey in the starter switch, even stopping the engine.
- If the SmartKey with KEYLESS-GO is
positioned farther away from the vehicle, the system may no longer recognize the SmartKey with KEYLESS-GO. The vehicle then cannot be locked or the engine started via the KEYLESS-GO system.
- If the SmartKey with KEYLESS-GO is removed from the vehicle while the engine is switched on
(e.g. if passenger exits the vehicle with the SmartKey with KEYLESS-GO), the message KEY NOT RECOGNIZED! will appear in the multifunction display. Find the SmartKey or change its present location immediately (e.g. place it on the front passenger seat or insert it in shirt pocket).
- Remember that the engine can be started by anyone with a SmartKey
with KEYLESS-GO that is left inside the vehicle. If you leave the SmartKey with KEYLESS-GO behind when exiting and locking the vehicle, the message KEY DETECTED IN VEHICLE! will appear in the multifunction display.
Locking and unlocking
Global unlocking
Grasp the door handle. The vehicle will lock again automatically within approximately 40 seconds of unlocking if neither door nor trunk is opened.
The vehicle could inadvertently be unlocked if the SmartKey with KEYLESS-GO is within 3 ft. (1 m) of the vehicle and:
- the door handle is splashed with water, or
- you attempt to clean the door handle
Global locking
Press lock button at door handle or trunk.
Selective setting
If you frequently travel alone, you may wish to reprogram the SmartKey with KEYLESS-GO so when you, grasp the driver's door handle only the driver's door and the fuel filler flap unlocks, but if you grasp the door handle on the passenger side unlocks all doors and trunk. To activate press and hold buttons "unlock" and "lock" simultaneously for about six seconds until battery check lamp (5) flashes twice. To deactivate perform activation procedure again.
If you can not lock or unlock the vehicle with the SmartKey with KEYLESS-GO, then the battery in the SmartKey is discharged, the SmartKey with KEYLESS-GO is malfunctioning or the vehicle battery is drained. Check the battery in the SmartKey with KEYLESS-GO and replace them if necessary. Use the mechanical key to lock/unlock the doors and the trunk lid (if applicable) as required.
Locking the vehicle
Press vehicle lock button (1) or press the lock button at the outside door handle.
Vehicles with trunk lid opening/closing system, press the KEYLESS-GO locking/closing switch at the trunk.
The vehicle locks. The turn signals flashes three times to confirm locking.
Opening the doors from the inside
You can open a locked door from the inside.
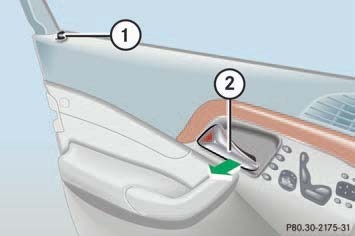
- (1) Locking knob
- (2) Inside door handle
Pull on door handle (2). If door was locked, locking knob (1) will move up.
If the vehicle has previously been locked from the outside with the SmartKey, opening a door from the inside will trigger the anti-theft alarm system.
Canceling alarm
To cancel the alarm, do one of the following: With the SmartKey:
- Insert the SmartKey in the starter switch.
- Press button "unlock" or "lock" on the SmartKey.
With KEYLESS-GO:
- Grasp the outside door handle.
- Press the KEYLESS-GO start/stop button.
Power closing assist for doors and trunk lid
It is not necessary to slam the door or trunk lid closed. A pneumatic power-assisted mechanism draws doors and trunk lid closed quietly and automatically once door and trunk lid has been latched. When the pneumatic power-assisted mechanism has stopped, doors and/or trunk can be re-opened.
Press the doors gently past the initial engage position into the lock. The doors close automatically. Press the trunk lid gently into its lock. The trunk closes automatically.
Automatic central locking
The doors and the trunk automatically lock when the ignition is switched on and the wheels are turning at vehicle speeds of approximately 9 mph (15 km/h) or more. You can open a locked door from the inside.
The doors unlock automatically after an accident if the force of the impact exceeds a preset threshold.
You can deactivate the automatic locking using the control system.
Locking and unlocking from the inside
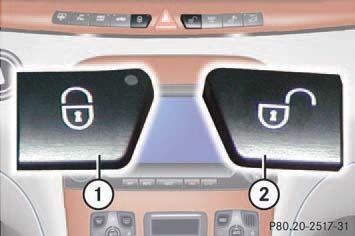
You can lock or unlock the doors and the trunk from inside using the central locking or unlocking switch. This can be useful, for example, if you want to lock the vehicle before starting to drive.
The fuel filler flap will not be locked or unlocked with the central locking or unlocking switch, respectively.
The switches are located in the center console.
Press central locking switch (1). If all door's are closed, the vehicle locks. Press central unlocking switch (2). The vehicle unlocks.
If the vehicle was previously centrally locked with the SmartKey or the SmartKey with KEYLESS-GO it will not unlock using the central locking switch.
If the vehicle was previously locked with the central locking switch:
- While in the global remote control mode, the vehicle is unlocked completely when a door is opened from the inside.
- While in the selective remote control mode, only the door opened from inside is unlocked.
Unlocking/locking in an emergency
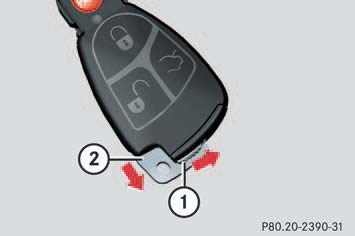
If you are unable to unlock the vehicle with the SmartKey, open the driver's door and the trunk using the mechanical key.
Unlocking your vehicle with the mechanical key will trigger the anti-theft alarm system.
Move locking tab (1) in direction of arrow and slide the mechanical key (2) out of the housing.
Unlock the door with the mechanical key. To do so, push the mechanical key into the lock until it stops and turn it to the left.
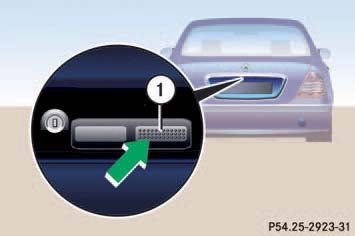
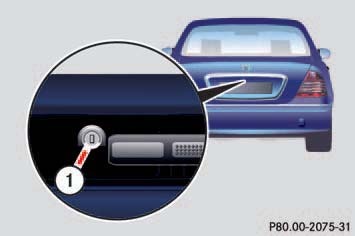
The trunk lid lock is located above the rear license plate recess.
Seats
Seat heating*
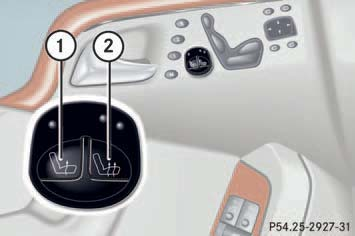
The switch is located on the door.
Seat heating has three modes:
- Rapid heating (two lamps on)
- Normal heating (one lamp on)
- No heating (lamps off)
The system switches from the rapid heating mode to normal heating mode after approximately five minutes. The seat heating will be automatically switched off after approximately 30 minutes.
If one or both of the lamps on the seat heating switch are flashing, there is insufficient voltage available since too many electrical consumers are turned on. The seat heating switches off automatically.
The seat heating will switch back on again automatically as soon as sufficient voltage is available.
Seat ventilation
The seat ventilation for the driver's seat is automatically set to the highest level if activated via summer opening feature.
Interior lighting
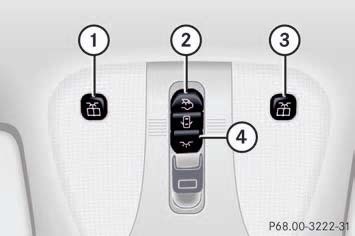
The controls are located in the overhead control panel.
- (1) Left front reading lamp
- (2) Rear interior lamps
- (3) Right front reading lamp
- (4) Rocker switch for automatic control system
To activate automatic control press rocker switch (4) to the center position. Interior lamps are switched on in darkness, even when you: unlock the vehicle, open a door, remove the SmartKey from the starter switch. The interior lamps are switched off after a present time.
If the door remains open, the interior lamps switch off automatically after approximately five minutes, when the SmartKey is removed or in the switch position 0.
Courtesy lighting
For better orientation in the dark, courtesy lamps will illuminate the interior of your vehicle as follows:
- With parking lamps switched on: the door entry lamps, the driver and passenger footwells
- With SmartKey in starter switch position 1: the door entry lamps, the center console
If you turn the SmartKey in the starter switch to position 0 and switch off the exterior headlamps, the door entry lamps will remain lit for approximately five minutes.
Instrument cluster
The instrument cluster is activated when you: open a door, turn on the ignition, press the reset button, switch on the exterior lamps.
You can change the instrument cluster settings in the instrument cluster submenu of the control system.
Instrument cluster illumination
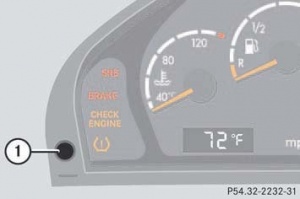
Use knob (1) to adjust the illumination brightness for the instrument cluster. Press knob (1). The knob will pop out. Turn knob clockwise. The instrument cluster illumination will brighten. Turn knob counterclockwise. The instrument cluster illumination will dim.
The instrument cluster illumination is dimmed or brightened automatically to suit ambient light conditions.
The instrument cluster illumination will also be adjusted automatically when you switch on the vehicle’s exterior lamps.
Coolant temperature gauge
Excessive coolant temperature triggers a warning in the multifunction display.
During severe operating conditions, e.g. stop-and-go traffic, the coolant temperature may rise close to 248°F (120°C), i.e. close to the red zone of the temperature gauge. The engine should not be operated with the coolant temperature above 248°F (120°C), i.e. in the red zone of the coolant temperature gauge. Doing so may cause serious engine damage which is not covered by the Mercedes-Benz Limited Warranty.
Trip odometer
Make sure you are viewing the trip odometer display. If it is not displayed, press the button on the multifunction steering wheel repeatedly until the trip odometer appears. Press and hold reset button on the instrument cluster until the trip odometer is reset.
Tachometer
The red marking on the tachometer denotes excessive engine speed. To help protect the engine, the fuel supply is interrupted if the engine is operated within the red marking.
Avoid driving at excessive engine speeds, as it may result in serious engine damage that is not covered by the Mercedes-Benz Limited Warranty.
The tachometer of the S55 AMG does not have a red marking denoting excessive engine speed. To help protect the engine, the fuel supply is interrupted if the engine is operated at an excessive engine speed.
Outside temperature indicator
The outside temperature is diplayed in the instrument cluster. For information on how to select the unit of the displayed temperature, i.e. degrees Celsius (°C) or degrees Fahrenheit (°F), see "Selecting temperature display mode".
The temperature sensor is located in the front bumper area. Due to its location, the sensor can be affected by road or engine heat during idling or slow driving. Therefore, the accuracy of the displayed temperature can only be verified by comparison to a thermometer placed next to the sensor, not by comparison to external displays (e.g. bank signs, etc.). When moving the vehicle into colder ambient temperatures (e.g. when leaving your garage), you will notice a delay before the lower temperature is displayed. A delay also occurs when ambient temperatures rise. This prevents inaccurate temperature indications caused by heat radiated from the engine during idling or slow driving.
Control system
The control system is activated as soon as the SmartKey in the starter switch is turned to position 1 or as soon as the KEYLESS-GO start/stop button is in position 1. The control system enables you to call up information about your vehicle and change vehicle settings. For example, you can use the control system to find out when your vehicle is next due for service, to set the language for messages in the instrument cluster display, and much more.
The displays for the audio systems (radio, CD player) will appear in English, regardless of the language selected.
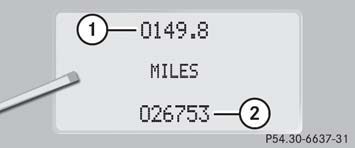
The control system relays information to the multifunction display.
- (1) Trip odometer
- (2) Main odometer
Multifunction steering wheel
The displays in the multifunction display and the settings in the control system are controlled using the buttons on the multifunction steering wheel.
Pressing any of the buttons on the multifunction steering wheel will alter what is shown in the multifunction display.
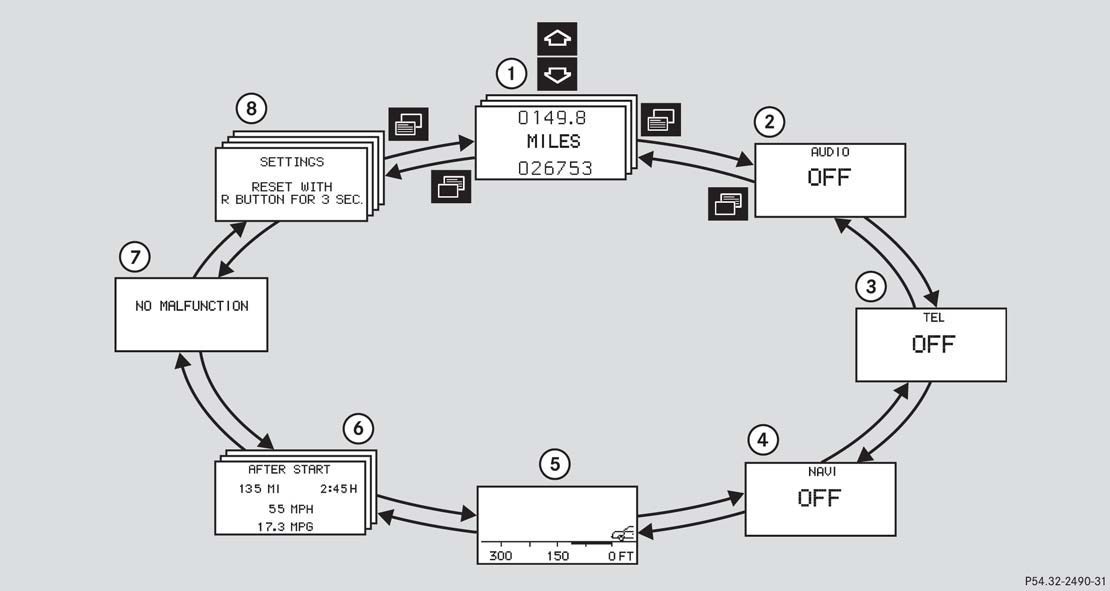
The information available in the multifunction display is arranged in menus, each containing a number of functions or submenus. The individual functions are then found within the relevant menu (radio or CD operations under AUDIO, for example). These functions serve to call up relevant information or to customize the settings for your vehicle.
It is helpful to think of the menus, and the functions within each menu, as being arranged in a circular pattern.
In the SETTINGS menu, instead of functions you will find a number of submenus for calling up and changing settings. The number of menus available in the system depends on which optional equipment is installed in your vehicle.
This is what you will see when you scroll through the menus.
- Menu (1) - Standard display: Call up FSS, Check tire pressure, Check engine oil level, Digital speedometer.
- Menu (2) - AUDIO: Select radio station, Select satellite radio station (USA only), Operate CD player, Operate cassette player.
- Menu (3) - Telephone: Load phone book, Search for name in phone book, Select number last dialed.
- Menu (4) - NAVI: Activate route guidance.
- Menu (5) - Distronic: Call up settings.
- Menu (6) - Trip computer: Fuel consumption statistics after start, Fuel consumption statistics since the last reset, Call up range.
- Menu (7) - Malfunction memory: Call up malfunction messages.
- Menu (8) - Settings: Reset to factory settings, Instrument cluster submenu, Lighting submenu, Vehicle submenu, Convenience submenu.
The first function displayed in each menu will automatically show you which part of the system you are in.
Call up FSS
Check tire pressure
Check engine oil level
Display digital speedometer
The current vehicle speed is shown in the multifunction display.
The functions in the AUDIO menu operate the audio equipment which you currently have turned on. If no audio equipment is currently turned on, the message AUDIO OFF is shown in the display.
Select radio station
Turn on the radio. Refer to separate COMAND operating instructions.
Press button repeatedly until you see the currently tuned station in the display.
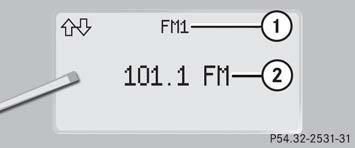
- (1) Waveband
- (2) Station frequency
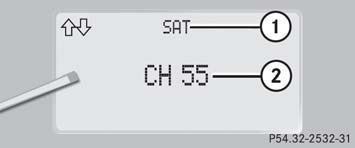
Select satellite radio station (USA only)
The satellite radio is treated as a radio application. Select satellite radio with the corresponding key on the COMAND control panel (SAT). Press button repeatedly until you see the currently tuned station in the display.
- (1) SAT mode and preset number
- (2) Channel name or number
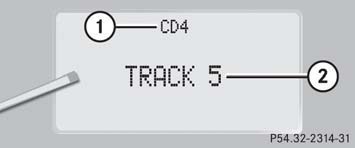
Operate CD player
Turn on the radio and select the CD player. Refer to separate COMAND operating instructions. Press button repeatedly until the settings for the CD currently being played appear in the display.
- (1) Current CD
- (2) Current track
CD changer: To select a CD from the magazine, press a number on the COMAND system key pad located in the center dashboard.
If a CD changer has been installed in the system, it can be operated from the COMAND system key pad located in the center dashboard. A loaded magazine must be installed for CD playing.
Should excessively high temperatures occur while in CD mode, CD TEMP HIGH will appear on the display and muting will take place. The unit will then switch back to the last operating mode used until the temperature has decreased to a safe operating level. Should excessively low temperatures occur while in CD mode, CD TEMP LOW will appear on the display, but the CD will continue to play.
Your CD drive has been designed to play CDs which correspond to the IEC 60908 standard. If you insert thicker data carriers, e.g. ones that have data on both sides (one side with DVD data, the other side with audio data), they cannot be ejected and will damage the drive.
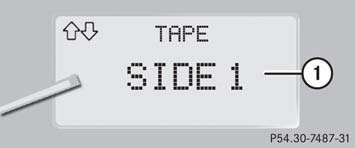
Operate cassette player
Turn on COMAND and select cassette player. Please refer to the separate operating instructions. Press button repeatedly until you see the settings for the cassette being played in the display.
- (1) Current side
You can use the functions in the TEL menu to operate your telephone, provided it is connected to a hands-free system and switched on.
Switch on the telephone and COMAND. Press button on the steering wheel repeatedly until you see the TEL menu in the display.
Which messages will appear in the display field depends on whether your telephone is switched on or off. If the telephone is off, the message in the multifunction display is: TEL OFF. If the telephone is on the telephone will then search for a network. During this time the display reads NO SERVICE. As soon as the telephone has found a network, READY is indicated in the display.
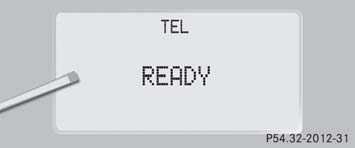 The standby message indicates that your telephone is ready for use and you can operate it using the control system.
