Front axle: Difference between revisions
(→Part Numbers - Complete Front Axle/Suspension: Lemforder inner and outer tie rods) |
|||
| Line 709: | Line 709: | ||
|{{#ev:youtube|https://www.youtube.com/watch?v=_4dWy53BW8k|320|left|2002 S430 front right upper control arm removal|frame}} | |{{#ev:youtube|https://www.youtube.com/watch?v=_4dWy53BW8k|320|left|2002 S430 front right upper control arm removal|frame}} | ||
|} | |} | ||
=== Check track rod and drag link linkage for play, check rubber boots === | |||
<!-- AP46.00-P-4653F, Check track rod and drag link linkage for play, check rubber boots, 2.7.13 --> | |||
{| | |||
| | |||
* 1g - Bellows | |||
* 10 - Tie rod | |||
* 10l - Tie rod end | |||
|[[File:W220_tie_rod.png]] | |||
|[[File:W220_tie_rod_bellow.png]] | |||
|} | |||
# Switch off ignition | |||
# Check boots (1g). Never check the boot (1) by pressing in or around the ribs. This will cause damage to the plastic and then result in leakage. Raise vehicle at front axle. Stretch bellows by turning the steering to the left and right while checking for damage (cracks, chafing marks and dents). If damaged, the boot (1g) must be replaced. | |||
# Check tie rod ball joint for play. Inspect tie rod joints by pulling and pushing firmly. In event of play on tie rod ball joint the tie rod (10) is to be replaced. | |||
# Check rubber boots of tie rod ends (10l) for signs of leaks and condition. If a rubber boot leaks replace tie rod (10). | |||
== Wheel speed sensor == | == Wheel speed sensor == | ||
Revision as of 09:36, 11 October 2020
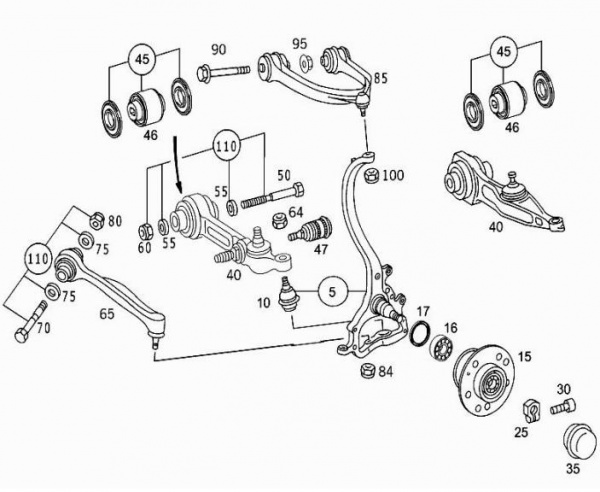
Description - Complete Front Axle/Suspension
Transverse Control Arm Top or Upper Control Arm Item 85 - Complete Front Axle/Suspension
Transverse Control Arm Top/Upper (also called Upper Control Arm (UCA)), Item 85 Right and Left.

Steering Knuckle Item 5 - Complete Front Axle/Suspension
Steering Knuckle (also Spindle or Hub) (Item 5)

Transverse Control Arm Lower or Lower Control Arm Item 40 - Complete Front Axle/Suspension
Transverse Control Arm Bottom/Lower (Lower Control Arm (LCA)) Item 40 Right and Left

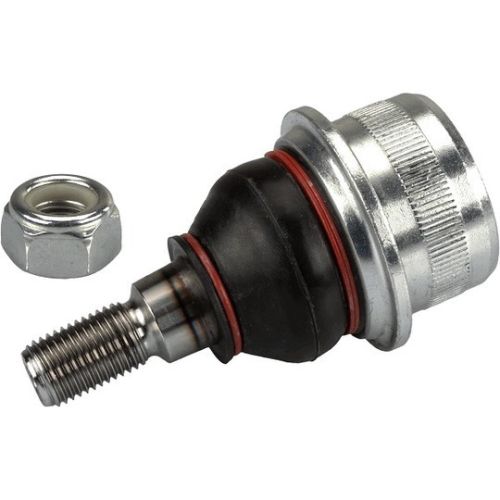
Ball Joint Steering Knuckle to Lower Control Arm Item 10 - Complete Front Axle/Suspension
Ball Joint Steering Knuckle to Lower Control Arm (Item 10)
Strut Item 65 - Complete Front Axle/Suspension
Strut (also called Thrust Arm or Torque Strut) Item 65 Right and Left

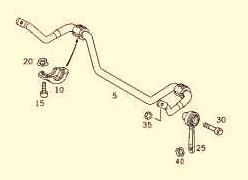
Rod Torsion Bar Item 25 - Complete Front Axle/Suspension
Rod Torsion Bar (Sway Bar Link) Item 25 Right and Left

Part Numbers - Complete Front Axle/Suspension
| Item no. | Part number | Designation/description | Quantity |
|---|---|---|---|
| 5 | A 220 330 37 20 | STEERING KNUCKLE LEFT Code: -Z04 | 001 |
| 5 | A 220 330 37 20 | STEERING KNUCKLE RIGHT Code: -Z04 | 001 |
| 10 | A 220 333 07 27 (LEMFORDER 3377301 (EUR 20)) | JOINT . LEFT | 001 |
| 10 | A 220 333 07 27 (LEMFORDER 3377301 (EUR 20)) | JOINT . RIGHT | 001 |
| 15 | A 220 330 07 25 | FRONT WHEEL HUB WITH BEARING | 002 |
| 16 | A 002 980 65 02 | TAPERED ROLLER BEARING . WHEEL HUB, OUTSIDE. Code: -Z07 | 002 |
| 16 | A 140 981 03 05 | TAPERED ROLLER BEARING. WHEEL HUB, INSIDE. Code: -Z07 | 001 |
| 16 | A 140 981 03 05 | TAPERED ROLLER BEARING. WHEEL HUB, INSIDE | 001 |
| 17 | A 022 997 97 47 | SEAL RING. WHEEL HUB . Code: -Z07 | 001 |
| 17 | A 022 997 97 47 | SEAL RING. WHEEL HUB | 001 |
| 25 | A 116 334 03 72 | NUT FRONT WHEEL HUB TO STEERING KNUCKLE | 002 |
| 30 | N 000000 003358 | HEXALOBULAR BOLT FRONT WHEEL HUB TO STEERING KNUCKLE M6X25 | 002 |
| 35 | A 168 357 00 89 | PLUG FRONT WHEEL HUB TO STEERING KNUCKLE | 002 |
| 40 | A 220 330 89 07 | TRANSVERSE CONTROL ARM BOTTOM LEFT Code: -487-Z07 | 001 |
| 40 | A 220 330 90 07 | TRANSVERSE CONTROL ARM BOTTOM RIGHT Code: -487-Z07 | 001 |
| 45 | A 220 330 91 07 | TS SPRING LINK PARTS KIT LEFT AND RIGHT Code: -Z07 . [408] ONLY REPLACEABLE BY PAIRS | 002 |
| 46 | A 220 333 31 14 | BEARING SPRING CONTROL ARM . . Code: -Z07 | 002 |
| 47 | A 211 323 00 68 | JOINT. LEFT | 001 |
| 47 | A 211 323 00 68 | JOINT. RIGHT | 001 |
| 50 | A 220 333 00 71 | BOLT SPRING CONTROL ARM AT FRAME M14X1.5 | 002 |
| 50 | A 220 333 01 71 | FITTED BOLT FOR ADJUSTING WORK ONLY M14X1.5 | 002 |
| 55 | A 220 333 00 76 | SHIM SPRING CONTROL ARM AT FRAME | 004 |
| 60 | N 000000 003281 | HEXAGON NUT SPRING CONTROL ARM AT FRAME M14X1,5 | 002 |
| 64 | N 000000 003281 | HEXAGON NUT SPRING LINK ON SUPPORTING JOINT M14X1,5 | 002 |
| 65 | A2203305711 (LEMFORDER 3123501 (EUR 72)) | STRUT LEFT | 001 |
| 65 | A2203305811 (LEMFORDER 3123601 (EUR 72)) | STRUT RIGHT | 001 |
| 70 | A 220 333 00 71 | BOLT STRUT AT FRAME M14X1.5 | 002 |
| 70 | A 220 333 01 71 | FITTED BOLT FOR ADJUSTING WORK ONLY M14X1.5 | 002 |
| 75 | A 220 333 00 76 | SHIM STRUT AT FRAME | 004 |
| 80 | N 000000 003281 | HEXAGON NUT STRUT AT FRAME M14X1,5 | 002 |
| 84 | N 000000 003281 | HEXAGON NUT STRUT TO STEERING KNUCKLE M14X1,5 | 002 |
| 85 | A 220 330 93 07 (LEMFORDER 2539001 (EUR 120)) | TRANSVERSE CONTROL ARM TOP, LEFT | 001 |
| 85 | A 220 330 94 07 | TRANSVERSE CONTROL ARM TOP, RIGHT | 001 |
| 90 | A 004 990 81 04 | BOLT UPPER CONTROL ARM TO FRAME M10X95 | 004 |
| 95 | N 913023 010002 | NUT UPPER CONTROL ARM TO FRAME M10 | 004 |
| 100 | N 910113 010000 | HEXAGON NUT UPPER TRANSVERSE CONTROL ARM TO STEERING KNUCKLE M10 | 002 |
| 110 | A 000 330 00 18 | TS BOLT PARTS KIT FOR ADJUSTING WORK ONLY | 004 |
- Front end lower shock mount control arms (ABC models only) are part number 215 330 07 07.
- FL thrust arm (Lemfoerder): W0133-1717286
- FR thrust arm (Lemfoerder): W0133-160157.
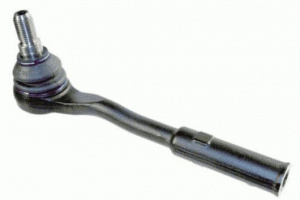
- Tie Rod outer left/right: A2303300203 (Lemforder 2115402 (EUR 45))
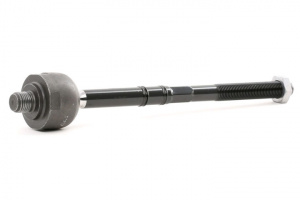
- Tie Rod inner left/right: A2203380715 (Lemforder 2115302 (EUR 12))
- All of those come with new ball joints installed.
 |
 |
Issues - Complete Front Axle/Suspension
Common issues with the Complete Front Axle/Suspension are;
- Front tyre/s wearing unevenly.
- Front suspension making a creaking sound at low speed indicating possible ball joint failure.
- Looseness indicated by excess movement in ball joint/s (Item 100) ie it feels worn and not firm in its socket.
- Cracks in the control arm (Item 85) bushings and ball joints.
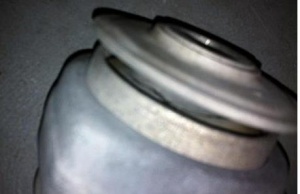
If you experience any of the above issues, the following parts are the ones that often need replacing due to wear after about 130,000 Km (80,000 miles).
The front rear lower control arms (shock mount control arms) are not a "must replace" item. If your car has higher miles (80k+), then it would be a good idea to replace them as well. The outer end of the arm can be quite tricky to force off the ball joint at the knuckle (spindle).
The thrust arms (torque arms) wear out faster, as they take the brunt force of the vehicle under braking. Once you pull out the thrust arms, take a look at the chassis side joint. If the rubber has clearly failed (lots of cracks), then it may be a good idea to change the shock control arms as well.
- Item 85 Transverse Control Arm Top (Upper Control Arm (UCA)).
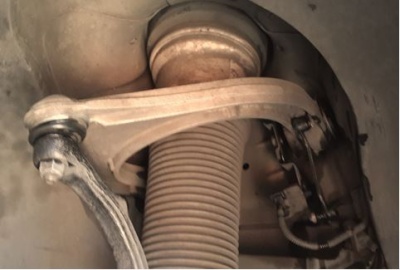

- Item 40 Transverse Control Arm Bottom/Lower (Lower Control Arm (LCA))
- Rear View of Transverse Control Arm Bottom Lower Item 40
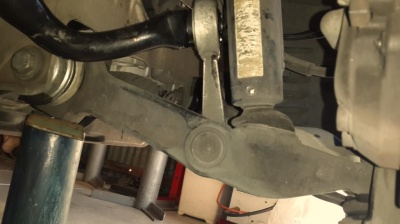
- Front View of Transverse Control Arm Bottom Lower Item 40
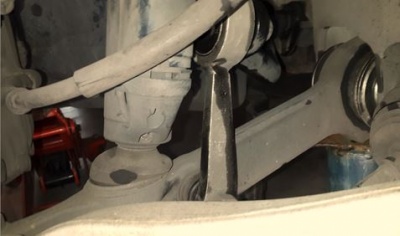

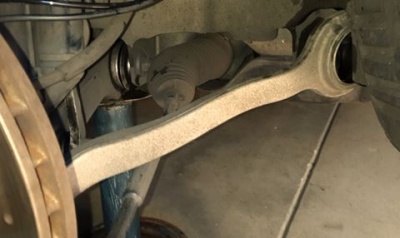
- Item 65 Strut (Thrust Arm or Torque Strut)

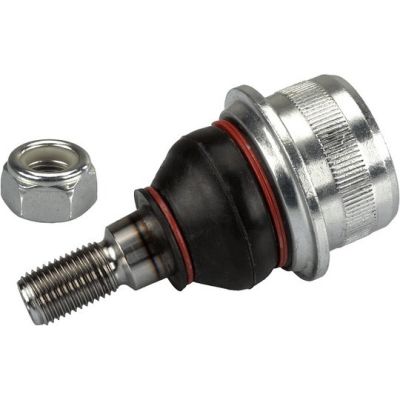
- Item 10 Joint (Ball Joint)
- Item 25 Rod Torsion Bar (Sway Bar Link)


Special Tools Required - Complete Front Axle/Suspension
Tips for DIY Repairs - Complete Front Axle/Suspension
- Make absolutely certain that the car is properly and safely supported. You will be pulling and pushing hard on the car while you are under it.
- atmshsr says “On a recommendation of a machinist, I kept all new parts in the freezer for a few days to shrink them before assembly because the fit tolerances are so tight, and did not remove each part until just prior to installing the part.“
- Make sure to soak all the bolt/nuts a few hours before you start work with PB blaster or Penetrene.
- BenzWorld Member Tip: In hindsight, I should have replaced both the Strut (also called Thrust Arm or Torque Strut) Item 65, and control arms
- Transverse Control Arm Top/Upper (also called Upper Control Arm (UCA)), Item 85
- Transverse Control Arm Bottom/Lower (Lower Control Arm (LCA)), Item 40
at the same time because they have similar bushings that undergo the same service environment. Additionally, if I had to do it over, I would do both control arms and completely remove the Steering Knuckle (also Spindle or Hub) (Item 5) for easier access to a ball joint and ease reinstallation.
- Take your time disconnecting and reconnecting any of the electrical connectors in the area - its easy to mess these up. Use some masking tape to mark the connections.
- Once the car is jacked up and the wheels removed, release the air pressure on the top of the shock. With the key off, and the vehicle raised up, crack open the fitting at the top of the airmatic strut. Be careful not to allow any dirt in the system. Once everything is connected back up it will just fill back up once the car is turned on.
- When using the Ball Joint Separator tool, tighten it, walk away. Come back a few hours later, tighten it a little more and walkway. Repeat the steps. The ball joint normally breaks loose due to tension. If you are lucky it will let go after about 30-40 minutes.
- Use a hot air dryer on each stuck nut for about five mins each and they come out easy, the heat breaks down the lock-tight bond.
- The 5mm Alan has blue Loctite from the factory and normally requires an impact grade driver to remove. If you end up rounding the Alan out, (which can easily happen) then the drill must come out and carefully drill out the set screw. Here's how to remove them using a a miniature butane torch [1]
- Good website for more tips on how to get set screws out and ball joints separated. [2]
- If you are doing this DIY with a jack and stands the easiest way is to remove the Steering Knuckle (also Spindle or Hub) (Item 5) with the arms attached after removing the brake caliper. Just remove the tie rod end from the knuckle then disconnect the strut from the control arm, followed by releasing the upper control arm from the knuckle then control arms from the chassis. This way it is a lot easier to remove the arms from the knuckle on a work-bench.
- Removing the Steering Knuckle (also Spindle or Hub) (Item 5) as a first step really frees up the area for further work. Please note that it is essential to use a 5mm hex key to hold the center stud from turning when removing the 21mm nut at the wheel hub. A long handled key with a Blackhawk brand 21mm ratcheting closed end wrench is useful.
- After strut replacement the correct procedure is to do a ride height adjustment using M-B's Star Diagnosis System (SDS) and then a four wheel alignment, failure to do so will result in bad tyre wear.
- As long as you do not extend or shorten the Tie-Rod, from the inner tie rod, after it is disconnected from the steering knuckle, there is no need for alignment. So, leave the Tie-rod alone after you separate it from the knuckle.
- When you are done with repair, put the wheels on and carefully lower the vehicle back down with the weight of the car resting on the suspension. THEN, tighten the airmatic fittings and turn the car on. The vehicle should return back to its normal height. Only tighten the lower control arm bolt to the vehicle fitting with the vehicle weight fully on the wheels (or lower the car onto car ramps), as this will prevent the rubber from being torqued and tearing in the lower control arm.
DIY Repairs - Complete Front Axle/Suspension
Before starting any DIY repairs make sure to read the Tips section above.
DIY How To Remove Ball Joints Using a Ball Joint Separater Tool
This video shows in detail how to replace the Ball Joint outside of the car (with the steering knuckle removed from the car).
http://www.benzworld.org/forums/w220-s-class/1519699-w220-ball-joint-replacement-diy-tutorial.html
DIY How To Remove Ball Joints Using a Ball Peen Hammer
DIY How to Replace Front Lower Control Arm Bushings
http://www.benzworld.org/forums/w220-s-class/1810897-02-s500-lower-control-arm-bushings.html
DIY How to Replace Front Lower Control Arm and Torque Strut
This video shows in detail how to replace the lower Control Arm (aka Spring Link) and the Radius Rod (aka Torque Strut).
DIY Fitted Bolt
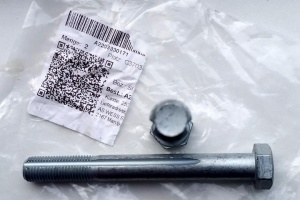
The Transverse Control Arm and Thrust Arm uses standard bolt A2203330071 fitted at factory. After an accident or through years of heavy use the chassis of the vehicle deforms which causes problems for suspension geometry adjustment. For more flexible suspension adjustment a fitted bolt A2203330171 can be installed. See wheel alignment.
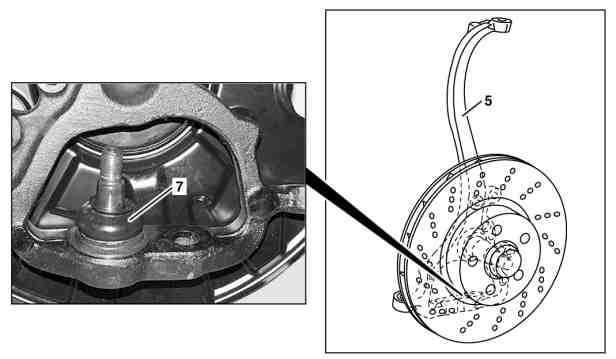
Replace supporting joint
|
|
- Remove steering knuckle (5)
- Check supporting joint (7)
- Press supporting joint (7) out of steering knuckle (5)
- Install in the reverse order
The joint can be pressed out without completely removing the steering knuckle, but it is much more convenient to do it on removed steering knuckle.
Remove/install torque strut at front axle
|
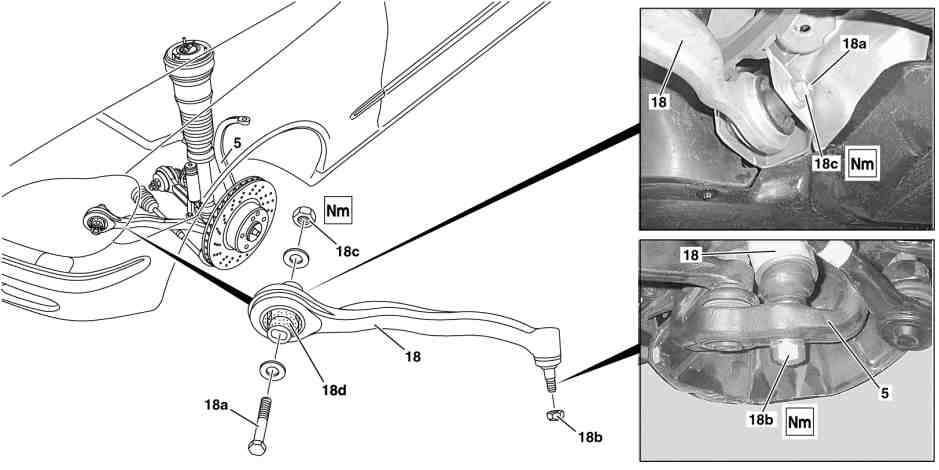
|
- Lift vehicle on lifting platform.
- Remove front wheel
- Press radius rod (18) out of steering knuckle. Installation: Replace self-locking nut (18b).
- Detach front engine compartment paneling from the inner paneling of the fender
- Swing back the inner paneling of the fender
- Unscrew nut (18c), pull out bolt (18a) and remove strut rod (18) from front axle carrier.
- If repair kit installed: The bolt (18a) may not be twisted. Always counterhold bolt (18a) when loosening or tightening nut (18c), otherwise the lock tabs for caster adjustment in the rubber mount (18d) will be sheared off.
- Installation: Screw on nut (18c) of bolt (18a) until it abuts, however do not tighten yet so that the rubber mount (18d) of the strut rod (18) can twist when the vehicle is rocked to settle the suspension. Tighten nut (18c) with the vehicle in curb position.
- Check rubber boot on ball joint of torque strut (18) for damage. If damaged the strut rod (18) should be replaced.
- Check rubber mount (18d) of torque strut (18) for damage. If damaged the strut rod (18) should be replaced.
- Install in the reverse order. Installation: Only tighten nuts (18b, 18c) in the ready-to-drive condition.
Torque specifications:
- Self-locking nut, torque strut to front axle carrier: Stage 1: Nm 80, Stage 2: Angle 120.
- Self-locking nut, radius rod to steering knuckle: Stage 1: Nm 50, Stage 2: Angle 60.
Remove/install steering knuckle
|
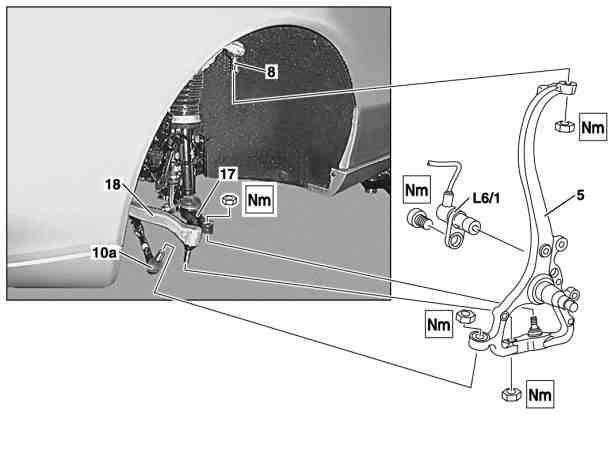
|
- Remove front wheel
- Remove brake disc
- Remove front wheel hub (actually not needed)
- Detach brake cover plate
- Detach left front rpm sensor (L6/1) from steering knuckle (5)
- Press tie rod joint (10a) out of steering knuckle (5)
- Press follower joint (8) out of steering knuckle (5)
- Press radius rod (18) out of steering knuckle (5). Do not detach torque strut (18) from the front axle carrier.
- Press spring control arm (17) out of steering knuckle (5). Do not detach spring control arm (17) from the front axle carrier.
- Check supporting joint
- Install in the reverse order
- Before starting engine, actuate brake pedal several times until the pressure is built up and maintained in the brake system.
- Only tighten nuts and bolts of chassis components when vehicle is in a ready-to-drive condition.
Torque specifications:
- Self-locking nut, track control arm to stub axle: Stage 1: Nm 50, Stage 2: ° 60.
- Self-locking nut, radius rod to steering knuckle: Stage 1: Nm 50, Stage 2: ° 60.
- Self-locking nut, upper wishbone follower joint to steering knuckle: Stage 1: Nm 20, Stage 2: ° 90.
- Self-locking bolt, front axle rpm sensor to steering knuckle: Nm 25
- Self-locking nut, tie rod to steering knuckle: Stage 1: Nm 50, Stage 2: ° 60
- Bolt brake cover plate to steering knuckle / wheel carrier: M6 Nm 10
Inspect front axle joint for play, inspect rubber boots
|
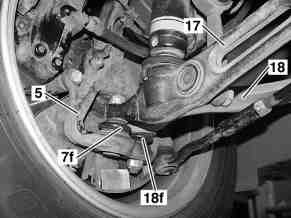
|
- Check rubber boot (7f) on supporting joint for leakage and condition. If the rubber boot (7f) is leaky, replace supporting ball joint (7) or lower control arm.
- Check front axle supporting joints
- Check rubber boot (18f) on ball joint of torque strut (18) for leaktightness and condition. If the rubber boot (18f) is leaky, replace strut rod (18).
- Check rubber boot on follower joint for leakage and condition. If rubber boot is leaky (e.g. grease escape) replace upper transverse control arm or upper ball joint.
- Check follower joint for play. If there is play in the upper ball joint, replace upper transverse control arm or upper ball joint.
Checking supporting joint and follower joint of steering knuckle mount (removed)
|
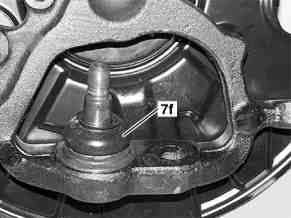 
|
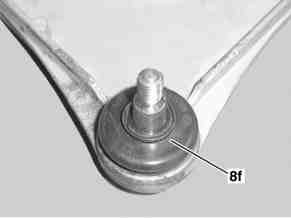
- Move the ball pin in all directions with an approximately 150 mm long pipe. The ball pin should move without play (without seizing), and should not cause any creaking noise.
- Check rubber boot (7f) on supporting joint for cracks and damage. Replace supporting joint if necessary.
- Check rubber boot (8f) on follower joint for cracks and damage. If necessary, replace follower joint or upper transverse control arm. For upper transverse control arms made of die-cast aluminum the upper transverse control arms must be replaced. For upper transverse control arms made of sheet metal aluminum the follower joint must be replaced.
Checking follower joint of steering knuckle mount (installed)
|
|
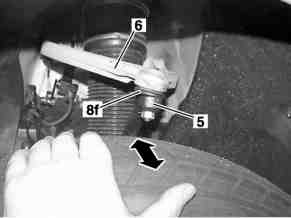
- Raise vehicle with lifting platform
- Check rubber boot (8f) for signs of cracks and damage and, if necessary, replace upper transverse control arm or follower joint. For upper transverse control arms made of die-cast aluminum the upper transverse control arms must be replaced. For upper transverse control arms made of sheet metal aluminum the follower joint must be replaced.
- Check play of follower joint and, if necessary, replace upper transverse control arm or follower joint. Feel the ball joint for signs of play while forcefully pushing and pulling the front wheel. For upper transverse control arms made of die-cast aluminum the upper transverse control arms must be replaced. For upper transverse control arms made of sheet metal aluminum the follower joint must be replaced.
- Check rubber boot (8f) for leaktightness and condition. If rubber boot is leaking (e.g. grease leaking out) install new upper transverse control arm (6).
Check front axle supporting joints
| * 7 - Support joint | 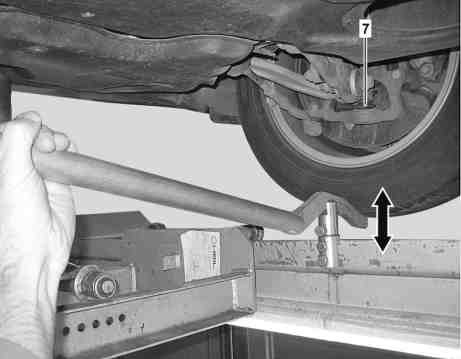 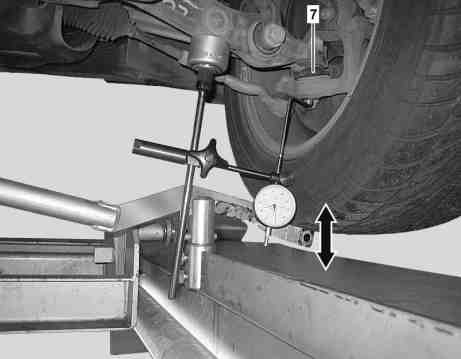
|
- Check rubber boot of supporting joint (7) for cracks and damage
- Check play in supporting joint (7).
- With pit or drive-on platform with guard edge check play by moving the front wheel up and down.
- Checking by hand: Replace supporting joint if play is perceptible.
- Checking with dial indicator: Replace supporting joint if play > 0.6 mm.
- On vehicle lift check play by moving the front wheel up and down while simultaneously feeling the supporting joint (an assistant is required). Replace supporting joint if play is perceptible.
Remove/install front wheel hub
|
|
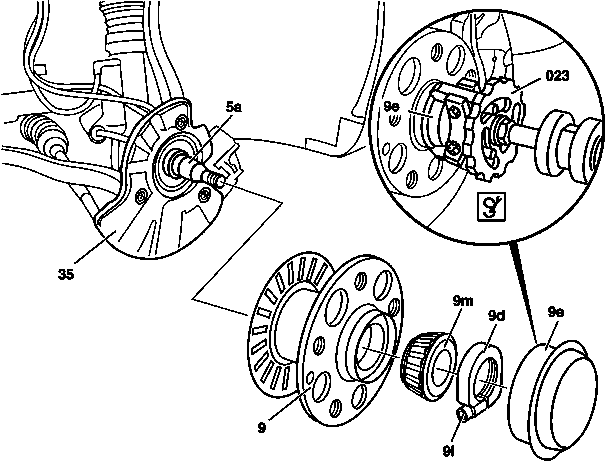
- Only tighten nuts and bolts of chassis components when vehicle is in a ready-to-drive condition.
- Remove front wheel
- Remove brake disc
- Pull off hub cap (9e)
- Undo hexagon socket head screw (9i), remove clamp nut (9d) and remove outer tapered roller bearing (9m). Installation: Adjust wheel bearing play.
- Pull off front wheel hub cover (9). If the front wheel hub (9) is seized, detach AR33.20-P-0310-01A the front wheel hub (9) using a slide hammer puller (023). Installation: Coat the radial sealing ring with grease and, if necessary, pack the space between the lip and outer tapered roller bearing (9m) with grease. Push the front wheel hub (9) with inner tapered roller bearing and radial sealing ring onto the steering knuckle spindle (5a). Installation: Fill the front wheel hub (9) with grease.
Check:
- Check brake cover plate (35). Replace if necessary. Installation: When using a new brake cover plate (35), ensure that the rubber grommet that seals the wheelspeed sensor socket is pushed onto the wheelspeed sensor.
- Check steering knuckle spindle (5a) for discoloration and wear, and check bearing surface of radial sealing ring. Discoloration can be caused by the excessive heat that can result from incorrect bearing adjustment: Replace stub axle.
- Check front wheel hub (9). Check tapped holes and rotor teeth for damage, and if necessary: Install new front wheel hub (9).
- Check the lateral and radial runout of the front wheel hub (9). If permitted measurements are exceeded: Install new front wheel hub (9).
- Inspecting tapered roller bearing and bearing races. Damaged bearings cannot be replaced (actually can); if necessary: Install new front wheel hub (9).
- Install in the reverse order
- Front wheel hub flange lateral runout: mm 0.03
- Radial runout on disk wheel alignment fitting of front wheel hub: mm 0.05
Inspecting tapered roller bearing and bearing races
The tapered roller bearings and bearing races can be used again if:
- the tapered rollers and bearing races have a smooth, grey running track
- no discoloration (from severe overheating, etc.) is found.
- the roller cage and the face ends of the tapered rollers are not damaged.
- the bearing races sit tight in the wheel hub.
The tapered roller bearings and bearing races cannot be interchanged. If damage is present, a new front wheel hub must be installed. The replacement front wheel hub is supplied complete with both bearings and sealing ring.
Adjust wheel bearing play
|
|
Removing:
- Remove front wheel
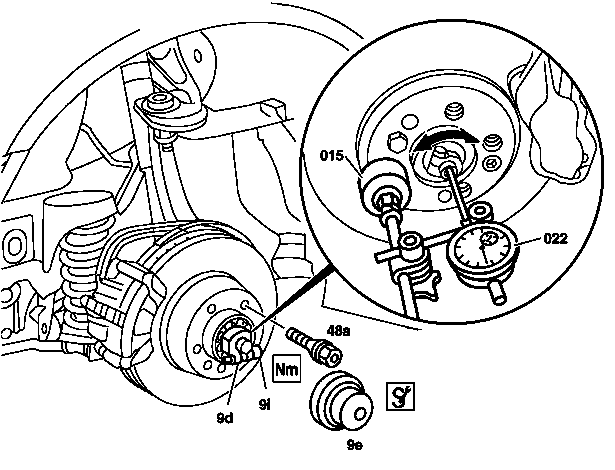
- Turn-in wheel bolt (48a) opposite from brake rotor attachment bolt (to immobilize brake rotor).
- Press brake pads back into brake caliper
- Pull off hub cap (9e) using removal and installation tool
Checking:
- To set up the wheel bearing loosen hexagon socket bolt (9i) and tighten clamp nut (9d) lightly whilst turning the front wheel hub.
- Mount dial indicator (022) with dial indicator holder (015) on the brake disk
- Adjust wheel bearing play by turning (arrow) the clamping nut (9d) in stages while pushing and pulling the brake disk firmly back and forth. Do not twist or tilt the wheel hub during the measurement. Correct measurement is only possible by pulling and pushing parallel to the wheel axle. Incorrect measurement will result in the set wheel bearing play being too small. This can then lead to wheel bearing damage.
- Tighten the Allen bolt (9i), check the wheel bearing end float again.
- Remove the dial indicator (022) with dial indicator holder (015).
Install:
- Fill hub cap (9e) with high-temperature roller bearing grease.
- Mount hub cover (9e)
- Remove wheel bolt (48a)
- Mount front wheel
- Wheel bearing play at front axle: mm 0.01...0.02
- Filling capacity: Hub cover: g 15, Hub (total capacity): g 95
Replacing wheel bearings
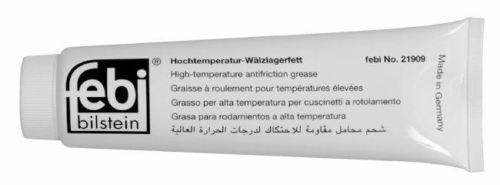
High temperature antifriction bearing grease (NLGI grade 2). Passenger cars: Front wheel hubs
Product name (Customer, town/country):
- MB 265.1 Hochtemp-Wälzlagerfett A 002 989 00 51 (Daimler AG, Stuttgart/Germany)
- ARAL Radlagerfett (Aral Aktiengesellschaft, Hamburg, Germany)
- AVIA LITHOPLEX 2 EP (Avia Mineralöl-AG, Munich, Germany)
- Axellence 152 S Green (Axel Christiernsson International, NOL/SWEDEN)
- AXELLENCE 1525 EPS Green (Axel Christiernsson International, NOL/SWEDEN)
- Caltex Delo Grease ESI (Chevron Global Lubricants, GENT/ZWIJNAARDE, BELGIUM)
- Castrol LMX Li-Komplexfett (Castrol Limited, SWINDON, UNITED KINGDOM)
- Chevron Delo Grease ESI (Chevron Global Lubricants, GENT/ZWIJNAARDE, BELGIUM)
- Fuchs Renolit LX-PEP 2 (Fuchs Petrolub AG, Mannheim, Germany)
- Hytex EP 2 LF (Chevron Global Lubricants, GENT/ZWIJNAARDE, BELGIUM)
- KAJO-Wälzlagerfett LC 002 (Kajo-Chemie GmbH, Anröchte, Germany)
- LiLube Plus (SAF Holland GmbH, Aschaffenburg/Germany)
- MOTOREX FETT 3000 (Bucher AG Langenthal, Langenthal, Switzerland)
- RAVENOL Hot Red Grease HRG 2 (Ravensberger Schmierstoffvertrieb GmbH, Werther, Germany)
- Renolit LX-PEP 2 DC (Fuchs Petrolub AG, Mannheim, Germany)
- rhenus LKR 25 (Rhenus Lub. GmbH & Co KG, Mönchengladbach, Germany)
- Siebert high-temperature grease 5611 (Siebert GmbH, Mönchengladbach/Germany)
- Texaco Starplex EP 2 (Chevron Global Lubricants, GENT/ZWIJNAARDE, BELGIUM)
Unlisted products satisfying 265.1 specification:
- FEBI BILSTEIN 21909
- SWAG 10 92 1909
Remove/install brake disc (front axle)
|
|
Remove/install:
- Remove wheels
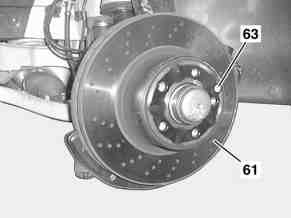
- Check brake lining thickness and brake disks (61). Inspect condition of brake disks. Check brake lining thickness. Only replace brake pads and brake disks (61) in complete sets if necessary. If the brake pads have worn down to beyond the wear limit, the bar between the sealing groove and dust cap may be damaged; therefore: Inspect brake system for leaks with pressure tester.
- Remove brake disk. Do not detach brake hose, instead attach brake caliper to vehicle so that it is free of tension. Do not kink or tension brake hose, as otherwise it will be damaged.
- Remove locking bolt (64) and remove brake disk (61). Installation: Replace securing bolt (64)
Clean:
- Clean contact surfaces and seat of brake disk (61) if necessary.
- Lightly grease seat of brake disk (61) using Hot lubricating paste.
- Install in the reverse order
Checking:
- Carry out brake test on the test stand
Torque specifications:
- Locking bolt of rear/front axle brake disk: Nm 10
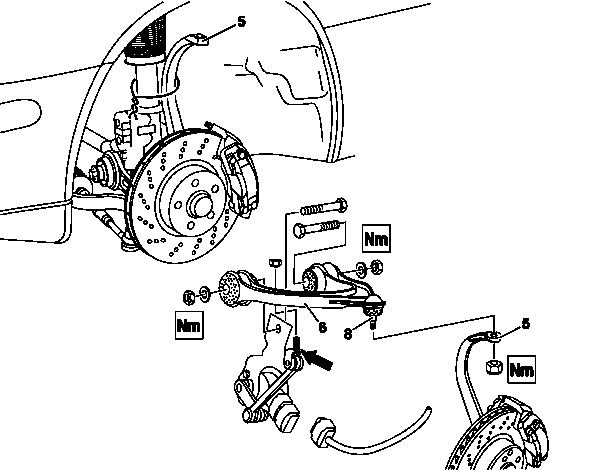
Remove/install upper control arm
- Remove front wheel
- Separate plug connection from level sensor.
- Detach link rod (arrow) from level sensor on the upper transverse control arm (6)
- Press follower joint (8) out of steering knuckle (5)
- Secure steering knuckle (5) with wire to prevent it from swinging away
- When removing the right upper transverse control arm, detach coolant expansion reservoir and put to one side. Do not detach the coolant hoses.
- Remove upper control arm (6) from frame. Installation: Do not tighten nuts until vehicle is ready to roll. Counterhold nut with suitable box wrench.
- Check follower joint
- Install in the reverse order
Torque specifications:
- Self-locking nut of upper wishbone on front end: Nm 50
- Self-locking nut, upper wishbone follower joint to steering knuckle: Stage 1: Nm 20, Stage 2: ° 90
- Nut, level sensor link rod to upper control arm: Nm 10
Check track rod and drag link linkage for play, check rubber boots
|
|
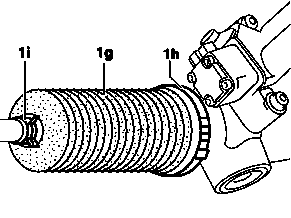
|
- Switch off ignition
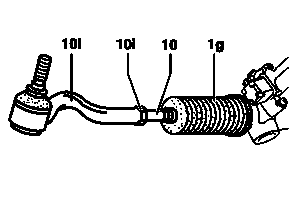
- Check boots (1g). Never check the boot (1) by pressing in or around the ribs. This will cause damage to the plastic and then result in leakage. Raise vehicle at front axle. Stretch bellows by turning the steering to the left and right while checking for damage (cracks, chafing marks and dents). If damaged, the boot (1g) must be replaced.
- Check tie rod ball joint for play. Inspect tie rod joints by pulling and pushing firmly. In event of play on tie rod ball joint the tie rod (10) is to be replaced.
- Check rubber boots of tie rod ends (10l) for signs of leaks and condition. If a rubber boot leaks replace tie rod (10).
Wheel speed sensor
Shown on model 203
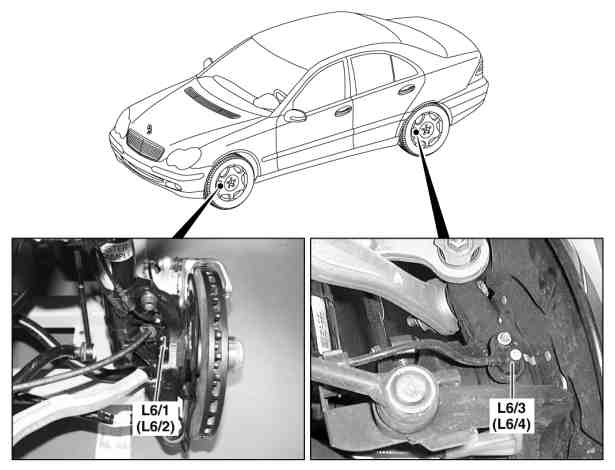
|
|
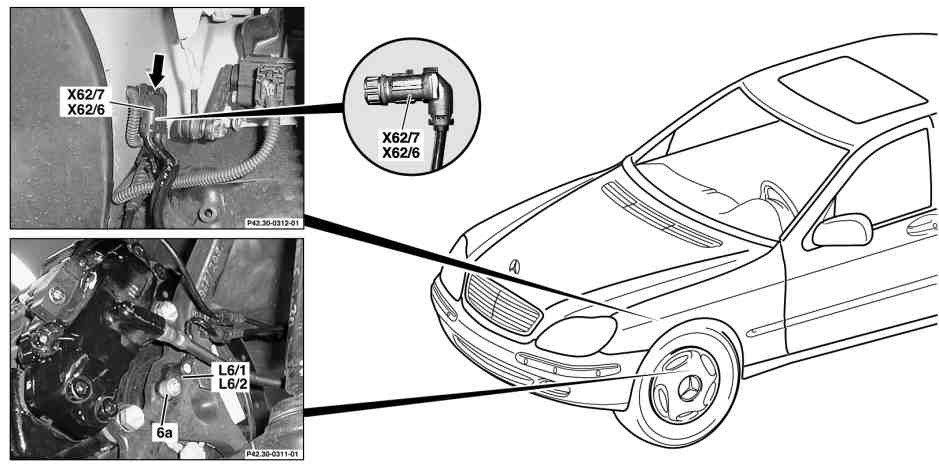
The front wheelspeed sensors (L6/1 and L6/2) are mounted on the front steering knuckle assemblies. The rear wheelspeed sensors (L6/3 and L6/4) are installed on the rear wheel carriers.
It is active sensor consisting of a casing and a sensor element relying on a magnetoresistive effect to monitor rotation rate. The task of the sensor is to supply the current wheel speed to the ESP control module.
Function of the active wheel speed sensor
The diagram shows the current path through the active wheel speed sensor during an acceleration phase.
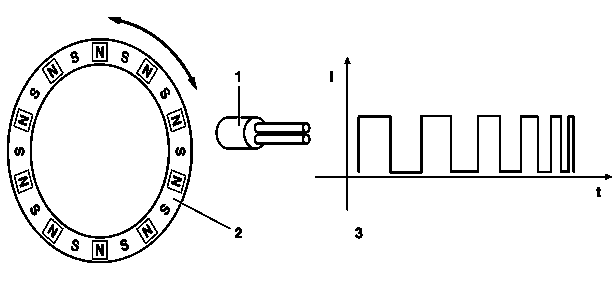
|
|
The strength and direction of an external magnetic field causes a change in the internal resistance inside the sensor. An electronic analysis system accommodated in the sensor produces a square-wave signal, whose frequency is proportional to the rotational speed but whose amplitude is constant. This signal is received by the relevant dynamic handling control system and transmitted over the CAN.
A reluctor with multiple trigger points generates the external magnetic field. This consists of an elastomer plastic containing metallic particles. These are aligned by a special magnetization method so as to produce various magnets whose polarity at the circumference alternates from north to south.
Parts
- A2205400117 (OE) - left/right (~EUR 110).
- FEBI 27857 (~EUR 40)
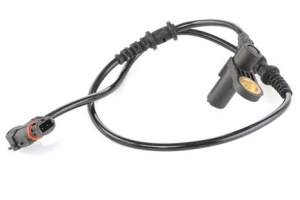
Remove/install left front or right rpm sensor
Shown on model 220
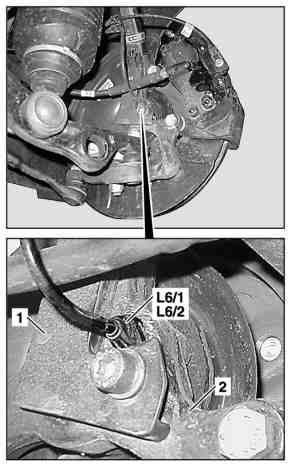
|
|
Remove/install:
- Remove bolt (6a).
- Take out left front rpm sensor (L6/1) or right front rpm sensor (L6/2). Installation: Apply light coating of grease to bore in steering knuckle (2). Hot lubricating paste.
- Unlock and disconnect left front axle multiple circuit junction connector, major assembly compartment (X62/7) or right front axle multiple circuit junction connector, major assembly compartment (X62/6). Press clip in direction of arrow.
- Install in the reverse order.
- Installation: Ensure that the electrical feed line to the rpm sensor has sufficient play. The vehicle suspension must be able to fully compress and rebound without damaging the feed line. The feed line should not chafe at any point, as this could lead to system failure.
- Installation: Model 230 without code (P99) Special model "AMG Black Series", observe installation position: The chafe protection (1) must be screwed to the front rpm sensor as shown here. It must not be mounted between the rpm sensor and steering knuckle (2).
- Installation: On model 215, 220 check rotor of wheel hub for damage. Pay attention to cleanliness of magnetic tip.
- Connect STAR DIAGNOSIS, read out fault memory and erase if necessary
Torque specification:
- Self-locking bolt, front axle rpm sensor to steering knuckle: 25 Nm
Front wheel speed sensor can be replaced without removing the wheel. To get access the steering wheel must be turned out as much as possible and Airmatic raised setting must set.
Remove/install left rear or right rpm sensor
Torque Specifications - Complete Front Axle/Suspension
Torque specs for a 2004 S600 (with ABC) are as follows from WIS. According to WIS, these values apply to all W220 and 215 cars with ABC. If your 2003 S600 has ABC, then it is assumed these apply. Do double check though as we will not be held liable for any damages.
- Tie rod to steering knuckle (spindle) is 50NM then 60 degrees
- Torque arm (thrust arm) to chassis 80NM then 120 degrees
- Torque arm (thrust arm) to knuckle (spindle) 50NM then 60 degrees
- Upper control arm to knuckle (spindle): 20NM then 90 degrees
- Lower control arm (aka spring control arm-front rear lower control arm that shock mounts) to knuckle (spindle) 50NM then 60 degrees
- Lower control arm (aka spring control arm-front rear lower control arm that shock mounts) to chassis 80NM then 120 degrees
NOTE: all must be torqued under load at the correct ride height (ie the vehicle on the ground). Since most don't have a four post lift, you'll need to take careful measurements, then support each corner accordingly before fully tightening. You will also need four eccentric bolts if you wish to have a proper wheel alignment done afterwards. Eccentric bolt kits are # W0133-1630584
