Rear doors: Difference between revisions
Jump to navigation
Jump to search
m (Pokseva moved page WIS 72.12 Rear Door to Rear doors) |
|||
| Line 1: | Line 1: | ||
[[ | == Remove/install door lining on rear door == | ||
<!-- AR72.12-P-1010M, Remove/install door lining on rear door, 15.9.97 | |||
MODEL 220.026 /028 /063 /065 /070 /073 /074 /075 /128 /165 /170 /173 /174 /176 /179 | |||
MODEL 220.175 /178 | |||
except CODE (Z04) Light armoring | |||
except CODE (979) Special protection version | |||
MODEL 220.875 /878 except CODE (P082) Electrically adjustable curtains | |||
--> | |||
{| | |||
|[[File:W220_remove_install_door_lining_on_rear_door_1.png]] | |||
| | |||
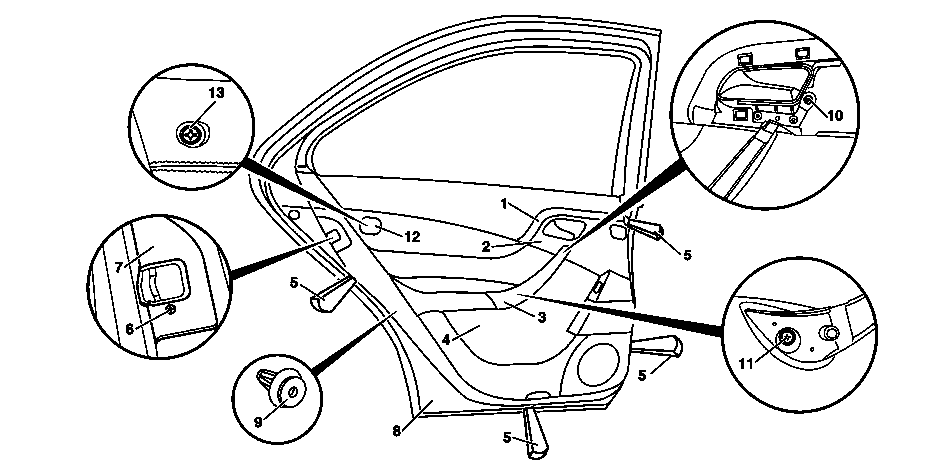
* 1 - Trim strip | |||
* 2 - Door control unit covering | |||
* 3 - Door handle cover | |||
* 4 - Door lining | |||
* 5 - Mounting wedge | |||
* 6 - Bolt | |||
* 7 - Lock trim surround | |||
* 8 - Inner door panel | |||
* 9 - Clip retainer | |||
* 10 - Bolt | |||
* 11 - Bolt | |||
* 12 - Cover | |||
* 13 - Bolt | |||
|} | |||
{| | |||
|[[File:W220_remove_install_door_lining_on_rear_door_2.png]] | |||
| | |||
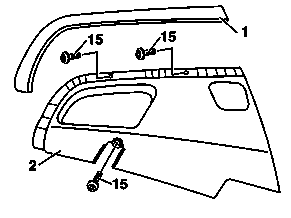
* 1 - Trim strip | |||
* 2 - Door control unit covering | |||
* 15 - Bolts | |||
|} | |||
{| | |||
|[[File:W220_remove_install_door_lining_on_rear_door_3.png]] | |||
| | |||
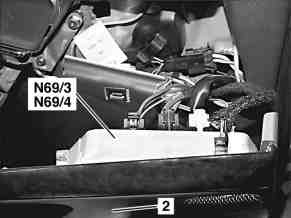
* 2 - Door control unit covering | |||
* N69/3 - Left rear door control unit | |||
* N69/4 - Right rear door control unit | |||
|} | |||
# Press trim strip (1) off of door control module covering (2) with mounting wedges (5). | |||
# Remove door handle cover (3) from door handle | |||
# Unscrew bolts (15) and press door control module covering (2) out of door lining (4) with mounting wedges (5) and remove | |||
# Disconnect connectors from left rear door control module (N69/3) and right door control module (N69/4) and remove door control module covering (2) | |||
# Unscrew bolt (6) from lock cover plate (7) and remove lock trim surround (7). | |||
# Remove cover (12) and unscrew bolt (13) | |||
# Press door lining (4) off of inner door panel (8) with mounting wedges (5). Move mounting wedges (5) directly to clip retainer (9) so that the retainer tab of the clip retainer do not tear out off the door lining. | |||
# Pry door lining (4) out of retaining clamps on at top of sealing rail with mounting wedges (5) and simultaneously remove from inner door panel. | |||
# Unhook control cable from inside door opener. | |||
# Disconnect electrical connectors from door lining (4) and lay down door lining (4). | |||
# Check insulating mat and clip retainers (9). Replace damaged insulating mat and clip retainers. | |||
# Install in the reverse order. Installation:Remove clip retainers still on inner door panel (9) and install at corresponding point on door lining. | |||
{| | {| | ||
|{{#ev:youtube|https://www.youtube.com/watch?v=k_ekMDzNy2U|320|left|Rear door panel removal.|frame}} | |{{#ev:youtube|https://www.youtube.com/watch?v=k_ekMDzNy2U|320|left|Rear door panel removal.|frame}} | ||
|} | |} | ||
Revision as of 19:10, 19 April 2017
Remove/install door lining on rear door

|
|

|
|
- Press trim strip (1) off of door control module covering (2) with mounting wedges (5).
- Remove door handle cover (3) from door handle
- Unscrew bolts (15) and press door control module covering (2) out of door lining (4) with mounting wedges (5) and remove
- Disconnect connectors from left rear door control module (N69/3) and right door control module (N69/4) and remove door control module covering (2)
- Unscrew bolt (6) from lock cover plate (7) and remove lock trim surround (7).
- Remove cover (12) and unscrew bolt (13)
- Press door lining (4) off of inner door panel (8) with mounting wedges (5). Move mounting wedges (5) directly to clip retainer (9) so that the retainer tab of the clip retainer do not tear out off the door lining.
- Pry door lining (4) out of retaining clamps on at top of sealing rail with mounting wedges (5) and simultaneously remove from inner door panel.
- Unhook control cable from inside door opener.
- Disconnect electrical connectors from door lining (4) and lay down door lining (4).
- Check insulating mat and clip retainers (9). Replace damaged insulating mat and clip retainers.
- Install in the reverse order. Installation:Remove clip retainers still on inner door panel (9) and install at corresponding point on door lining.
