Arduino Controlled PSE Pump
Description
The Pneumatic System Equipment (PSE) Pump performs several functions including locking/unlocking of doors, extension and retraction of the trunk handle and dropping the rear headrests. It consists of an electronic controller, an air pump and some solenoid valves. Since the electronic controller (printed circuit board) is programmed for the specific vehicle that it is in, if the PSE fails and is being replaced with a new or used one, it needs to be either reprogrammed or the printed circuit board needs to be swapped with the original one. This should retain all your vehicle’s PSE functionality.
However, if the original printed circuit board is faulty and you have no means to reprogram a replacement, an alternate solution is to create a custom electronic controller using an Arduino.
Cautionary Note
The intent of this page is to document what was learnt from experimenting with the PSE, and is not meant to be a guide. It is not the recommended method of repairing a PSE pump due to its complexity and lack of safety features. It does not connect to the car’s electronics and therefore will not operate as per the manufacturer's intent. This includes some of the convenience features and more importantly, the safety procedures during emergencies.
Main Components
The main components are an RF remote module, an Arduino, an 8-channel Relay Module and the Mercedes PSE pump with the PCB (printed circuit board) removed. The Arduino reads when a button on the remote is pressed and then opens/closes PSE valves via the relays to achieve the desired action.
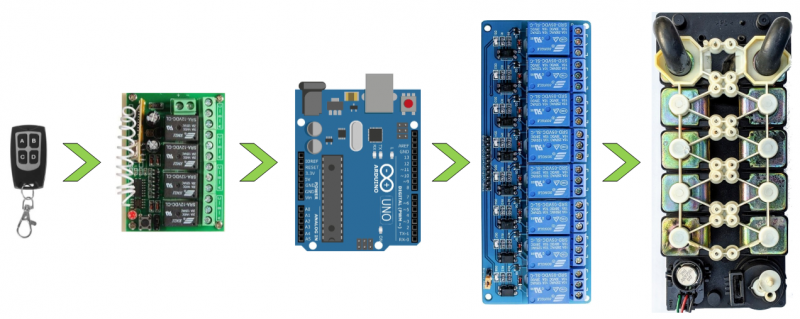
A generic Arduino Uno and a 5V 8-channel Optocoupler Isolation Relay Control Board can be used. The remote control shown is a 433MHz Wireless RF 12v 4-Channel Wireless Remote Control Relay Module.
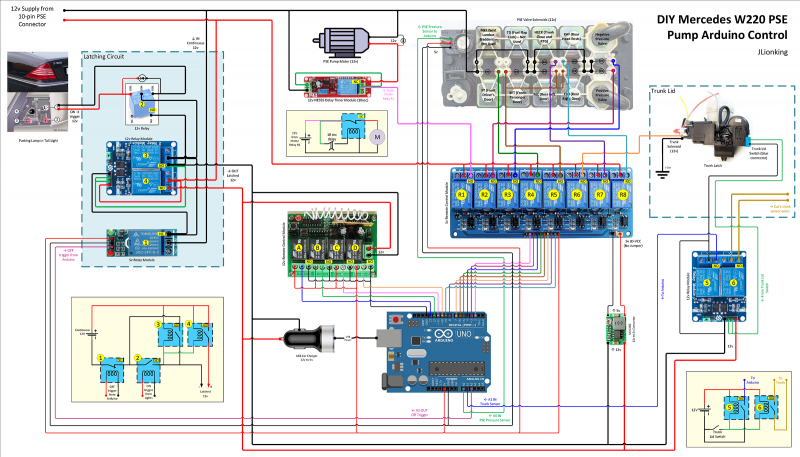
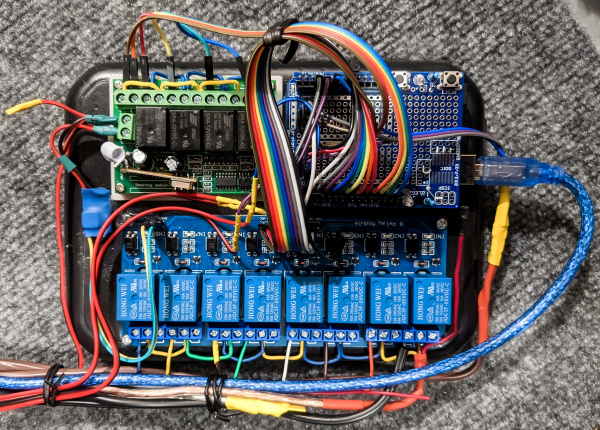
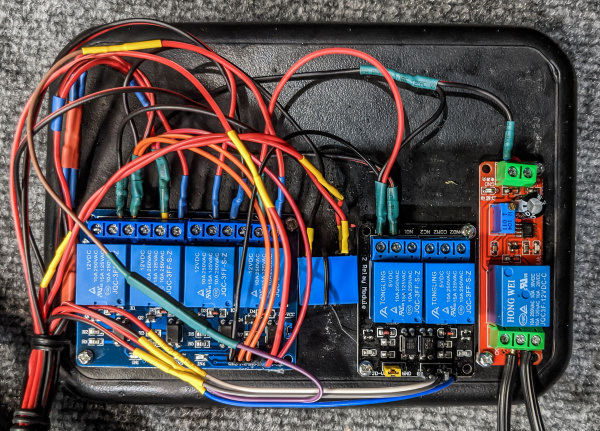
PSE Solenoids
In the W220, the PSE has 10 solenoids. Two of them are for switching between positive and negative pressure. The remaining eight route air to/from specific parts in the vehicle (More info). Running the motor with the appropriate solenoids energized performs a specific action.For example, to unlock the driver's door, the solenoids for negative pressure and the front driver's door (FT) are energized. The motor is run for about 5 seconds, and then the valves are de-energized.
With the Arduino controlling the motor and all the solenoids, performing these sequences is pretty straight forward.
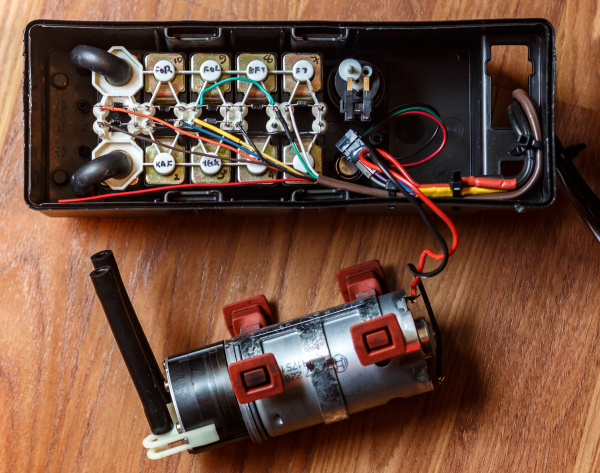
The solenoids require flyback diodes to prevent sparking at the relay.
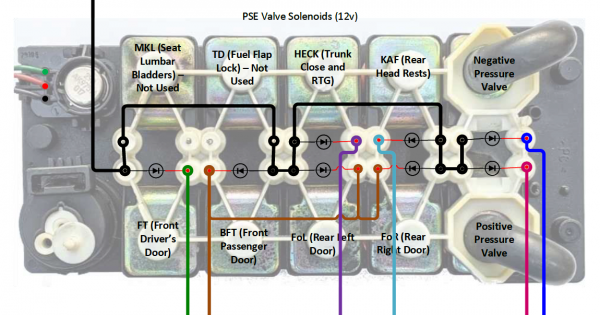
The front passenger and both rear doors can be combined to keep it simple. This setup skips the seat bladder solenoid since the car it is going in does not have intact seat bladders. The fuel flap lock solenoid has also been skipped since there’s no secondary means to manually unlock/unlatch it in case of a failure.
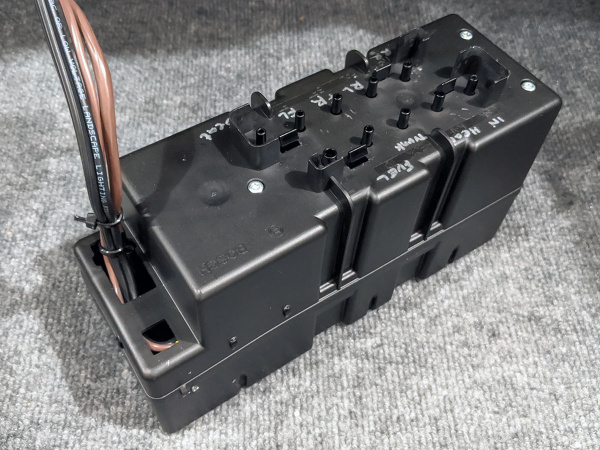
The Trunk
In a W220 without an auto-closing trunk, the PSE pump has three trunk functions - unlocking, soft closing and extending/retracting the hidden handle. This is well documented here.
The latch in the trunk lid has its own solenoid valve similar to the ones in the PSE. This needs to be energized to unlock the trunk. The wire to the solenoid is in the smaller 6pin connector that plugs into the PSE. The solenoid already has a flyback diode, so I did not need to add one here.
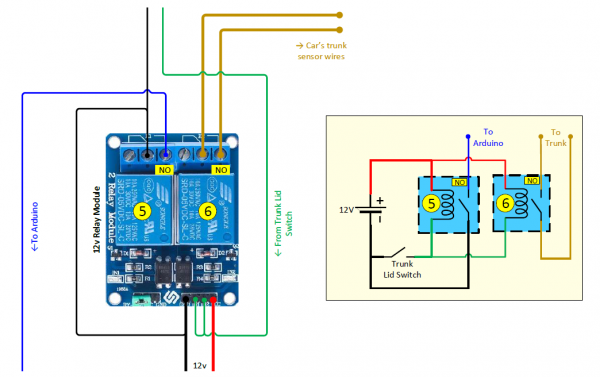
The trunk also has a sensor/switch that detects when the trunk lid is closed. Relays can be used to isolate the signal going to the Arduino from the one going to the car. When it detects that the lid has been closed, the Arduino initiates the soft-close sequence and retracts the hidden handle (RTG).
Power Source
Power to the whole system is drawn from the 10-pin connector that plugs into the PSE unit (Pins 2 and 6). That way the system is protected by the same 20amp fuse. The male connector from the failed PSE board can be repurposed.
The Arduino is powered by a USB car charger and the 5v 8-channel relay is powered by a Mini360 DC-DC Buck Converter set to 5v.
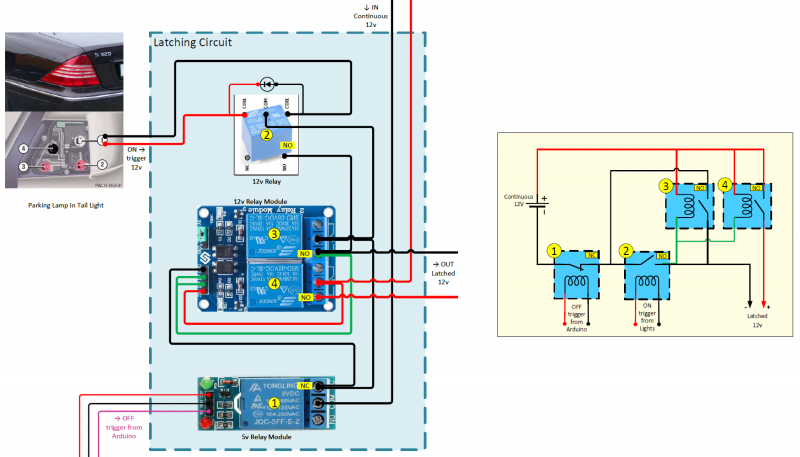
Keeping the Arduino continuously powered all the time will drain an idle car’s battery in a couple of weeks or so. Since the tail parking lights flash when the alarm is armed or disarmed, it can be used as a trigger to turn on a latching circuit that powers the Arduino. The Arduino breaks the latch automatically after 4 hours of inactivity, thereby turning itself off.
Motor Protection
Here are three safety measures to protect the motor from running for too long.
- The Arduino code will only run the motor for a predetermined number of seconds and then stop. It will not run indefinitely.
- The Arduino reads the air pressure from the pressure sensor in the PSE. The sensor runs on 5v from the Arduino and is hooked up to one of the analogue inputs. If the pressure is above (+ive) or below (-ive) a certain threshold, the motor will stop.
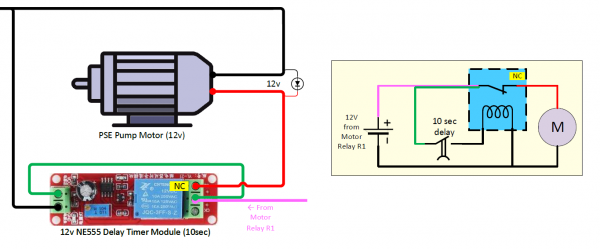
- Power to the motor is routed through an NE555-based 10 second delay timer. Even if something goes wrong with the Arduino or relays and the motor stays on for too long, this module will cut power to it after 10 seconds of running.
Arduino Code
Here’s the Arduino Controlled PSE Pump Code. Explanations are in the comments.
Double presses and long presses have been implemented. This allows us to perform more than one operation per button. It also makes the remote function more like a traditional keyfob.
Limitations
- This system currently does not connect to the car’s electronics in any way. So it does not work with any of the buttons in the car or the SmarKey keyfob. It also cannot arm/disarm the alarm. The Arduino remote is required to perform any action.
- The system is not a closed loop, meaning that it does not know if the requested action was actually completed successfully or not. It will send air to the door lock, but it does not know if the door was actually locked or not.
- The soft-close doors do not work. There are solenoids in each door that need to be energized to route air to the soft-close actuators. This has not yet been attempted.
Further Improvements
Collision detection - A 3-Axis Accelerometer and Gyroscope Sensor Module such as the MPU6050 can be used to detect an impact or a rollover. The doors can then be unlocked automatically.
Auto locking when the car moves - Either a GPS module or a CAN shield can be used to obtain the vehicle’s speed.
Bluetooth and Wifi - A module such as the ESP32 should allow remote control from my phone and enable Alexa/Google integration.
Switching to an Arduino Mini Pro - These should consume a lot less power, lowering the chance of draining the battery. An Arduino Mega 2560 PRO MINI could be used if more I/O pins are required.