Distronic
Description - Distronic and Distronic Plus
The Distronic system in Mercedes-Benz is an important feature to maintaining the selected vehicle speed (cruise control function) and also regulating the distance to a vehicle ahead of the car.
The Distronic detects the traffic situation ahead of the vehicle by means of the radar sensor located behind the radiator grille. If the Distronic approaches another vehicle travelling at a slower speed, the speed of the car is reduced. The Distronic control unit calculates the distance required and can activate the following over the CANbus:
- Increase/reduction in the specified engine speed (Engine management control ME-SFI(ME) control unit),
- Braking (Electronic Stability Program (ESP) control unit),
- Shifting gears (Electronic transmission control (ETC) control unit).
The Distronic can be used from a speed of approx. 30 Km/h to 180 Km/h or 20 mph to 110 mph. If no vehicle is driving ahead, the Distronic behaves in the same way as a normal cruise control.
The Distronic is a convenience system and not a safety system. The driver must himself brake when corresponding traffic situations arise.
If a vehicle suddenly appears ahead (e.g. as a result of changing lanes), the Distronic attempts to take control. The braking action is, however, limited to approx. 2 m/s (which equals approximately 20% of the maximum braking power) for safety reasons. If more braking power is required, the driver is warned by means of an audible signal.
There is also a further audible signal (off signal) which sounds if the vehicle speed drops below approx. 30 km/hour.
If the speed set with the cruise control lever is exceeded by depressing the accelerator pedal, the distance measurement of the Distronic continues to remain active even above 180 km/h (110 mph). The Distronic again controls the vehicle to the speed last set after the accelerator pedal is released.
The driver is able to influence the distance travelled behind the vehicle ahead with the distance potentiometer mounted in the centre console adjacent to the gear lever. The setting is actually a time setting of about 1 to 2 seconds.
If the Distronic is switched off, the calculation of the distance continues to remain active.
The display in the instrument cluster and the audible warning signal inform the driver if the distance to the vehicle ahead is extremely close or if there is a major difference in speed to the vehicle ahead. Visual indication (red distance warning lamp in the instrument cluster remains on) is also given if the time distance to the vehicle ahead is less than 0.8 seconds over a time period of more than 3 seconds.
The distance measurement range of the Distronic radar unit is 0 to 150 m.
Distronic
In W220 models UP TO 2004-05-31 with Data Card CODE 219, the Proximity Controlled Cruise Control Distance Radar (Distronic) system consists of a Distronic Radar Sensor (B29) (Item #30) and a separate Distronic Electronic Control Unit (ECU) (N63/1) (Item #10).
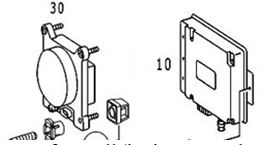
N63/1 is located in the front passenger footwell (both LHD and RHD vehicles, ie always the passenger footwell) and is connected to several control units via the CAN-C bus.
When following vehicles that are slowly decelerating the Distronic disengages at 20 mph. The Distronic will alarm with an audio and visual alert when the closure speed is not to its liking - the system can be turned on or off for that function.
The original video ‘Mercedes S-Class Distronic Cruise Control' in operation in a W220 is here;
Distronic Plus
In W220 models FROM 2014-06-01 the Proximity Controlled Cruise Control Distance Radar (Distronic) system was simplified with all the electronics now in an integrated radar sensor and control unit (A89) mounted behind the front grill. Note that for the later A89 Distronic, there are different connector versions for models 209/215/220 and 211/219/230
In these later models the Distronic Plus is more of an anti-collision system. It works great even in stop and go traffic situations and will even bring the car to a complete stop when needed. After a complete stop of more than three seconds, you just need to pull the cruise control stalk towards you and the car will accelerate. No need to touch the pedals!
Another great feature of Distronic Plus is that when you change lanes it accelerates as soon as you turn the turn signal on! For example, if your set speed is 100, but you are going at 80 because there is a car in front of you, as soon as you turn the left turn signal on, the car will start to accelerate if there is no car in the left lane. Very useful when you need to squeeze in between two cars!
Think of Distronic Plus as a robotic driving system that takes over from cruise control when the car detects another car in the 200meters (way beyond the braking system sensors) ahead. While there is a car in front Distronic Plus takes over from cruise control and tracks the car in front, maintaining a constant time gap as traffic speeds and slows. This mostly controls the throttle but will also brake in necessary. When the car in front gets too far in front the system then hands over to cruise control.
A video of a Distronic Plus in operation in a 2013 M-B B250 is here;
When following vehicles that are slowly decelerating the Distronic disengages at 20 mph. The Distronic will alarm with an audio and visual alert when the closure speed is not to its liking - the system can be turned on or off for that function. Refer to: Original Video ‘Mercedes S-Class Distronic Cruise Control’ at;
Issues - Distronic
Is it possible to retrofit Distronic Cruise Control Radar functionality to a W220?
Thanks to David Prokity’s Project on his 2006 S430 recorded on video on YouTube it is, and he states “This is absolutely the best option I have ever retrofitted”. David Prokity did the research and the physical install of the hardware and wiring. The reprogramming of the vehicle computer was outsourced. He was able to retrofit a W220 MY00 and a C215 MY04. He states that beside the horrible cost if you have to buy new parts, its a easy and straight forward installation. BUT "Make sure that you have all EXACT part #'s before you are starting".
The part which is a little more complicated is the coding. The W220 MY00 has had no SCN coding and all coding can be done with an offline DAS System. Later on more and more SCN coding was introduced and nowadays you need to modify your datacard in Stuttgart first, then pull the required SCN codes with an Online DAS.
Distronic Components - W220 up to 2004-05-31
For W220 up to 2004-05-31 with Data Card CODE 219 as per information found in WIS.
Distronic Function Description Contents

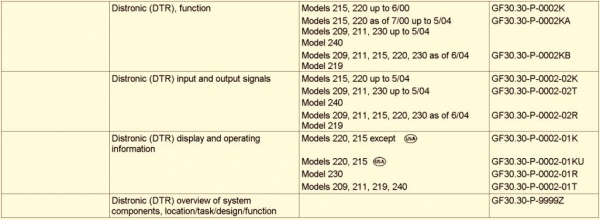
Distronic Function

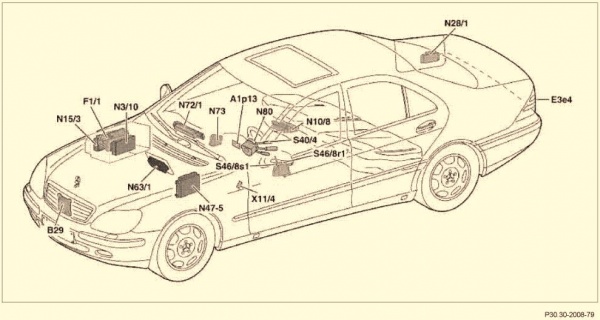

- Note Diagram is WRONG. N73 is the Electronic Ignition Switch (EIS) control unit and not the DI control unit.


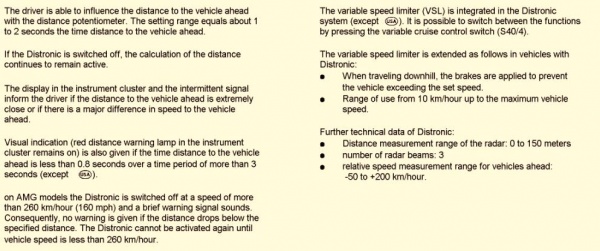

Distronic Input and Output Signals
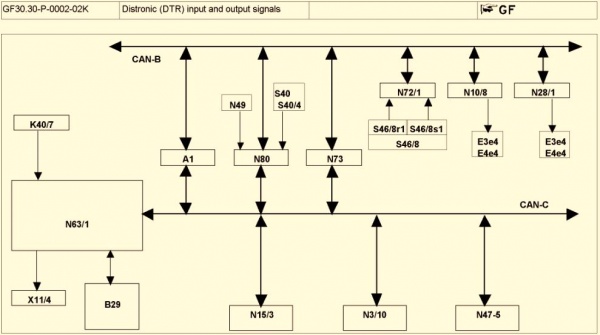

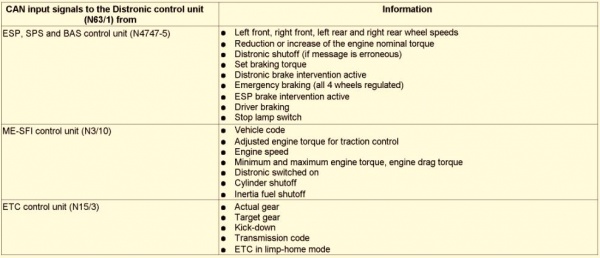

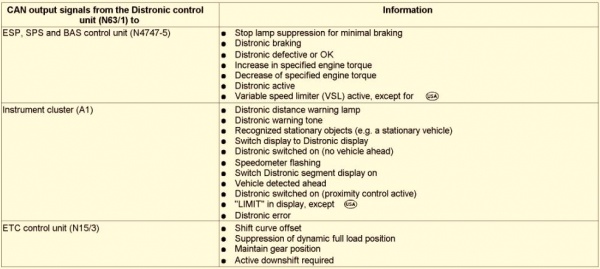

Distronic Display and Operating Information
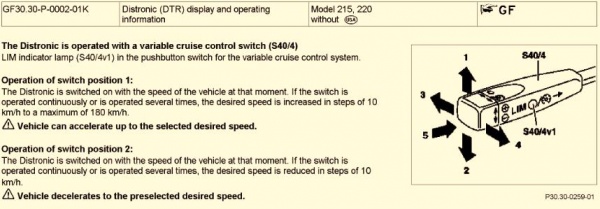


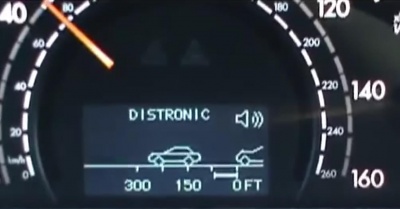

Distronic Radar Sensor - Location Task Design Function
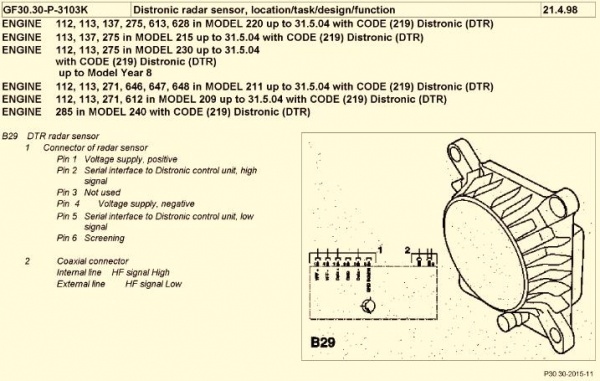


Distronic Radar Sensor - Location

Distronic Control Unit - Location Task Design Function

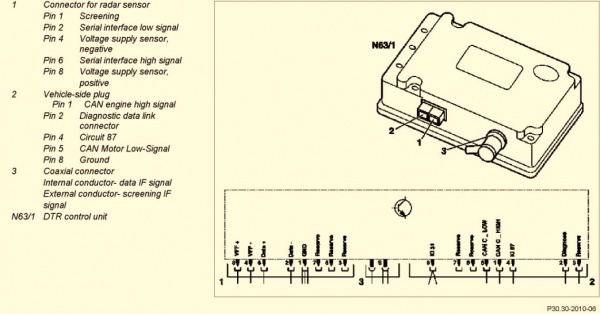
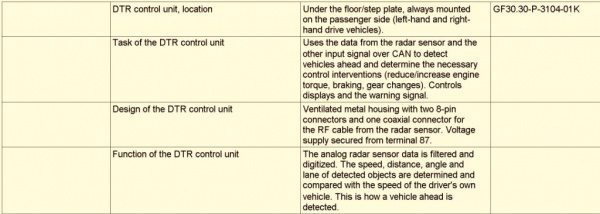
Distronic Control Unit - Location


Switch Block - Location Task Design Function
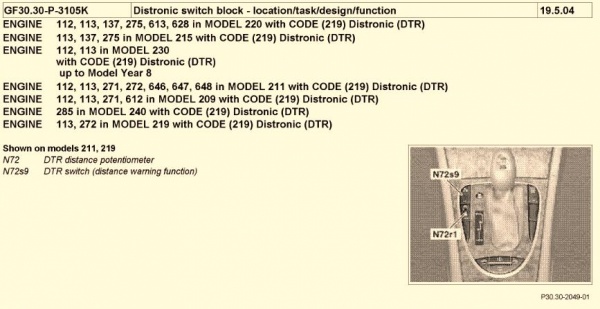

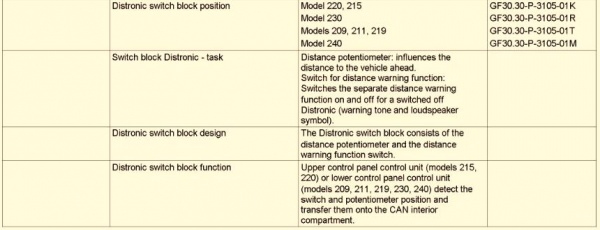

Distronic Component Diagram - W220 up to 2004-05-31
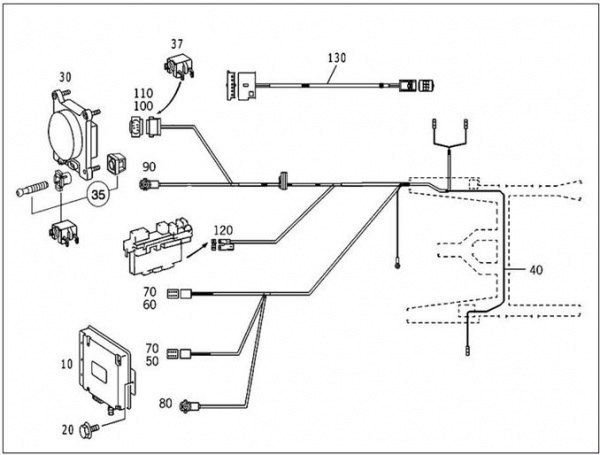
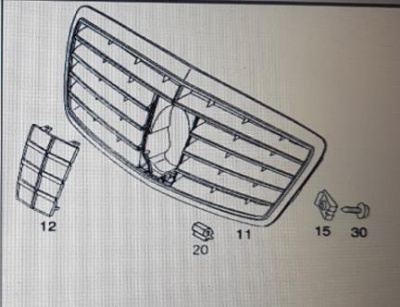
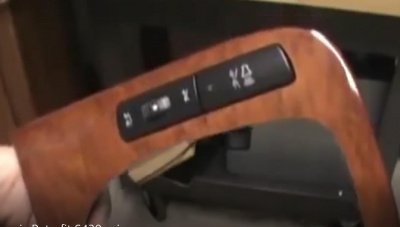
- Item #10 Control Unit (N63/1)
- Item #11 Panelling for Adaptive Cruise Control or Distronic grill (with the plastic window Item #12 for the protection of the radar sensor)
- Item 20 Mounting Bolts Control Unit
- Item #30 Radar Sensor Unit (B29)
- Item #35 Mounting Kit Radar Sensor Unit
- Item #40 Wiring Harness
- Item #115 Switch block (S46/8) with distance potentiometer (S46/8r1) and distance warning function switch (S46/8s1)
- Item #130 Electrical Cable Upper Control Panel (N72/1) to Switch block (S46/8)
Part Numbers- Distronic
How to Find Distronic Part Numbers
startekinfo
Note startekinfo is not able to accept non-US credit cards as some of the technical information is U.S. Government-regulated.
Get help from someone on BenzWorld to access startekinfo [1]
Then key in your VIN and look for the Distronic parts, you will see a list of interchangeable part numbers.
WIS EPC
Using SDS EPC, enter your VIN.
Look at EPC, 54 Electrical Equipment and Instruments, 755 Proximity Controlled Cruise Control.
Use Options, Filter, Untick Disable the Datacard SA filter.
Then you have the option to see all the required and valid parts for the VIN designated model, even without Distronic fitted.
mbpartsworld
Access mbpartsworld website [www.mbpartsworld.com] and search for relevant model.
Distronic Part Numbers - W220 up to 2004-05-31
To be completed.
Distronic Part Numbers - W220 after 2004-06-01
To be completed.
Availability - Distronic Parts
eBay
As always search for OEM part number in first instance.
MBenzNL
Website [2]
Facebook [3]
Email [mbenznl@gmail.com]
Retrofit Method – Distronic
Be aware that the method varies for W220 up to 2004-05-31 and W220 after 2004-06-01.
W220 up to 2004-05-31
To be completed.
Refer to Section 7 in;
http://www.mercupgrades.com/Distronic+Retrofit+++SL++R230++2002+2004-article-69.html
W220 after 2004-06-01
To be completed.
See the excellent video by David Prokity;
Activation/Adaptation/Coding – Distronic (DTR)
Vehicle Control Unit Activation/Adaptation/Coding is necessary after:
- Replacement of DTR control module (N63/1)
- Replacement of steering angle sensor (N49)
- Removal of steering wheel
- Replacement or adjustment of radar sensor (B29)
- Exchange or repair of chassis components including setting wheel toe.
Distronic Adaptation must be done to ensure the vehicle DTR control module recognises the following;
- steering angle sensor,
- radar sensor,
- lateral/yaw sensor, and
- wheel speed inputs.
BE WARNED Activation requires specialized expertise. Distronic activation with STAR alone is not possible for vehicles manufactured after 2004-06-01. ESP SPS BAS errors will result. And note that Dealers and Independent Workshops may be very reluctant to code the SCN.
On later model cars if you don't have option 219 added to the datacard and the engine management system is SCN coded later, then the Distronic will not work and an ESP error will alternate with SRS warnings on the instrument panel.
Activation – W220 before 2004-05-31
W220 manufactured before 2001-05-31 do not require SCN coding and hence DTR Adaptation may be performed with an off-line SDS using Developer Mode.
The method for adapting the Distronic (DTR) is very similar to that used for changing the Vmax top speed of an AMG. BenzWorld member Bayhas Kana has posted a video [4] on this topic and it is a useful guide for retrofitting the DTR as far as the coding is concerned. Also see; [5].
In summary the steps required for setting Distronic using SDS are as follows.
Note: The author prefers to use a list rather than a video as a tutorial because it can be printed and each step ticked off as they are done.
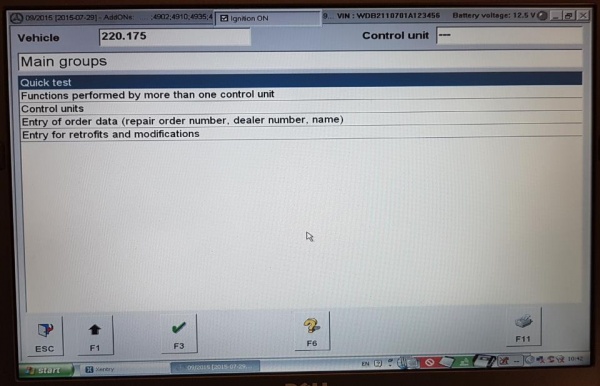
STEP 01 Starting XENTRY
Connect DAS (must have Developer Mode enabled) to vehicle Important Note: The engine needs to be running and idling, for ME control unit programming to be properly stored and committed.
- Open XENTRY Diagnostics
- Observe XENTRY, Brand > Product Group
- Click on vehicle eg S (220)
- Observe XENTRY, Brand > Product Group > Vehicle
- Highlight the required model eg 220.175 – S500 and click Continue
- Observe XENTRY, Brand > Product Group > Vehicle > Transmission/engine
- Highlight the relevant Engine eg 113.960
- Highlight the relevant Transmission eg 722.901 and click Continue
- Observe XENTRY, Brand > Product Group > Vehicle > Transmission/engine > Overview – Identification is complete.
- Click on the stethoscope icon on left to start Xentry Diagnostics application
- Observe NOTES re damage to electronic components
- Click F2 to accept NOTES and go forward.
- Observe NOTES re Sicherheitshinweise [Safety instructions]
- Click F2 to accept NOTES and go forward.
- Observe several windows with “Vehicle data are being read...”
- Wait while “Data are being determined, please wait…”
- Observe the page Control unit --- with title Main groups.
- Highlight Control units then click F3.
- Observe the page Control unit --- with title Control unit groups.
This is the starting page for all DTR adaptations.
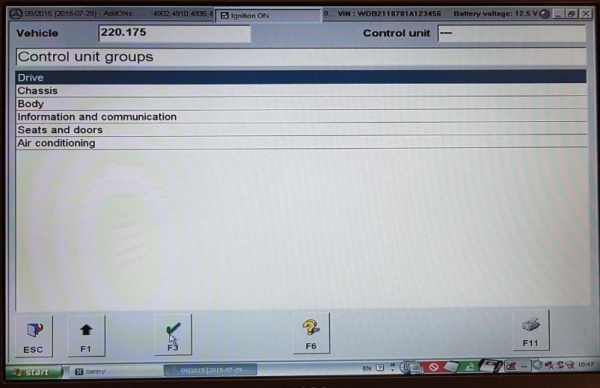
STEP 02 Add DTR to EZS
The following steps may be used to add Distronic (DTR) availability to the Electronic ignition switch (EZS or ZGW) electronic control module for a M-B W220 manufactured before 2004-05-31.
- Perform the steps for Starting XENTRY above.
- Observe the page Control unit --- with title Control unit groups.
- Highlight Body, then click F3.
- Observe the page Control unit --- with title Body.
- Highlight EZS – Electronic ignition switch ELCODE (DAS 3), then click F3.
- Observe the page Control unit EZS with title Electronic ignition switch.
- Note: Before performing any adaptation coding any existing fault codes and event memory records should be erased.
- A. Highlight Fault codes, then click F3.
- B. Observe the page Control unit EZS with title Fault codes.
- C. If there are Fault codes present erase them by clicking F9.
- D. Note the question. Do you really wish to erase fault memory? If you delete fault codes, stored events will also be deleted.
- E. Click YES.
- F. If there are no Fault codes go back by clicking F1.
- G. Observe the page Control unit EZS with title Electronic ignition switch.
- H. Now check there are no remaining events stored in the car’s memory.
- I. Highlight Event memory and click F3.
- J. Observe the page Control unit EZS with title Event memory.
- K. If there are Event memory codes present erase them by clicking F9
- L. Note the question. Do you really wish to erase event memory? If you delete events, fault codes will also be deleted.
- M. Click YES.
- N. If there are no Event memory codes go back by clicking on F1.
- Note: Before performing any adaptation coding any existing fault codes and event memory records should be erased.
- Observe the page Control unit EZS with title Electronic ignition switch.
- Highlight Development data and click F3.
- Observe the page Control unit EZS with title Main menu of control module EZS3.
- Important Note: The engine needs to be running and idling, for ME ECM programming modification to be properly saved and permanently stored.
- Highlight Control unit adaptations and click F3.
- Observe the page Control unit EZS with title Control unit adaptations.
- Highlight Control unit adaptations (Variant coding).
- Note: This is the command for manual coding of different features in the vehicle.
- Click F3.
- Observe the page Control unit EZS with title Control unit adaptations.
- Highlight Varcode_Description, then click F3.
- Observe the page Control unit EZS with title Varcode_Description.
- Scroll up and down the page to see Abstandregeltempomat [Adaptive cruise control].
- Observe the associated field nicht vorhanden [not available].
- Use the drop down arrow to view the field options and highlight vorhanden [available].
- Click F3 to go forward.
- Observe the page Control unit EZS with title Varcode_Description.
- Read the question; Is the coding to be transferred to the control unit?
- Click on YES F3.
- Observe the page Control unit EZS with title Varcode_Description.
- Observe statement; The coding has been carried out.
- Click F2 to forward.
- Observe the page Control unit EZS with title Control unit adaptations.
- Click F1 to back.
- Observe the page Control unit EZS with title Control unit adaptations.
- Highlight Read coding and/or transfer download data to a new control unit.
- Click F3 to go forward.
- Observe the Warning; When replacing different control module versions (e.g. Q1 for Q2), wrong coding can occur. For this reason the code settings must be check (sic) under ‘Control unit adaptations (Variant coding)’.
- Note: That is what was done a few steps above and will be repeated in Section Confirm DTR Added to EZS below.
- Click OK
- Observe the page Control unit EZS with statement Coding has been read.
- Switch off ignition.
- Switch on ignition.
- To be completed.
- To be completed.
- To be completed.
- To be completed.
- To be completed.
- To be completed.
- Now back out gracefully.
- a. Go forward by clicking on F2.
- b. Observe the page Control unit EZS with title Control unit adaptations.
- c. Go back by clicking on F1.
- d. Observe the page Control unit EZS with title Main menu of control module EZS3.
- e. Go back by clicking on F1.
- f. Observe the page Control unit EZS with title Electronic ignition switch.
- g. Go back by clicking on F1.
- h. Observe the page Control unit --- with title Body.
- i. Go back by clicking on F1.
- j. Observe the page Control unit --- with title Control unit groups.
- This is the starting page for all DTR adaptations.
STEP 03 Confirm DTR Added to EZS
The following steps may be used to confirm Distronic (DTR) availability to the Electronic ignition switch (EZS or ZGW) electronic control module for a M-B W220 manufactured before 2004-05-31.
To be completed.
STEP 04 Unlock ME 2.8 SFI for Programming
The following steps may be used to unlock the ME 2.8 SFI electronic control module ready for programming for a M-B W220 manufactured before 2004-05-31.
To be completed.
STEP 05 Add DTR to ME 2.8 SFI
The following steps may be used to add Distronic (DTR) availability to the ME 2.8 SFI engine control module for a M-B W220 manufactured before 2004-05-31.
To be completed.
STEP 06 Add DTR to ICM
The following steps may be used to add Distronic (DTR) availability to the Instrument Cluster (ICM) electronic control module for a M-B W220 manufactured before 2004-05-31.
To be completed.
STEP 07 Reset/Initialize DTR ECM
The following steps may be used to reset/initialize DTR electronic control module for a M-B W220 manufactured before 2004-05-31.
To be completed.
STEP 08 Add DTR to UCP
The following steps may be used to add Distronic (DTR) availability to the Upper control panel (UCP) electronic control module for a M-B W220 manufactured before 2004-05-31.
To be completed.
Activation – W220 after 2004-06-01
For the Activation, David Prokity recommends;
- Replace the main factory software with new. The programming that brings the car to life was basically reinstalled with Distronic added.
- Have the code number (219) added to the data card, which is the build card ie the factory record of the items installed like Parktronics, TPMS, Voice Command, NAV etc.
- Have SCN code added to the Engine Management System.
Calibration – Distronic
It is essential that the three radar beams of the Distronic can detect and recognise vehicles at the correct distances and positions on the road.

The Radar Sensor Unit has three screws for adjusting the transmit angle.
It is preferable that the Distronic calibration and alignment be performed by a M-B expert using an alignment tool such as MERCEDES Distronic Adjustment Calibration Tool 900589072100 Polytec OJV-060.
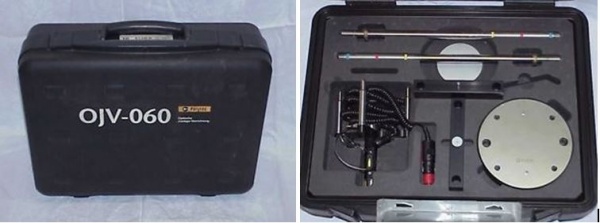
One BenzWorld member posted "To aim the unit you just turn the mounting screws all the way in by hand . Do not torque just bottom them out. Back out 1½ turns and you are set. Drive around and over time you will see if you need to adjust. It is really that easy and no expensive equipment is required."
Also checkout
AR30.30-p-1000R: Check/adjust sensor setting of Distronic (DTR).
AR30.30-p-1010Q: Remove/install Distronic sensor (DTR).
