Parking brake: Difference between revisions
Ricebubbles (talk | contribs) mNo edit summary |
(description added) |
||
| Line 1: | Line 1: | ||
==Description - Parking | ==Description== | ||
<!-- operator's manual --> | |||
When parked on an incline, gear shift position P alone may not prevent your vehicle from moving, possibly hitting people or objects. | |||
Always set the parking brake in addition to shifting to position P. | |||
On steep slopes, turn the front wheels towards the curb. | |||
[[File:W220_parking_brake_operators_manual.png|300px]] | |||
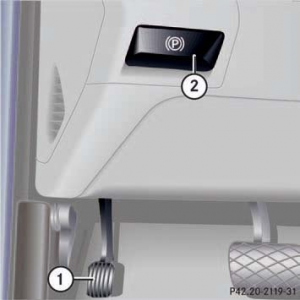
# Parking brake pedal | |||
# Parking brake release handle | |||
Step firmly on parking brake 1. | |||
When the engine is running, the indicator lamp in the instrument cluster illuminates. | |||
Release the parking brake by pulling handle 2. | |||
The indicator lamp in the instrument cluster goes out. | |||
==DIY Procedures - Parking Brake== | ==DIY Procedures - Parking Brake== | ||
Revision as of 00:51, 27 May 2015
Description
When parked on an incline, gear shift position P alone may not prevent your vehicle from moving, possibly hitting people or objects. Always set the parking brake in addition to shifting to position P. On steep slopes, turn the front wheels towards the curb.
- Parking brake pedal
- Parking brake release handle
Step firmly on parking brake 1. When the engine is running, the indicator lamp in the instrument cluster illuminates. Release the parking brake by pulling handle 2. The indicator lamp in the instrument cluster goes out.
DIY Procedures - Parking Brake
Replacing - Parking Brake
Edit required.
Adjusting - Parking Brake
Take off the rear wheel, observe how freely the rotor turns while turning it by hand.
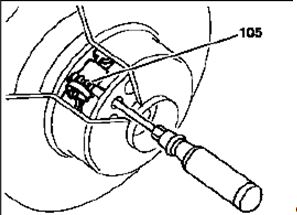
Align one of the lug bolt holes with the adjusting wheel inside. One enthusiast found his was aligning with one of the holes at 2 o'clock position. The adjusting wheel could be at different positions on different model and years. You just have to look for it.
Hold a flashlight into the hole to see what the tooth of the wheel inside looks like and insert a flat blade screwdriver through the hole and catch between 2 teeth.

Start moving the screwdriver handle upward (tip of the screwdriver moving downward) to turn the adjusting wheel clockwise, do about 2 turns and turn the rotor to see if there is a slight resistance turning the rotors and adjust more or less depending on the resistance.
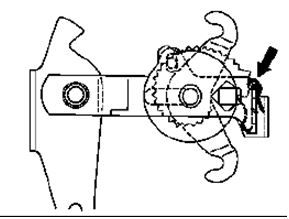
Finally relieve the load on the automatic slack adjuster. Lift center hold down clip using a screwdriver so that the cable slack adjuster sets itself automatically.

