Parking brake: Difference between revisions
| Line 120: | Line 120: | ||
Part no A2204200038 (~55 EUR). | Part no A2204200038 (~55 EUR). | ||
{| | {| | ||
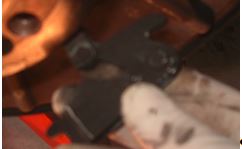
|[[File:W220_parking_brake_automatic_slack_adjuster.jpg|thumb|none|Slack adjuster (underneath vehicle | |[[File:W220_parking_brake_automatic_slack_adjuster.jpg|thumb|none|Slack adjuster pretensioned (underneath vehicle)]] | ||
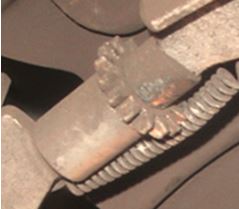
|[[File:W220_parking_brake_adjuster_A2204200038_underneath_view.jpg|thumb|none|Automatic slack adjuster (underneath view)]] | |[[File:W220_parking_brake_adjuster_A2204200038_underneath_view.jpg|thumb|none|Automatic slack adjuster (underneath view)]] | ||
|[[File:W220_parking_brake_adjuster_A2204200038_top_view.jpg|thumb|none|Automatic slack adjuster (top view)]] | |[[File:W220_parking_brake_adjuster_A2204200038_top_view.jpg|thumb|none|Automatic slack adjuster (top view)]] | ||
| Line 127: | Line 127: | ||
==== Pre-tension automatic cable slack adjuster ==== | ==== Pre-tension automatic cable slack adjuster ==== | ||
<!-- AR42.20-P-0520-01A Pre-tension automatic cable slack adjuster --> | <!-- AR42.20-P-0520-01A Pre-tension automatic cable slack adjuster --> | ||
[[File:W220_pretention_automatic_cable_slack_adjustment.png]] | {| | ||
|[[File:W220_pretention_automatic_cable_slack_adjustment.png|thumb|none|Adjuster almost pretensioned (underneaeth view)]] | |||
|[[File:W220_parking_brake_adjuster_pretensioned.jpg|thumb|none|Adjuster pretentsioned (locked by clip)]] | |||
|} | |||
Turn detent eccentric bolt (g) to the left using the Allen wrench (approximately half a turn) | Turn detent eccentric bolt (g) to the left using the Allen wrench (approximately half a turn) | ||
| Line 133: | Line 136: | ||
engages with the raised section (h) in the holddown clip (d). | engages with the raised section (h) in the holddown clip (d). | ||
'' | ''Pretensioning spring-loaded slack adjuster releases any tension in the parking brake cables and the cables may even be taken off the tensioning mechanism if required. It can take a while to succeed. The trick is to rotate the detent eccentric bolt (g) counter clockwise (when viewed from underneath) and simultaneously push backwards to rear of vehicle (don't push it fully otherwise it will block against the other side and will not rotate) until it clicks into place into the hold down clip spring (d). It takes full turn to rotate fully relieved adjuster to pretensioned state. If the hexagonal socket (g) is badly worn, it may be easier to remove the adjuster off the vehicle (remove 11mm bolt holding cable which goes to brake pedal) and pretension it by moving spring-loaded detent eccentric (b) in the correct position by hands.'' | ||
==== Relieve load on automatic slack adjuster ==== | ==== Relieve load on automatic slack adjuster ==== | ||
<!-- AR42.20-P-0520-02A Relieve load on automatic slack adjuster --> | <!-- AR42.20-P-0520-02A Relieve load on automatic slack adjuster --> | ||
[[File:W220_Relieve_load_on_automatic_slack_adjuster.png]] | {| | ||
|[[File:W220_Relieve_load_on_automatic_slack_adjuster.png|thumb|Adjuster pretensioned (top view)]] | |||
|[[File:W220_parking_brake_adjuster_fully_relieved.jpg|thumb|none|Adjuster fully relieved (side view)]] | |||
|} | |||
Lift center holddown clip (arrow) using a screwdriver so that the cable slack adjuster sets itself automatically. | Lift center holddown clip (arrow) using a screwdriver so that the cable slack adjuster sets itself automatically. | ||
{| | {| | ||
|{{#ev:youtube|https://www.youtube.com/watch?v=o5aH0iRlKHI|320|left|Parking brake automatic cable slack adjustment.|frame}} | |{{#ev:youtube|https://www.youtube.com/watch?v=o5aH0iRlKHI|320|left|Parking brake automatic cable slack adjustment.|frame}} | ||
|} | |} | ||
== Remove/install brake shoes of parking brake == | == Remove/install brake shoes of parking brake == | ||
Revision as of 17:52, 4 October 2018
Description - Parking Brake
When parked on an incline, gear shift position P alone may not prevent your vehicle from moving, possibly hitting people or objects. Always set the parking brake in addition to shifting to position P. TIP: On steep slopes, turn the front wheels towards the curb.

- Parking brake pedal
- Parking brake release handle
Step firmly on parking brake 1.
When the engine is running, the indicator lamp in the instrument cluster illuminates.
Release the parking brake by pulling handle 2.
The indicator lamp in the instrument cluster goes out.
Friction brake pedal assembly / parking brake
|

|
Brake pedal (75) holds the parking brake in the pressed position and avoids loose knock.
A brake drum (1) is cast into the brake pedal (75). A pre-compressed flat spiral spring (2) is wound around this drum (1). The flat spiral spring is pre-compressed by a spring (6). If the brake pedal (75) is pressed, the force of friction of the flat spiral spring (2) continuously holds the brake pedal (75). When the pedal is pressed the familiar adjusting noise is passed on via the toothing (3) and the notch (4).
Parking brake pedal assembly modified
|
Phased in as of approx. 09/2002 a modified design of parking brake pedal systems (1) have been fitted. The new version of the pedal assembly (1) has a pulled notch (2a) instead of a pushed notch (2b) as previously. This results in different values for the adjustment of the parking brake. On account of the successive production launch and the possibility that in the case of repair, that old replaces new or new replaces old, on each vehicle, the version of the pedal assembly (1) is determined before the parking brake is adjusted. |

|
|
The new and previous version can be distinguished by the position of the shaft journal (3) in the pedal lever (4). Moreover the notches (2a, 2b) differ in color.
|

|
Remove/install parking brake pedal assembly


- Raise vehicle with vehicle lift
- Preload automatic slack adjuster (92)
- Remove screw (93) from intermediate lever (91) of automatic cable slack adjuster (92)
- Remove left cover below dashboard
- Remove front left floor covering
- Loosen clamps (arrows) and remove cover (76) of pedal assembly (71). Rear clamp only accessible when the defroster vent with trim ring is removed.
- Unhook brake cable (85) from tensioning shackle on parking brake pedal (75) and unclip from pedal assembly (71). Installation: Check that rubber ring (85c) is correctly seated.
- Remove bolts (72) and take off pedal assembly (71). Push pedal assembly (71) inwards slightly and remove from cover (76a). Do not loosen Torx bolts on the back of the pedal assembly (71), otherwise the pedal assembly (71) will be damaged beyond repair.
- Detach control cable (79) for releasing parking brake. To do so, remove bracket (77a) and unhook cable (79) from release lever (77). Unclip control cable (79) from pedal assembly (71) using tool (010).
- Install in the reverse order
- Slacken automatic cable slack adjuster (92)
- Check version of pedal assembly (71)
- Operate parking brake pedal (75) several times and check pedal travel of parking brake pedal (75). If the pedal travel is not within the tolerance range: Adjust parking brake.
Torque specifications:
- Bolt, foot-operated parking brake pedal assembly at front wall pillar: Nm 12
Adjusting parking brake


- Check version of parking brake pedal assembly (pulled vs pushed detent)
- Operate parking brake pedal and check pedal travel of parking brake pedal. If the pedal travel is not within the tolerance range, adjust parking brake.
- Lift vehicle with lifting platform until the wheels are clear
- Pre-tension automatic cable slack adjuster
- Remove rear wheels.
- Using a suitable tool, turn the adjusting wheel (105) until the brake shoes touch the brake drum and the rear wheel no longer turns. Adjustment direction for applying the brake shoes: Right side: Turn the adjusting wheel (105) from the bottom upwards. Left side: Turn the adjusting wheel (105) from the bottom upwards.
- Turn back the adjusting wheel (105) until the rear wheel can be turned completely freely. When slackening the adjusting wheels ensure that both sides are turned back by the same number of teeth (10 teeth).
- Relieve load on automatic cable slack adjuster.
- Actuate parking brake pedal several times
- Check that the rear wheels can turn freely
- Mount rear wheels
- Actuating force on parking brake pedal: N 170 (-50/+70)
- Notches through which the parking brake pedal must be depressed: 1 (pedal assembly with pulled dent)
- Notches through which the parking brake pedal must be depressed: 5 (pedal assembly with pushed detent)
Automatic slack adjuster
The parking brake cable automatic tensioning mechanism is located underneath the car. Part no A2204200038 (~55 EUR).
 |
 |
 |
Pre-tension automatic cable slack adjuster
 |
 |
Turn detent eccentric bolt (g) to the left using the Allen wrench (approximately half a turn) and simultaneously push backwards in slot until the spring-loaded detent eccentric (b) engages with the raised section (h) in the holddown clip (d).
Pretensioning spring-loaded slack adjuster releases any tension in the parking brake cables and the cables may even be taken off the tensioning mechanism if required. It can take a while to succeed. The trick is to rotate the detent eccentric bolt (g) counter clockwise (when viewed from underneath) and simultaneously push backwards to rear of vehicle (don't push it fully otherwise it will block against the other side and will not rotate) until it clicks into place into the hold down clip spring (d). It takes full turn to rotate fully relieved adjuster to pretensioned state. If the hexagonal socket (g) is badly worn, it may be easier to remove the adjuster off the vehicle (remove 11mm bolt holding cable which goes to brake pedal) and pretension it by moving spring-loaded detent eccentric (b) in the correct position by hands.
Relieve load on automatic slack adjuster
 |
 |
Lift center holddown clip (arrow) using a screwdriver so that the cable slack adjuster sets itself automatically.
Remove/install brake shoes of parking brake
|

|
- Remove rear wheels
- Remove brake disks on rear axle
- Preloading automatic cable slack adjuster
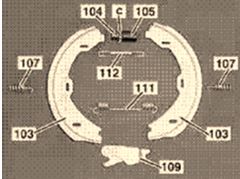
- Detach lower retracting spring (111) using removal and installation tool (040). Installation: Ensure that the lower retracting spring (111) is seated correctly!
- Remove retaining springs (107) with installation tool (041). Installation: Pay attention to correct seat of retaining springs (107).
- Remove brake shoes (103) over rear axle shaft flange (68). If brakes shoes (103) are burnt or brake disk surfaces are damaged, replace brake shoes (103), lower and upper retracting springs (111, 112), retaining springs (107) and brake disks. Installation: Turn back adjusting mechanism (105) and insert into both brake shoes (103) with the adjusting wheel (c) pointing toward front of vehicle.
- Detach upper retracting spring (112). Installation: Ensure that the upper retracting spring (112) is seated correctly! Lightly grease thread of thrust piece (104) and cylindrical part of adjustment wheel (c) with MB long-life grease.
- Remove expansion lock (109). Installation: Lightly grease all bearing and slide surfaces on expansion lock (109) with MB long-life grease.
- Install in the reverse order
- Release automatic slack adjuster
- Check version of pedal assembly
- Adjust parking brake
Replacing Parking Brake
- Unload Parking Brake Automatic Cable Slack Adjuster See below.
- Take off the rear wheel, observe how freely the rotor turns while turning it by hand.
- Rotate the right side wheel so that the access hole (any wheel bolt hole) is positioned at 11:00 o’clock position to provide access to the parking brake thumbwheel (ratchet mechanism). (For the left side wheel the access hole (wheel bolt hole) is positioned at the 1:00 o’clock position.
- Note the correct angle for the wide bladed screw driver tip.
- Shine a flashlight into the hole (or use a video inspection camera) to see what the tooth of the thumbwheel inside looks like.
- Insert a flat blade screwdriver through the hole and catch between two teeth.
- Adjust the parking brake shoes to provide maximum clearance. The next Figure shows an the internal View of Parking Brake Thumbwheel. This is what you are trying to do.
- Rotate the parking brake thumbwheel (ratchet mechanism) downwards (screw driver handle upwards) to release the brake to its maximum clearance.
- Remove the Torx screw holding brake disk to rear axle shaft flange.
- Remove the Brake Disk to gain access to the parking brake mechanisms. TIP: If you haven’t previously used anti-seize grease on the hub you may have to tap the disc with a rubber mallet.
- Remove the Parking Brake Lower Retracting Spring. This requires a fair bit of effort but it is possible with normal 45º long nose pliers.
- Remove the Brake Shoe Retaining Springs. Remove the two rear brake shoe retaining springs by pushing them inwards and twisting 90º.
- Note the Retaining Springs Alignment for Re-installation. TIP: The installed position of the retaining springs is such that the hook end is facing radially inwards and pointing directly at the centre of the wheel hub.
- Remove the Parking Brake Shoes and Adjusting Mechanism over the Wheel Hub.
- Note the Orientation of the Parking Brake Adjusting Thumbwheel. TIP: The thrust piece (shorter length) is towards the front of the vehicle on both sides. The next Figure shows the right side wheel.
- The diagram in WIS shows the left side wheel with the thrust piece (c) (shorter length) on the left facing towards the front of the vehicle.
- Store the Parking Brake. TIP: Store the parking brake out of the way maintaining the correct positioning for each component to aid in re-installation.
- Remove the Parking Brake Expansion Lock. TIP: Carefully remove the parking brake expansion lock (actuating mechanism) and note the orientation. The hooked end of the Expansion Lock (109) is towards the front of the vehicle on both sides. The next Figure shows the right side wheel.
- WIS shows the left side wheel.
- Remove the Parking Brake Cable. TIP: Remove the bolt and withdraw the parking brake cable and place out of the way.
- Reinstall in reverse order remembering to Preload Brake Automatic Cable Slack Adjuster. See below.


