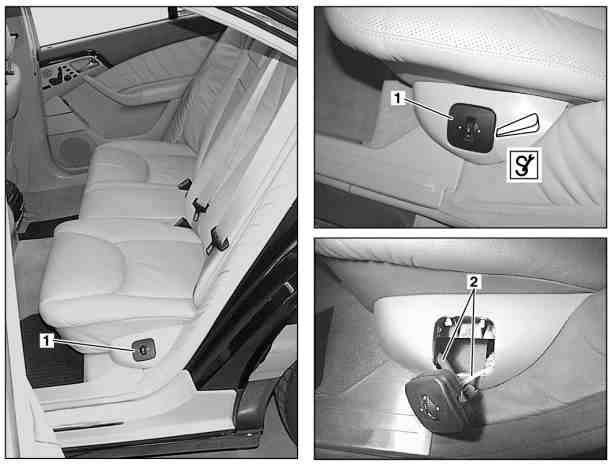
Rear seat adjustment
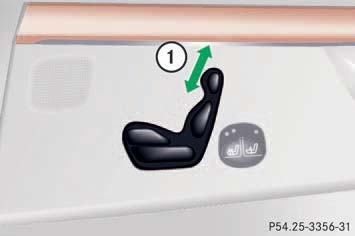
In vehicles equipped with option code ?? the switch can be used to adjust rear head restraint.
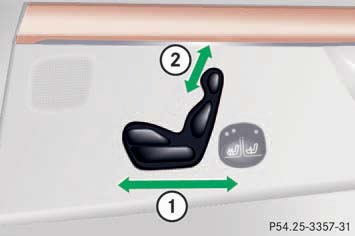
In vehicles equipped with option code ?? the switches can be used to adjust rear:
- (1) Seat bench fore and aft adjustment
- (2) Head restraint fold/place upright

In vehicles equipped with option code ?? the switches can be used to adjust rear:
- (1) Seat fore and aft adjustment
- (2) Seat height
- (3) Head restraint fold/place upright
Front passenger seat adjustment from rear
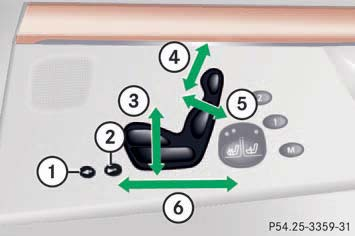
Vehicles equipped with option code 247 have two additional buttons (buttons (1) and (2)) on the rear DCM behind front passenger seat, which can be used to adjust front passenger seat.
None: Adjusting the passenger seat position from the rear is not possible if you deactivate the operation of the rear door windows (override switch in driver's door).
Remove Rear Seat Backrest
Lower the head restraints. There are 2 torx bolts at the bottom of the backrest - remove these and if the car doesn’t have electrical rear seats, lift the backrest up about an inch and pull it right out. With electrical rear seats the centre seat squab and back-rest must be removed to expose two Torx screws securing the left and right rear back-rests at the centre top.
Remove Rear Seat Bench
There are two push buttons under the bottom lip of the leather where it meets the floor carpet - run your fingers along until you feel the recess and just push it in. Do this on both sides of the car, and the bench can be lifted out.
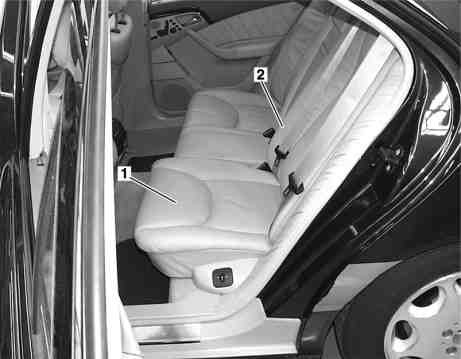
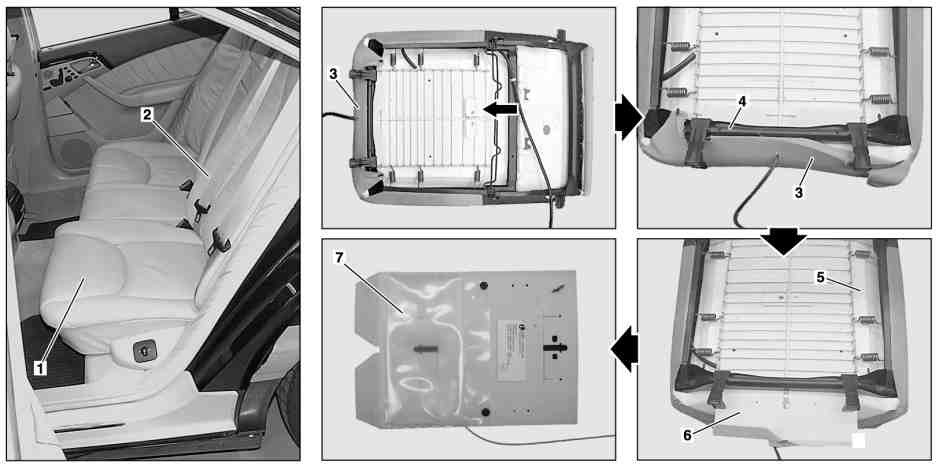
Remove/install rear seat cushion
Remove/install rear seat cushion
|
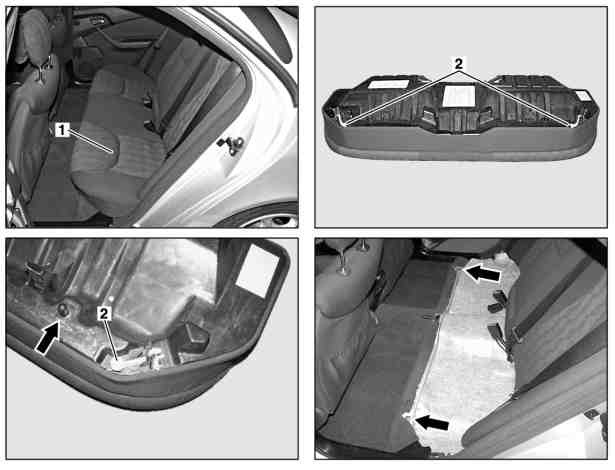
- 1 - Rear bench seat
- 2 - Release lever
|
- Pull release lever (2) upwards and lift up rear bench seat (1)
- Disconnect electrical connector for heated seats (on vehicles with electric heated seats for left and right rear seat, code 872).
- Remove rear bench seat (1). An assistant is needed for the rear bench seat with integral child seat.
- Installation: Expose lap belt and seat belt buckles. Pay attention to pilot stud (arrow) and insert the rear bench seat at the rear left and right in the crash bracket (3).
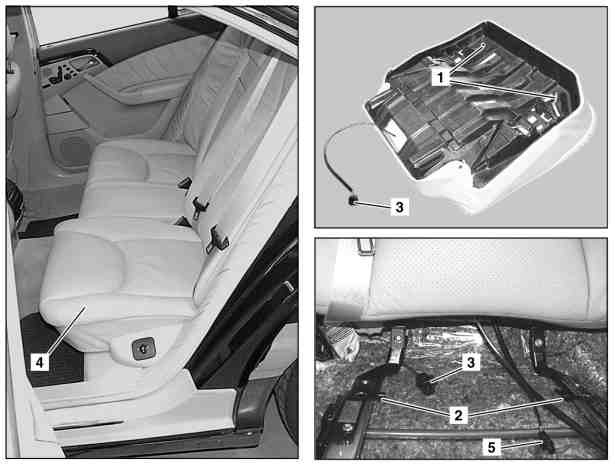
Remove/install rear seat cushion (CODE 223b)
|
- 1 - Springs for seat locking mechanism
- 2 - Pins for locating rear seat cushion
- 3 - Electrical connector for heated seats
- 4 - Rear seat cushion
- 5 - Electrical connector for seat ventilation
|
- Move rear seat cushion (4) fully forwards
- Press springs (1) below the rear seat cushion (4) outwards and remove seat cushion. Installation: Ensure that the pins (2) on the seat adjuster move in the guides on the seat.
- Disconnect electrical connector for heated seats (3) (on vehicles with electric heated seats for left and right rear seat, code 872).
- Disconnect electrical connector of seat ventilation (5) and heated seats (on vehicles with seat ventilation for rear seats, code 402a).
- Install in the reverse order
Remove/install rear seat cushion (CODE 224c)
|
- 1 - Rear seat cushion
- 2 - Retaining strap
- 3 - Arresting hooks
- 4 - Springs
- 5 - Electrical plug connection
|
- Move rear seat cushion (1) fully forwards
- Press the springs (4) under the rear seat cushion (1) outwards and unhook the rear seat from the locking hooks (3)
- Disconnect electrical connector for heated seats (5)
- Disconnect electrical connector of seat ventilation (5) and heated seats
- Unhook tensioning strap (2) on the left and right of the locking hooks (3). Installation: Attach the tensioning straps (2) on the left and right in sequence and lock the rear seat cushion in position.
- Remove front seat backrest (1) from seat adjuster. Installation: Ensure that the pins on the back of the seat adjuster move in the guides on the seat.
- Install in the reverse order
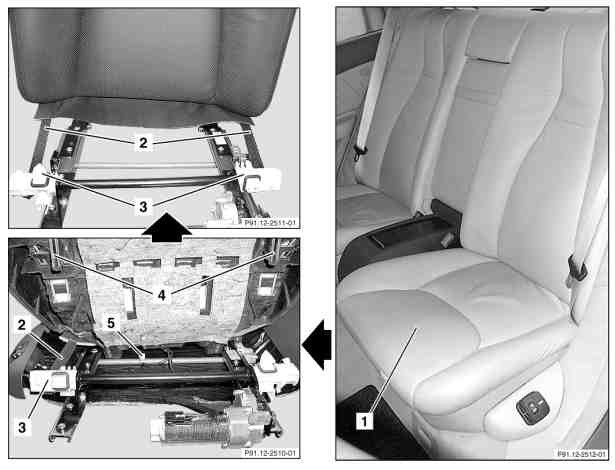
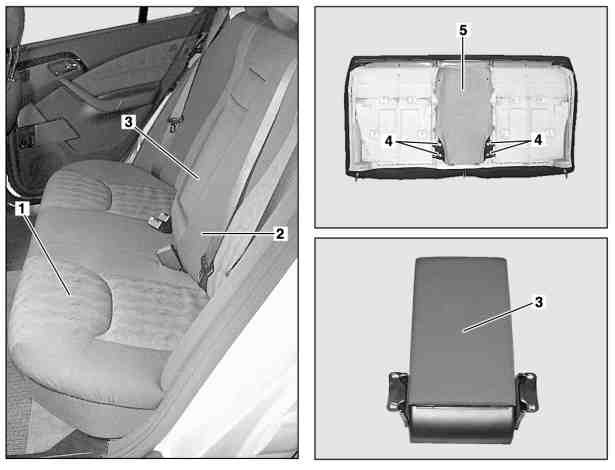
Remove/install rear-seat backrest
Remove/install rear-seat backrest
|
- 1 - Rear seat backrest
- 2 - Bolts
|
- Lower the rear head restraints
- Remove rear seat cushion
- Unscrew bolts (2) on the rear wall on the bottom, side left and right and in the middle.
- Disconnect electrical connector for heated seats (on vehicles with electrically heated left and right rear seats, code 872).
- Lift rear seat backrest (1) upwards and remove.
- Installation: Insert plug-in bracket (arrows) at the top of the rear wall; expose rear seat belts and seat belt buckle.
- Bolt for rear seat backrest to rear wall: Nm 25
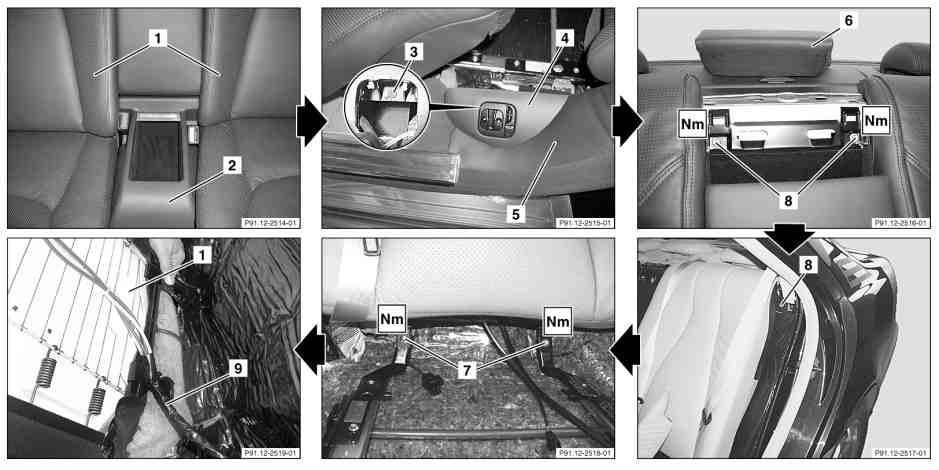
Remove/install rear-seat backrest (CODE 223b)
|
- 1 - Rear seat cushion
- 2 - Rear seat backrest
|

|
- 3 - Bolt
- 4 - Control valve cover
- 5 - Backrest side paneling
- 6 - Upholstery on center armrest
- 7 - Bolts
- 8 - Bolts
|
- Remove rear seat cushion (1).
- Remove lumbar support control valve for rear seat backrest
- Unscrew screw (3) and remove cover of control valve (4)
- Remove rear door sill molding
- Remove rubber door seals in the area of the backrest side paneling (5).
- Remove backrest side paneling (5). Ensure that retaining clamps (arrows) are seated correctly.
- Unlock upholstery above center armrest (6) and pull out upwards. Unlocking, accessible from above on the left and right.
- Unscrew bolts (7) from seat adjuster.
- Disconnect electrical connector for heated seats (on vehicles with electric heated seats for left and right rear seat, code 872).
- Disconnect electrical connector of seat ventilation and heated seats (on vehicles with seat ventilation for rear seats, code 402a).
- Expose pneumatic line from control valve to rear seat backrest.
- Unscrew bolts (8) and lift up rear seat backrest (2) and remove. Installation: Check belts and seat belt buckle for clearance.
- Install in the reverse order
- Bolt for rear seat backrest to seat adjuster: Nm 25
- Bolt for rear seat backrest to rear wall: Nm 25
Remove/install rear-seat backrest (CODE 224c)
|
- 1 - Rear seat backrest
- 2 - Storage box
- 3 - Bolt
- 4 - Cover
- 5 - Backrest side paneling
- 6 - Upholstery on center armrest
- 7 - Bolt
- 8 - Bolt
- 9 - Pneumatic hoses
|
- Removing rear seat multicontour backrest control module until pneumatic lines to rear seat backrests are easy to access.
- Remove rear seat multicontour backrest control switch
- Undo screw (3) and remove cover (4) from multicontour backrest control switch
- Remove rubber door seals in vicinity of backrest side paneling (5).
- Remove rear door sill molding
- Remove backrest side paneling (5)
- Release upholstery above center armrest (6) and pull out from above. Left and right release mechanisms, accessible from above.
- Unscrew screw (7, 2 pcs.) from seat adjuster
- Disconnect electrical connector for heater (on vehicles with code 872 for electric seat heater, left and right rear seats).
- Disconnect electric connector for seat ventilation and heating (on vehicles with code 402a for rear seat ventilation).
- Disconnect pneumatic hose (9) from rear seat multicontour backrest control module and reveal up to rear seat backrest (1)
- Unscrew screws (8, 2 pcs.) and lift and remove rear seat backrest (1)
- Installation: check clearance of seat belts and buckles.
- Install in the reverse order
- Bolt for rear seat backrest to seat adjuster: Nm 25
- Bolt for rear seat backrest to rear wall: Nm 25
Remove/install armrest at rear seat backrest
Remove/install armrest at rear seat backrest
|
- 1 - Rear seat cushion
- 2 - Rear seat backrest
- 3 - Armrest
- 4 - Bolts
- 5 - Fabric cover
|
- Remove rear seat backrest (2)
- Place rear seat backrest (2) on suitable surface with upholstery facing downwards
- Detach fabric cover (5)
- Remove screws (4, 4 pcs.)
- Remove arm rest (3). Installation: align armrest (3) on rear seat backrest (2).
- Install in the reverse order. Armrest (3) must be able to be easily moved.
Remove/install armrest at rear seat backrest (CODE 223b/224c)
Shown on vehicle with electrically adjustable rear bench seat, code 223b:
|
- 1 - Armrest
- 2 - Nut
- 3 - Electrical plug connection
- 4 - Armrest frame
|
- Remove rear seat backrest
- Unscrew nuts (2, 2 pcs.) from armrest frame (4)
- Remove armrest frame (4) from rear wall. Upper fastening points are attached to seat backrests.
- Separate electrical plug connection (3) (on vehicles with 2nd handset in rear armrest, code 856).
- Remove armrest (1) with armrest frame (4). Installation: Align armrest frame (4) in relation to rear wall.
- Install in the reverse order
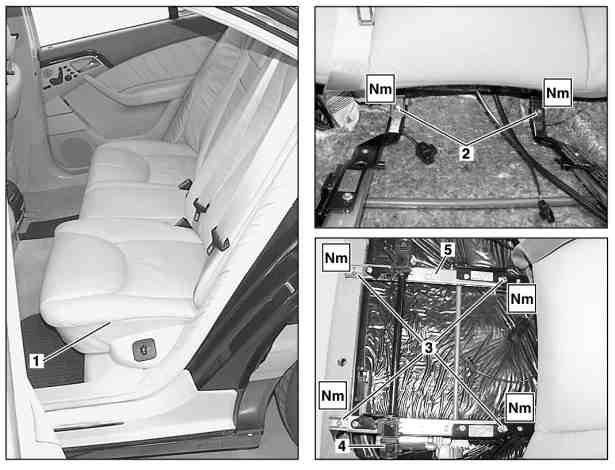
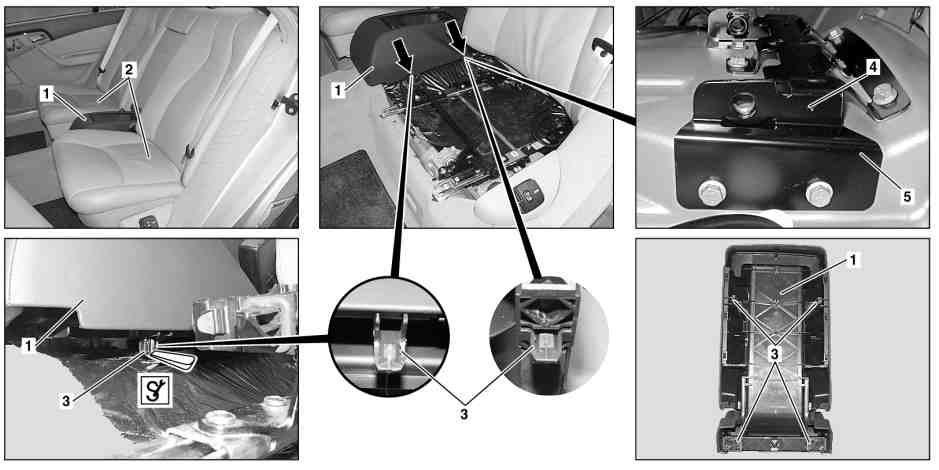
Remove/install seat adjuster at rear seat (CODE 223b/224c)
Shown on electrically adjustable rear bench seat, code 223b:
|
- 1 - Rear seat cushion
- 2 - Bolt
- 3 - Bolt
- 4 - Rear seat forward/back adjustment motor
- 5 - Seat adjustment mechanism
|
- Remove rear seat cushion (1).
- Remove screws (2) on rear seat backrest
- Move seat adjuster (5) back as far as possible, until the screws (3) are accessible
- Unscrew screws (3) on seat adjuster (5) and remove seat adjuster (5)
- Disconnect electrical connector from rear seat adjustment motor, forward/backward (4)
- Disconnect electrical connector from rear seat cushion inclination motor, up and down (on vehicles with electrically adjustable individual rear seats, with seat ventilation, heated seats and memory package, code 224c).
- Install in the reverse order
- Bolt for seat adjuster to frame floor: Nm 25
- Bolt for rear seat backrest to seat adjuster: Nm 25
Removing and installing rear seat backrest lumbar support control valve (CODE 223b)
|
- 1 - Control valve
- 2 - Pneumatic lines
|
- Unclip control valve (1) from rear seat paneling using assembly wedge
- Remove pneumatic lines (2). Pay attention to line routing.
- Install in the reverse order
- Perform lumbar support function check
Removing and installing rear seat multicontour backrest control switch (CODE 224c)

|
- 1 - Paneling
- S103 - Right rear multicontour backrest switch
- S104 - Left rear multicontour backrest switch
- A - Multicontour backrest switch up to model refinement package 2003
- B - Multicontour backrest switch as of model refinement package 2003
|
- Unclip rear right (S103), left (S104) multicontour backrest switch from paneling (1) with assembly wedge
- Disconnect electrical connector
- Install in the reverse order
- Perform multicontour backrest switch function check
Removing and installing rear seat lumbar support air cushions (CODE 223b)
|
- 1 - Rear seat cushion
- 2 - Rear seat backrest
- 3 - Seat cover
- 4 - Backrest frame
- 5 - Foam rubber
- 6 - Reinforcement plate
- 7 - Air cushion
|
- Remove rear seat backrest (2)
- Place rear seat backrest (2) with upholstery (3) facing downwards on suitably clean surface
- Unclip seat cover (3) from backrest frame (4) clip groove. Push backrest frame (4) down to relieve strain on seat cover (3).
- Remove reinforcement plate (6) with air cushion (7). Ensure that reinforcement plate (6) is not damaged at clips (arrows). Push foam rubber (5) down to relieve strain on reinforcement plate (6). Installation: Hook clips (arrow) onto second cross-wire from top.
- Install in the reverse order
- Check pneumatic operation
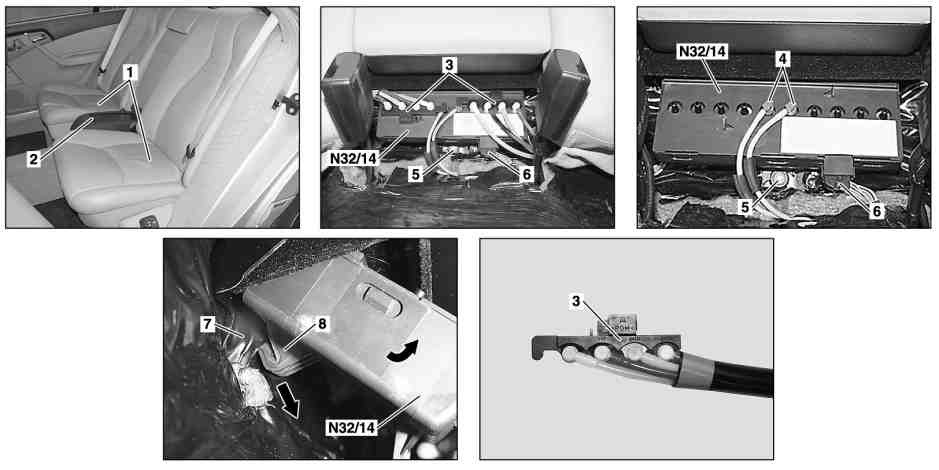
Removing and installing rear seat multicontour backrest control module (CODE 224c)
|
- 1 - Seat cushion
- 2 - Stowage box, rear seats
- 3 - Pneumatic line connecting rail
- 4 - Supply lines
- 5 - Torx bolt
- 6 - Connector
- 7 - Armrest frame
- 8 - Retaining clamp
- N32/14 - Rear multicontour backrest control module
|
- Remove stowage box (2) in rear seats
- Open catch and remove both pneumatic line onnecting rails (3) from rear multicontour backrest control module (N32/14). Release catch at pneumatic line connecting rail (3) using small screwdriver.
- Detach supply lines (4) from rear multicontour backrest control module (N32/14)
- Detach connector (6) from rear multicontour backrest control module (N32/14)
- Unscrew Torx screw (5)
- Swivel rear multicontour backrest control module (N32/14) with front upwards and move retaining clamps (8) downwards out of armrest frame (7) at same time. Do not break off retaining clamp (8).
- Install in the reverse order
- Perform multicontour backrest function check
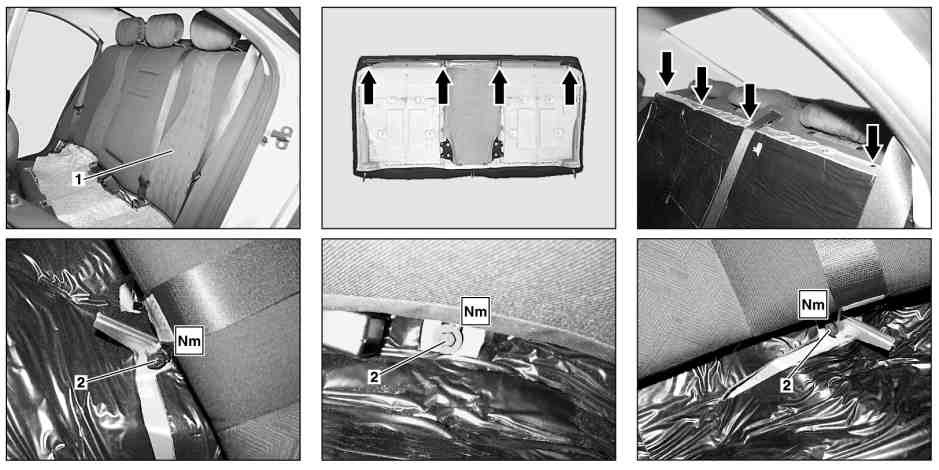
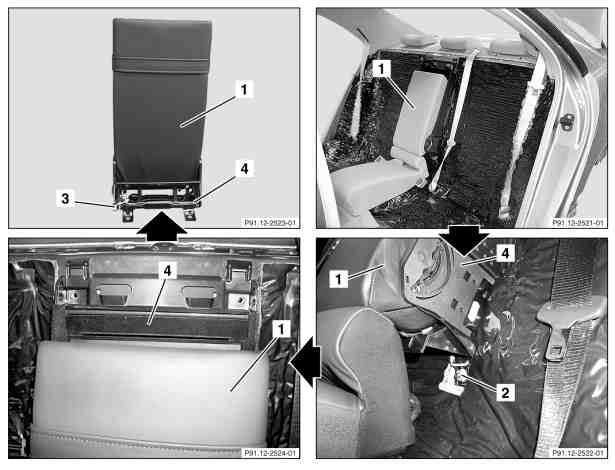
Removing and installing rear seat stowage box (CODE 224c)
|
- 1 - Stowage box, rear seats
- 2 - Rear seat cushion
- 3 - Retaining clamps
- 4 - Bore
- 5 - Bracket
|
- Remove rear seat cushion (2) on left and right.
- Release rear seat stowage box (1). Release front retaining clamps (3, 2 pcs.) at both sides using assembly wedge and raise front of rear seat stowage box (1) slightly. Release retaining clamps in rear area (3, 2 pcs.) using relevant drift. (Insert drift in hole (4) in bracket (5)). Ensure that the retaining clamps (3) are not damaged when releasing the rear seat stowage box (1).
- Remove rear seat stowage box (1) from bracket (5).
- Install in the reverse order. Installation: First place rear seat stowage box (1) onto rear seat backrest and clip into position.


