Workspace
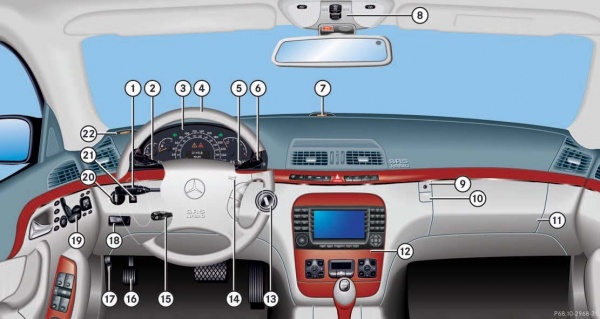
Cockpit
- (1) Combination switch
- Turn signals
- Windshield wipers
- High beam
- (2) Cruise control lever
- Cruise control
- Distronic
- (3) Instrument cluster
- (4) Multifunction steering wheel
- (5) Gear range indicator, clock
- (6) Lever for voice control system
- (7) Front Parktronic warning indicator for right front area
- (8) Overhead control panel
- (9) Glove box lock
- (10) Glove box lid release
- (11) Glove box
- (12) Center console
- (13) Starter switch
- (14) Horn
- (15) Steering wheel adjustment stalk, Heated steering wheel
- (16) Parking brake pedal
- (17) Hood lock release
- (18) Parking brake release
- (19) Door control panel
- (20) Exterior lamp switch
- (21) Headlamp washer button
- (22) Front Parktronic warning indicator for left front area
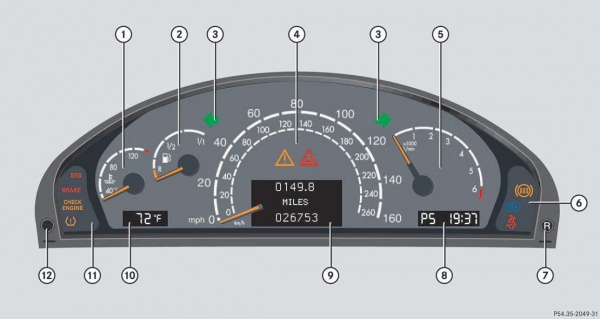
Instrument cluster
- (1) Coolant temperature gauge
- (2) Fuel gauge with: Fuel reserve warning lamp
- (3) Left turn signal indicator lamp, Right turn signal indicator lamp
- (4) Speedometer with: ESP warning lamp, Distance warning lamp (Vehicles without Distronic: Warning lamp without function. It illuminates when the ignition is on. It should go out when the engine is running.)
- (5) Tachometer
- (6) Right display with: Seat belt telltale, High beam headlamp indicator, Antilock Brake System (ABS) warning lamp
- (7) Reset button
- (8) Display with:
- Program mode
- Gear range indicator
- Digital clock (see COMAND operating in structions)
- (9) Multifunction display with:
- Trip odometer
- Main odometer
- Stored speed for: Cruise control, Distronic
- (10) Outside temperature indicator
- (11) Left display with:
- Supplemental restraint system indicator lamp
- Brake warning lamp
- Engine malfunction indicator lamp
- Tire pressure warning lamp
- (12) Knob for instrument cluster illumination
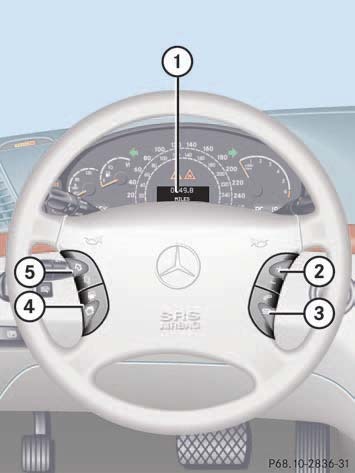
Multifunction steering wheel
- (1) Multifunction display, Operating control system
- (2) Selecting the submenu or setting the volume
- (3) Telephone: Press button
- to take a call, to dial a call
- to end a call, to reject an incoming call
- (4) Menu systems: Press button
- for next system
- for previous system
- (5) Moving within a menu: Press button
- for next display
- for previous display
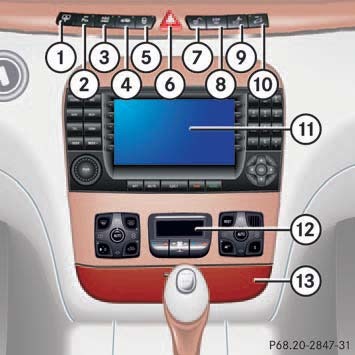
Center console
Upper part
- (1) Switch for rear window sunshade
- (2) Parktronic system deactivation switch
- (3) Airmatic or ABC switch
- (4) Level control switch
- (5) Central locking switch, Anti-theft alarm system indicator lamp
- (6) Hazard warning flasher on/off switch
- (7) Central unlocking switch
- (8) ESP control switch
- (9) Rear seat head restraints, switch for folding down
- (10) Tow-away alarm switch
- (11) COMAND system
- (12) Automatic climate control
- (13) Ashtray, Lighter
Lower part
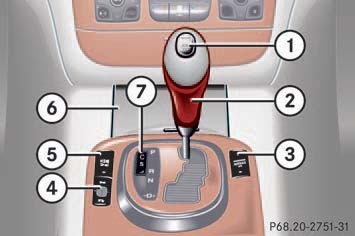
- (1) KEYLESS-GO start/stop button
- (2) Gear selector lever for automatic transmission
- (3) PASSENGER AIRBAG OFF indicator lamp
- (4) Thumbwheel for setting distance in Distronic
- (5) Distronic distance warning function on/off switch
- (6) Lower storage compartments
- (7) Program mode selector for automatic transmission
Overhead control panel
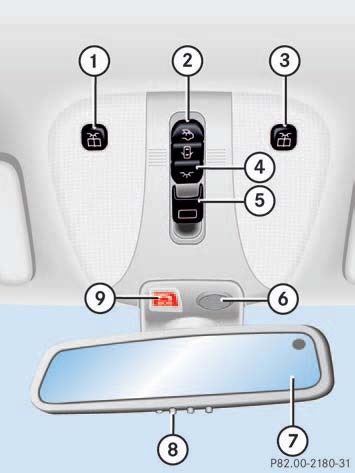
- (1) Left reading lamp on/off
- (2) Rear interior lighting on/off
- (3) Right reading lamp on/off
- (4) Interior lighting control
- (5) Sliding/pop-up roof
- (6) Hands-free microphone for Tele Aid (emergency call system), telephone, and voice control system
- (7) Rear view mirror
- (8) Garage door opener
- (9) Tele Aid (emergency call system) button
Door control panel
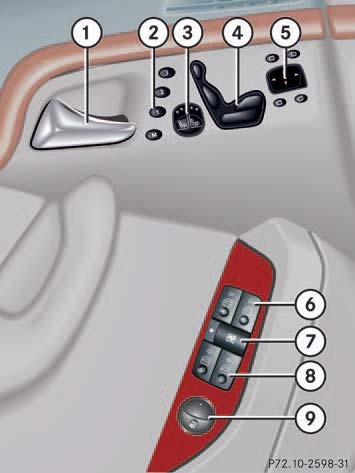
- (1) Door handle
- (2) Memory function (for storing seat, exterior mirror, and steering wheel settings)
- (3) Seat heating, Seat ventilation
- (4) Seat adjustment
- (5) Exterior mirror adjustment
- (6) Switches for opening/closing front door windows
- (7) Rear passenger compartment override switch
- (8) Switches for opening/closing rear windows
- (9) Remote trunk lid release switch, Trunk lid opening/closing system switch
Unlocking with the SmartKey
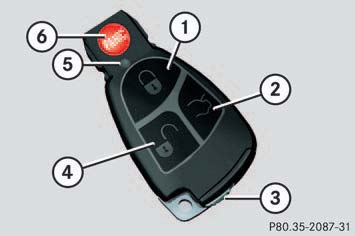
- (1) Lock button
- (2) Unlock button for trunk lid
- (3) Unlock button
- (4) Panic button
- Press unlock button on the SmartKey. All turn signal lamps flash once. The locking knobs in the doors move up.
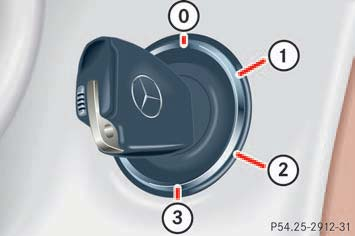
- Get in the vehicle and insert the SmartKey in the starter switch.
Starter switch positions
- 0 For removing SmartKey
- 1 Power supply to some electrical consumers, such as seat adjustment
- 2 Ignition (power supply for all electrical consumers) and driving position
- 3 Starting position
- The SmartKey can only be removed from the starter switch with the gear selector lever in position P.
- If the SmartKey cannot be turned in the starter switch, the battery may not be sufficiently charged.
- Check the battery and charge it if necessary.
- Get a jump start.
- To prevent accelerated battery discharge or a completely discharged battery, always remove the SmartKey from the starter switch when the engine is not in operation.
Unlocking with KEYLESS-GO
If your vehicle is equipped with the KEYLESS-GO function, your vehicle checks whether the SmartKey with KEYLESS-GO is valid when you grasp the door handle. If your SmartKey with KEYLESS-GO is valid, the doors will unlock, and you can open them. The function of the SmartKey overrules the KEYLESS-GO function.
To unlock the vehicle, the SmartKey with KEYLESS-GO must be outside the vehicle, no further than approximately 3 feet (1 meter) away from the door. Grasp the outside door handle. All turn signal lamps flash once. The locking knobs in the doors move up.
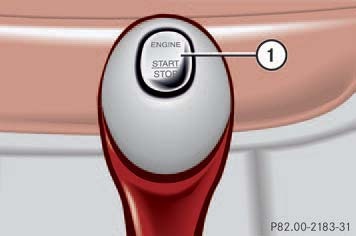
If the SmartKey is inside the vehicle, pressing the KEYLESS-GO start/stop button on the gear selector lever corresponds to turning the SmartKey to the various starter switch positions.
Before you press the KEYLESS-GO start/stop button (1), the vehicle's on-board electronics have status 0 (as with SmartKey removed). The SmartKey with KEYLESS-GO must be located in the vehicle.
- Make sure the gear selector lever is set to P.
- Do not depress the brake pedal.
Position 1 Press the KEYLESS-GO start/stop button (1) once. This supplies power to some electrical consumers, such as seat adjustment. If you now press the KEYLESS-GO start/stop button once again, the ignition (position 2) is switched on. Twice, the power supply is again switched off.
Ignition (or position 2) Press the KEYLESS-GO start/stop button (1) twice. This supplies power to all electrical consumers. All the lamps in the instrument cluster come on. If you now press the KEYLESS-GO start/stop button once, the power supply is again switched off.
