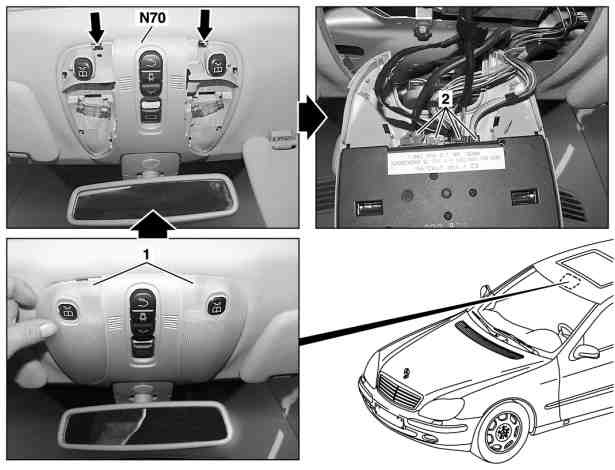
Overhead Control Panel (OCP) (N70)
Back to: WIS 83.40 Automatic Climate Control (ACC) or Heating Ventilation and Air Conditioning (HVAC)
Removing Overhead Control Panel Control Module

|
|
- Remove light lenses (1)
- Press clips (arrows) in direction of arrow and swing overhead control panel control module (N70) down
- Disconnect electrical connectors (2) and connections (2) on overhead control panel control module (N70)
- Install in opposite order
DIY Procedures - Overhead Control Panel (OCP) (N70)
DIY Dismantle and Repair - W220 2005 S500 OCP
Excellent article by BenzWorld Member jwells at Post #8:
http://www.benzworld.org/forums/w220-s-class/1460424-need-help-c-diag.html
Warning: Be aware that one of the OCP electrical connectors is particularly difficult to reinstall and if not done correctly can be a nightmare to diagnose.
The connector can feel seated when it clicks into place but if not properly seated will give error codes and malfunctions.
The Issue
If you remove the OCP and remove the 5 electrical plugs, then reinstall the electrical plugs, you need to pay special attention to the second plug in from the left. It is the one with a light gray swing clip on it that you pull to the left to cause the plug to slide itself out. When plugging it back in, if you just plug it in and move the lever back to the right, it will not seat itself all the way back in.
It might look and feel like it is connected, but often it is not.
You will receive an error or malfunction warning saying "Light Sensor Visit Workshop", and it will cause three issues:
- The headlights will stay on when in AUTO mode on the light switch, no matter if it is day or night.
- The automatic headlight delayed shut off will not work in Auto mode, the lights just turn off when you turn off the key instead of having a delayed turn off.
- The Rain Sensing wipers will not work in the first click position, they just act as intermittent wipers wiping every five seconds no matter how much rain is sensed.
The Solution
You MUST push in that second plug until it clicks in, then pull the lever back to the right to lock it in place. You will see on the black part of the plug a half circle tract that the light gray clip follows. The left side of that half circle must be right up against the module you are plugging into.