Blower
Back to: WIS 83.40 Automatic Climate Control (ACC) or Heating Ventilation and Air Conditioning (HVAC)
Issues - Blower Motor
- ACC Blower Motor Speed Regulator fails due to corrosion.
- ACC Blower Motor will not operate due to high resistance in the supply line.
- ACC Blower Motor hard to turn due to corrosion. This causes a high current draw and if not caught in time permanently damages the motor speed regulator components.
- Root cause of the many blower issues seems to be corrosion of the motor assembly due to excessive moisture due to blocked drains and debris in the plenum.
- A Blower Motor seized due to corrosion can be freed up but if the cause of the moisture is not addressed the issue will reoccur.
- Eventually a Blower Motor's brushes and commutator will wear to the point where the motor will cease to work.
Diagnosis/Testing - Blower Motor and Fuse f33
High Resistance in Supply Line and/or Fuse f33 - Blower Motor
The Blower Regulator A32n1 is connected to a constant supply of +12V via Circuit 30 in the Right Front Fuse and Relay Module K40/7. What commonly happens is that a small resistance develops somewhere in the line due to oxidization or corrosion and this generates a small amount of heat which then accelerates the failure, eventually melting plastic and making the resistance even higher and making the problem worse. It can easily cause a fire so should be attended to asap.
A simple test to determine if their is a high resistance is to measure the voltage at the Blower Regulator A32n1 Pin 3 with a very light load such as when the blower motor is off and with a heavy load such as when the blower motor is commanded to go flat out.
If the voltage measured at A32n1 Pin 3 (RDYE (Red Yellow) on the Blower Regulator) is NOT CONSTANT but is subject to how much current is being drawn ie how much load is applied then there is most likely a high resistance in the Blower Regulator Supply Line. That is the regulator supply circuit has a high resistance somewhere between the A32n1 Pin 3 and the vehicle's battery.
The possible high resistance is most likely to occur at the weak points which are at the various junctions in the supply line. The analysis of the circuit diagram reveals the weak points to be:
- Pin 3 RDYE (Red Yellow) in the Blower Regulator A32n1.
- Both in and out terminals of Blower Fuse Connector X64/1.
- MR1 Pin 2 in the Right Front Fuse and Relay Module K40/7.
- Both sides of Fuse f33 in the Right Front Fuse and Relay Module K40/7. (Fuses)
- And the connectors and junctions in circuit 30 where it goes from the Right Front Fuse and Relay Module K40/7 to the battery. Exact details TBD.
A positive confirmation test is to bypass the Blower Regulator supply line completely and see if the blower then works when commanded from the ACC Controller.
The best way to do this is to take a reasonably heavy wire from the +12V in the passenger foot well and connect it to Pin 3 RDYE (Red Yellow) in the Blower Regulator A32n1. It would be a good idea to use a 40A fuse in this hot wire connection just as a precaution. It is not absolutely necessary to remove the original Red Yellow wire from Pin 3 for this test. Just remove Fuse f33 in the Right Front Fuse and Relay Module K40/7.
Once the hot wire is in place and the Fuse f33 removed (Fuses), switch on the ACC and command the blower to run at maximum speed.
If the Blower still does not work you will have to start the diagnosis again.
If the blower now works properly you will have positively confirmed that there is a high resistance in the original supply line and the challenge is to then find exactly where it is.
Remove the hot wire bypass and reinstall the Fuse f33.
Test to find where the high resistance is occurring in the original supply line to the Blower Regulator.
The method is to make a series of voltage measurements on the supply line starting at Pin 3 on the Blower Regulator A32n1 and working backwards towards the battery.
Test each point with the Blower Motor off and then on and record the results. Make up a Results Table as per the following;
| Test Point | Voltage with Blower OFF | Voltage with Blower ON |
|---|---|---|
| Pin 3 A32n1 | ?V | ?V |
| Blower Regulator side of X64/1 | ?V | ?V |
| Fuse side of X64/1 | ?V | ?V |
| X64/1 side of Fuse f33 | ?V | ?V |
| Circuit 30 side of Fuse f33 | ?V | ?V |
It may be a bit difficult to determine which side of X64/1 is which, so just measure both sides separately and record the results. The same comment applies to Fuse f33 (Fuses).
When you find the Test Point where the voltage does not change with load you are one step upstream of the fault. That is if the X64/1 side of Fuse f33 drops to zero on load and the other side, the Circuit 30 side of Fuse f33 doesn't then the issue is with Fuse f33.
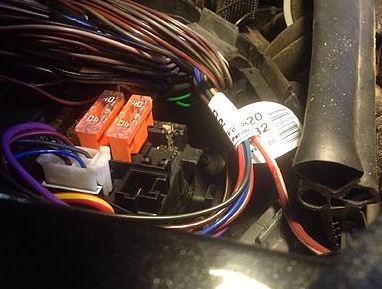
With acknowledgement to BenzWorld member 'cmitch' here is a photo of an overheated Fuse f33. Note the melted fuse socket.

Testing Control Voltage - Blower Motor
MOS500 had these symptoms: Very weak air flow especially though out the day in Dallas, TX heat. I noticed air flow getting weaker in a period of a month. So I broke out my Fluke DVM and only measured 2-3VDC across the blower terminals. If you press REST on the climate controls for 10sec. you get into the diagnostic mode. (See Automatic Climate Control (ACC) Service Menus.) I pressed the left AUTO button to cycle up to step 10 then adjusted (+-) fan buttons. On MAX, I only measured 4VDC. First start up in the morning yielded me 7VDC but still didn't flow a lot. When I commanded 1 or 2 bars (MIN), I got 1VDC. For Service Menus see here: Automatic Climate Control (ACC) Service Menus
ACC Blower Control Voltage Typical Results
Worn Brushes and Commutator - Blower Motor
The only way to diagnose that it is the brushes or commutator that is causing the problem is to remove the Blower from the vehicle and then remove the end plate and inspect the internal parts.
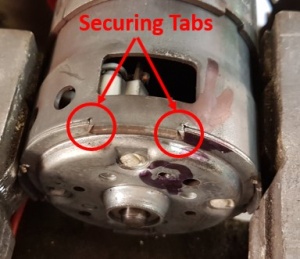
To remove the motor end plate, hammer back the securing tabs.

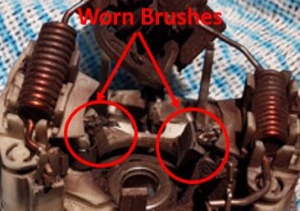
Example of severely worn Blower Motor brushes after 260,000Km. Note the brush on the left has disappeared completely!

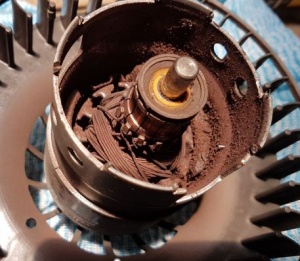
Example of a worn commutator. Note the excessive amount of worn brush material inside the housing.

The Blower Motor in this example is scrap value only.
DIY Procedures - Blower Motor
Blocked Drains
Frequent checks and maintenance for blocked drains must be conducted. Under Hood ACC Drain Access and Cleaning
Blower Motor - Removing Repairing Replacing
http://www.benzworld.org/forums/w220-s-class/1518325-how-do-i-get-my-c.html
- Post #8 by Gabby07621 shows how to remove the Blower Motor.
Blower Regulator - Removing/Replacing
Reference: http://www.benzworld.org/forums/w220-s-class/1518325-how-do-i-get-my-c.html
- Post #8 by Gabby07621 shows how to remove the Blower Motor and hence the Blower Regulator.
- Post #16 and Post #23 by cowboyt issue a warning about replacing the Blower Regulator. Make sure to read and double check the part number before ordering a replacement. The Regulator part number has been superseded by 2308216451 (or A-230-821-64-51).
MOS500 states it's a 10-15 minute job if you take your time.
I got my blower regulator off eBay for $75 with a supposedly German OEM supplier: Hamburg Technic. I called stealership and they quoted $292 and $399 for two brands. I didn't ask but assume it's Bosch or equivalent. Autohaus has German name brands for ~$170-230 so I took a chance with eBay.
Tools needed: Philips screwdriver #2 and Torx-20 driver.
Symptoms: Very weak air flow especially though out the day in Dallas, TX heat. I noticed air flow getting weaker in a period of a month. So I broke out my Fluke DVM and only measured 2-3VDC across the blower terminals. If you press REST on the climate controls for 10sec. you get into the diagnostic mode. (See Automatic Climate Control (ACC) Service Menus.) I pressed the left AUTO button to cycle up to step 10 then adjusted (+-) fan buttons. On MAX, I only measured 4VDC. First start up in the morning yielded me 7VDC but still didn't flow a lot. When I commanded 1 or 2 bars (MIN), I got 1VDC. For Service Menus see here: Automatic Climate Control (ACC) Service Menus
Blower Regulator - Repair
Reference: http://www.benzworld.org/forums/w140-s-class/1470248-blower-regulator-electronics.html#post3706621
Summary: The power transistor driving the motor is actually an N-channel power MOSFET (BTS282Z) which incorporates two temperature sensors mounted on the chip (making it a TEMPFET), sensing the gate and source temperatures. I think the MOSFET operates pretty much as dmac described, allowing for the difference in transistor type. The regulator also contains a pcb with one IC on it - a 14-pin DIP - which carries the IDs: 2901 and 90H815. From the 2901, I guess this is a quad comparator. The rest of the circuitry was not decodable. I assume the four comparators are used with the temperature sensors to stabilise the motor speed as the chip's temperature changes - also to protect the chip, although they don't seem too good at that. The 14-pin DIP would definitely needs its own 12 V line and I think that this is provided by the red connection to pin 4 of the regulator.
Overcoming a High Resistance in ACC Blower Regulator (and Motor) Fuse f33
If the Blower Regulator (and Motor) Fuse f33 is so severely damaged that it is beyond repair, one method to restore a working Blower Regulator and Motor is to bypass the Blower Regulator Supply Line completely.
Use a 10 gauge 40A fuse link and install a new line from the small positive 12V lug located in the passenger footwell. Cut the original Blower Regulator supply wire a couple inches back from the regulator plug and install a compression connector to the new line. Make sure the new supply line and all the connectors are well insulated and cannot be damaged by passengers.